Knowledge base > Getting started
Creating and managing presets on Nano Cortex
In this guide, we’ll walk you through the process of creating and managing Presets on your Nano Cortex. Presets allow you to save and recall your signal chain configurations, including your amp and cab setup, activated effects, and their specific parameters.
Overview
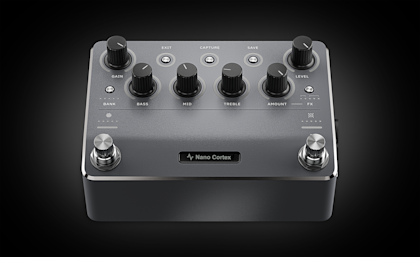
A preset on Nano Cortex stores the entire configuration of your signal chain, enabling you to recall your favorite tones easily and quickly. Nano Cortex can store up to 64 Presets. In the default 4-Preset Mode, Nano Cortex offers quick access to four Presets by using Footswitches I and II.
Footswitch I toggles between Presets IA and IB.
Footswitch II toggles between Presets IIA and IIB.
These four presets can be customized directly on the device using the global controls. The Cortex Cloud app is used for more advanced preset management, such as assigning Presets to footswitches, renaming, or deleting them.
Creating a preset on Nano Cortex
Creating a Preset on Nano Cortex is simple and intuitive:
Step 1: Start by selecting the Neural Capture you want to use:
Press the BANK button to cycle through the different Capture banks, and then turn Footswitch I to cycle between Captures.
Adjust the GAIN, BASS, MID, and TREBLE knobs to shape your tone.
Step 2: Choose an impulse response (IR):
Turn Footswitch II to cycle through the IRs and choose the one that compliments your amp.
Step 3: Add effects:
Press the FX button to cycle through the effect slots. Use the AMOUNT knob to adjust the amount of each effect added to your signal.
Press-and-hold the FX button to bypass or engage the currently selected FX slot.
Step 4: Save your Preset:
Once you’re satisfied with your setup, press and hold the SAVE button for 3 seconds to save your Preset.
Note: Saving will overwrite the currently loaded Preset. To learn how to create a new Preset without overwriting an existing one, refer to the ‘Creating a new Preset in an empty Preset slot’ section of this guide.
Managing and creating Presets on the Cortex Cloud app
The Cortex Cloud app features tools for more detailed Preset management. For more information, refer to our guides on pairing your Nano Cortex with the Cortex Cloud app and using the Cortex Cloud app.
Viewing, loading and managing your Presets:
Once your Nano Cortex is paired with the Cortex Cloud app, the app will display your footswitch-assigned Presets. You can easily access and edit the preset you’ve just created, as well as other presets stored on your device.

Tap SHOW ALL PRESETS to display all the Preset slots on a single screen.
Loading Presets:

Tap a Preset that has been assigned to a Footswitch to load it.

Tap an unassigned Preset to load it. Footswitch I will turn red, indicating the current Preset is not assigned to any footswitch.
Editing Presets:
Tap any element in the signal chain to access its controls and parameters. You can adjust these settings directly from the Cortex Cloud app.
Managing Presets:

Tap the button to the right of any Preset to open its contextual menu. Here, you can rename, delete, or assign the Preset to a footswitch:
Rename Preset: Tap to rename the selected Preset.
Delete Preset: Tap to delete the selected Preset.

Assign to Footswitch: Tap to assign or reassign the selected Preset to Footswitch I or II. Tip: You can assign a single Preset to multiple footswitches simultaneously.
Creating a new Preset in an empty Preset slot
Follow these steps to create a new Preset without overwriting an existing one:

Step 1: Load an empty Preset slot or tap ‘Create New Preset…’.
Step 2: Once you’ve dialed in your tone, press SAVE and give your preset a name.
Footswitch operation mode
Nano Cortex has two different Footswitch operation modes to suit your performance needs: 4-Preset Mode and 2-Preset Mode.

In 4-Preset Mode, both Footswitches I and II are used to toggle between four presets: IA, IB, IIA, and IIB.
In 2-Preset Mode, Footswitch I is used to toggle between presets IA and IB, while Footswitch II functions as a global bypass switch.
Changing the Footswitch operation mode
Step 1: Tap the contextual menu button at the app's upper-right corner and tap 'Settings' to access the Nano Cortex Settings screen.
Step 2: Navigate to ‘Preset Operation Mode’ and choose between 4-Preset Mode or 2-Preset Mode.
Loading Presets with MIDI
Nano Cortex can receive MIDI messages from external devices via USB-C and TRS MIDI Type-A.

Preset slots are automatically assigned to PC messages from Program 0 to 63. To view the assigned PC messages, tap the PC/CC button at the top-right corner of the Presets list.
For more detailed information, refer to our guide on using MIDI with Nano Cortex.
Enable MIDI over TRS

Step 1: Tap the contextual menu button at the app's upper-right corner, go to 'Settings', and ensure the EXP/MIDI operation mode is set to MIDI.
Step 2: Connect the external MIDI device's MIDI OUT to Nano Cortex's EXP/MIDI input by using a TRS MIDI Type-A cable.
Step 3: Set the external MIDI device to send PC messages (Program 0 to 63).
Step 4: Nano Cortex will recall Presets from the Preset Library accordingly.
Configuring MIDI over USB
Step 1: Connect your Nano Cortex to a computer via USB-C.
For USB MIDI on Windows® computers, you will need to download and install the Nano Cortex ASIO driver from our Downloads page. Read our guide on using Nano Cortex as an audio interface for more information on the driver installation process.
Note: No drivers are required for Mac® computers.
Step 2: Open your DAW and ensure Nano Cortex is recognized as a MIDI device.
Step 3: Create a MIDI Track, route its output to Nano Cortex, and place Program Change messages in a MIDI clip.
Step 4: Nano Cortex will recall Presets from the Preset Library accordingly upon playback.
Next steps
Now that you’re familiar with creating and managing presets on your Nano Cortex, you can start crafting Presets tailored for your performances.
The Cortex Cloud offers thousands of Neural Captures for you to explore and use in your Presets. Be sure to read our guide on using the Cortex Cloud app to learn more.
Additionally, we have guides on using MIDI with Nano Cortex, using Nano Cortex as an audio interface, and keeping your Nano Cortex up to date.
If you have any questions or need assistance, our support team is always here to help. You can reach us by emailing support@neuraldsp.com.
Guides for getting started with Nano Cortex
Creating and managing presets on Nano Cortex