NeuralDSP logoNeuralDSP logo
Archetype: Misha Mansoor X

01
Archetype: Misha Mansoor X
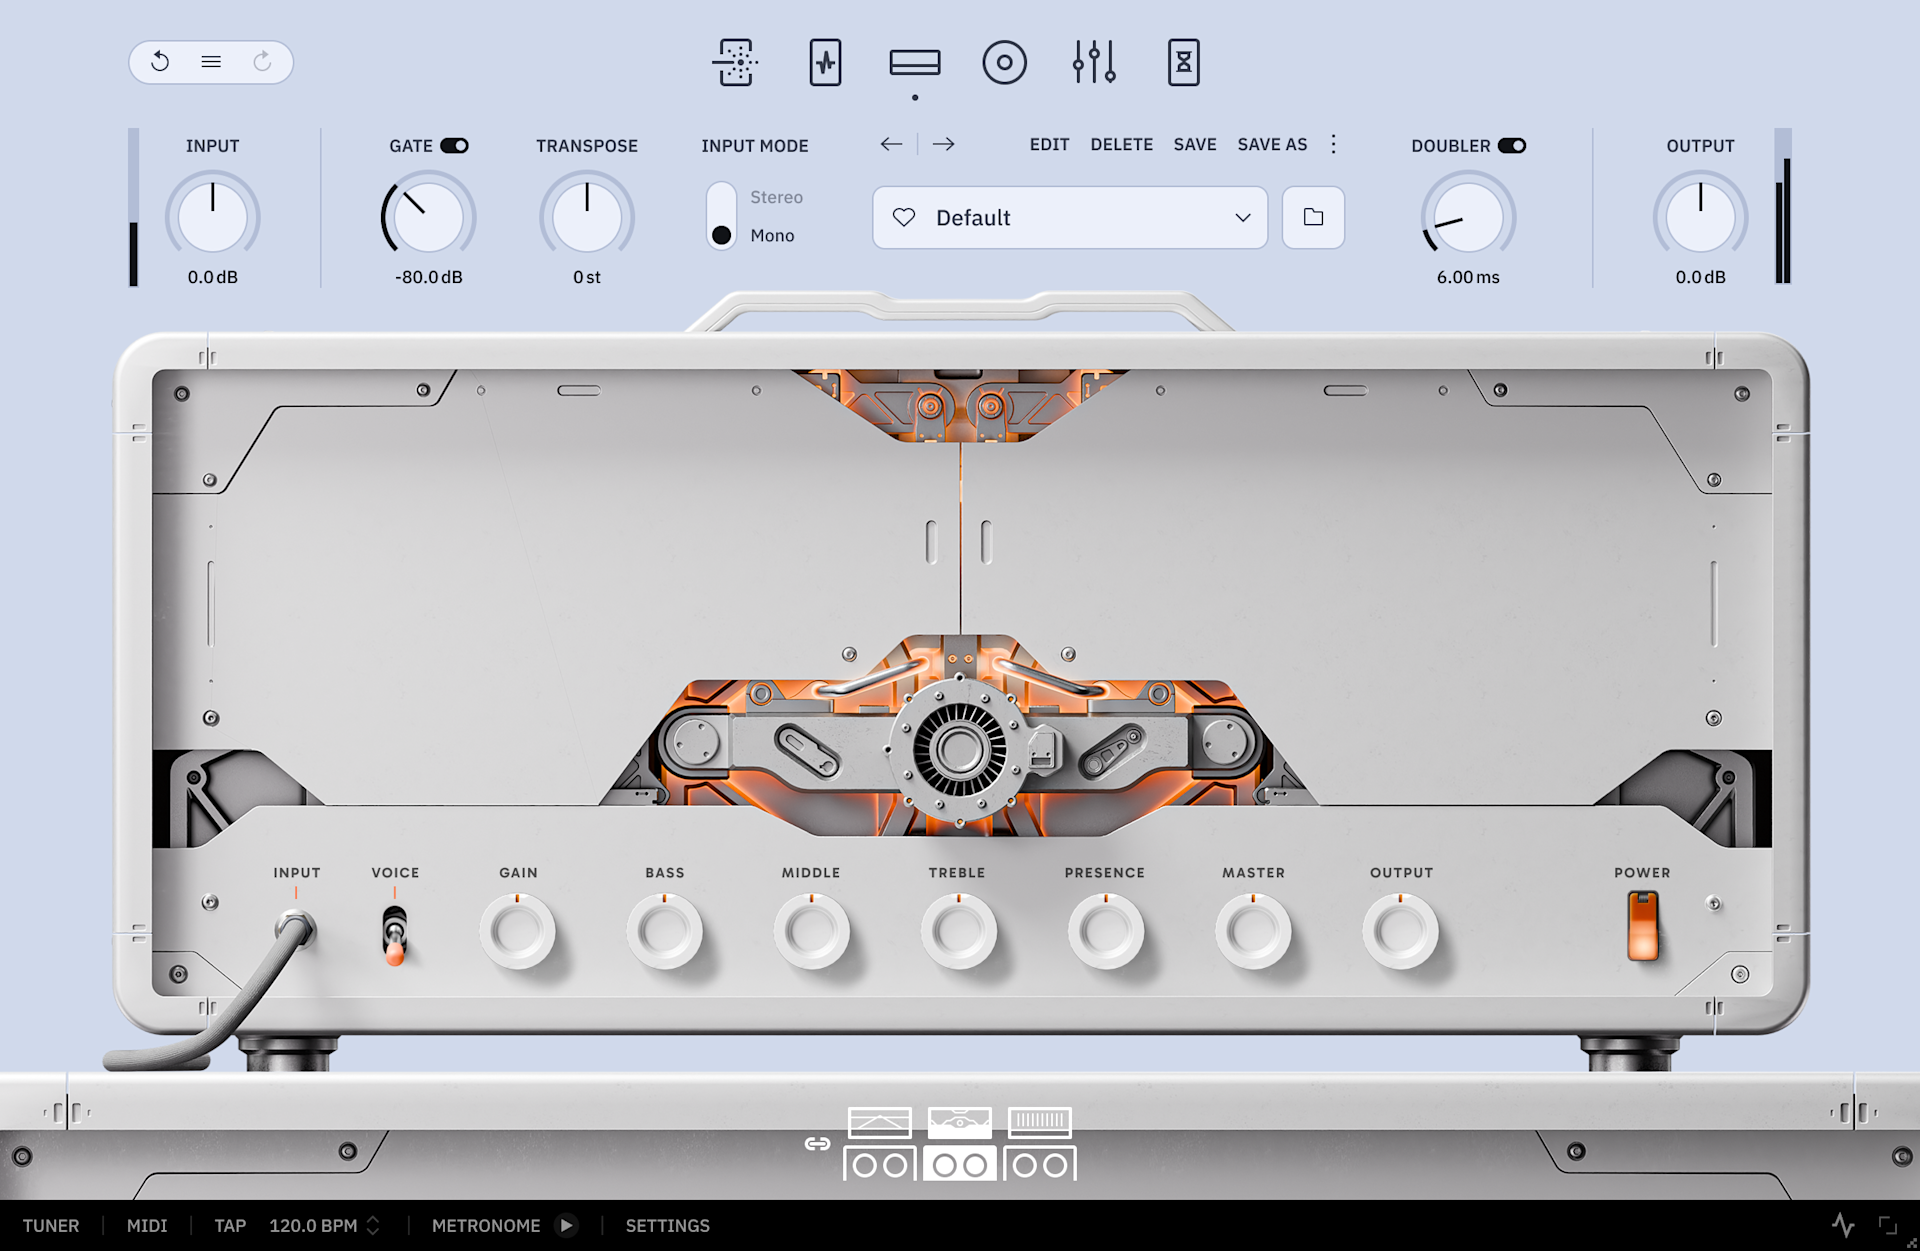
Few guitarists embody modern metal music quite like Misha Mansoor. As a founding force behind Periphery, his vision and creativity have shaped the sound of an entire generation. His influence extends far beyond riffs and solos, redefining how heavy music is written, produced, and performed.

Misha is as much an innovator as he is a player. By pushing the boundaries of amp design and creating groundbreaking pedals, he has always pursued tools that unlock new possibilities. That same drive has guided every detail of this plugin.

Archetype: Misha Mansoor X is more than an expansion of his iconic tones. It is an exploration of the unexpected, featuring experimental effects, unique amps, and a toolkit designed for players who share his restless curiosity.

We proudly present to you, Archetype: Misha Mansoor X.
02
Plugin components

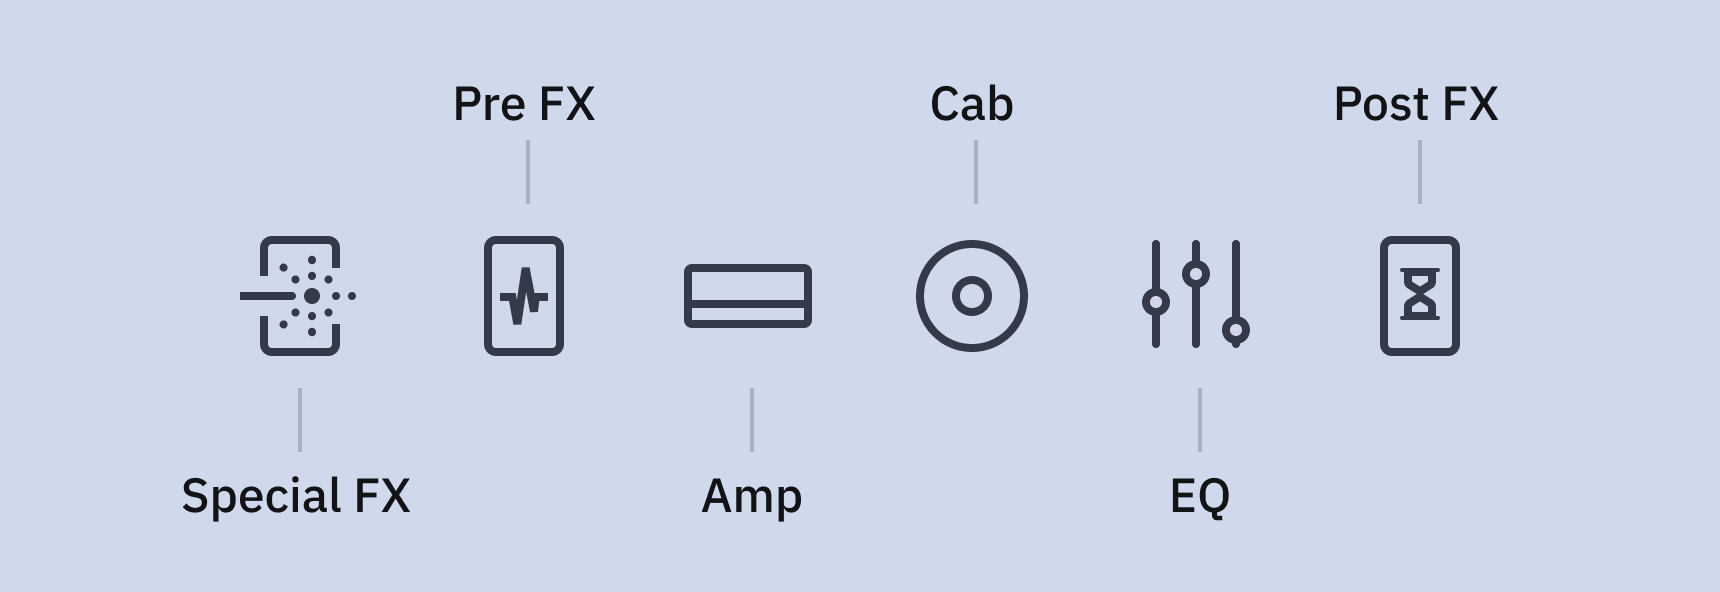
The different sections in the Plugin are accessible via the top navigation.

Special FX Section

This section consists of two effects in series which can be used either separately or combined.

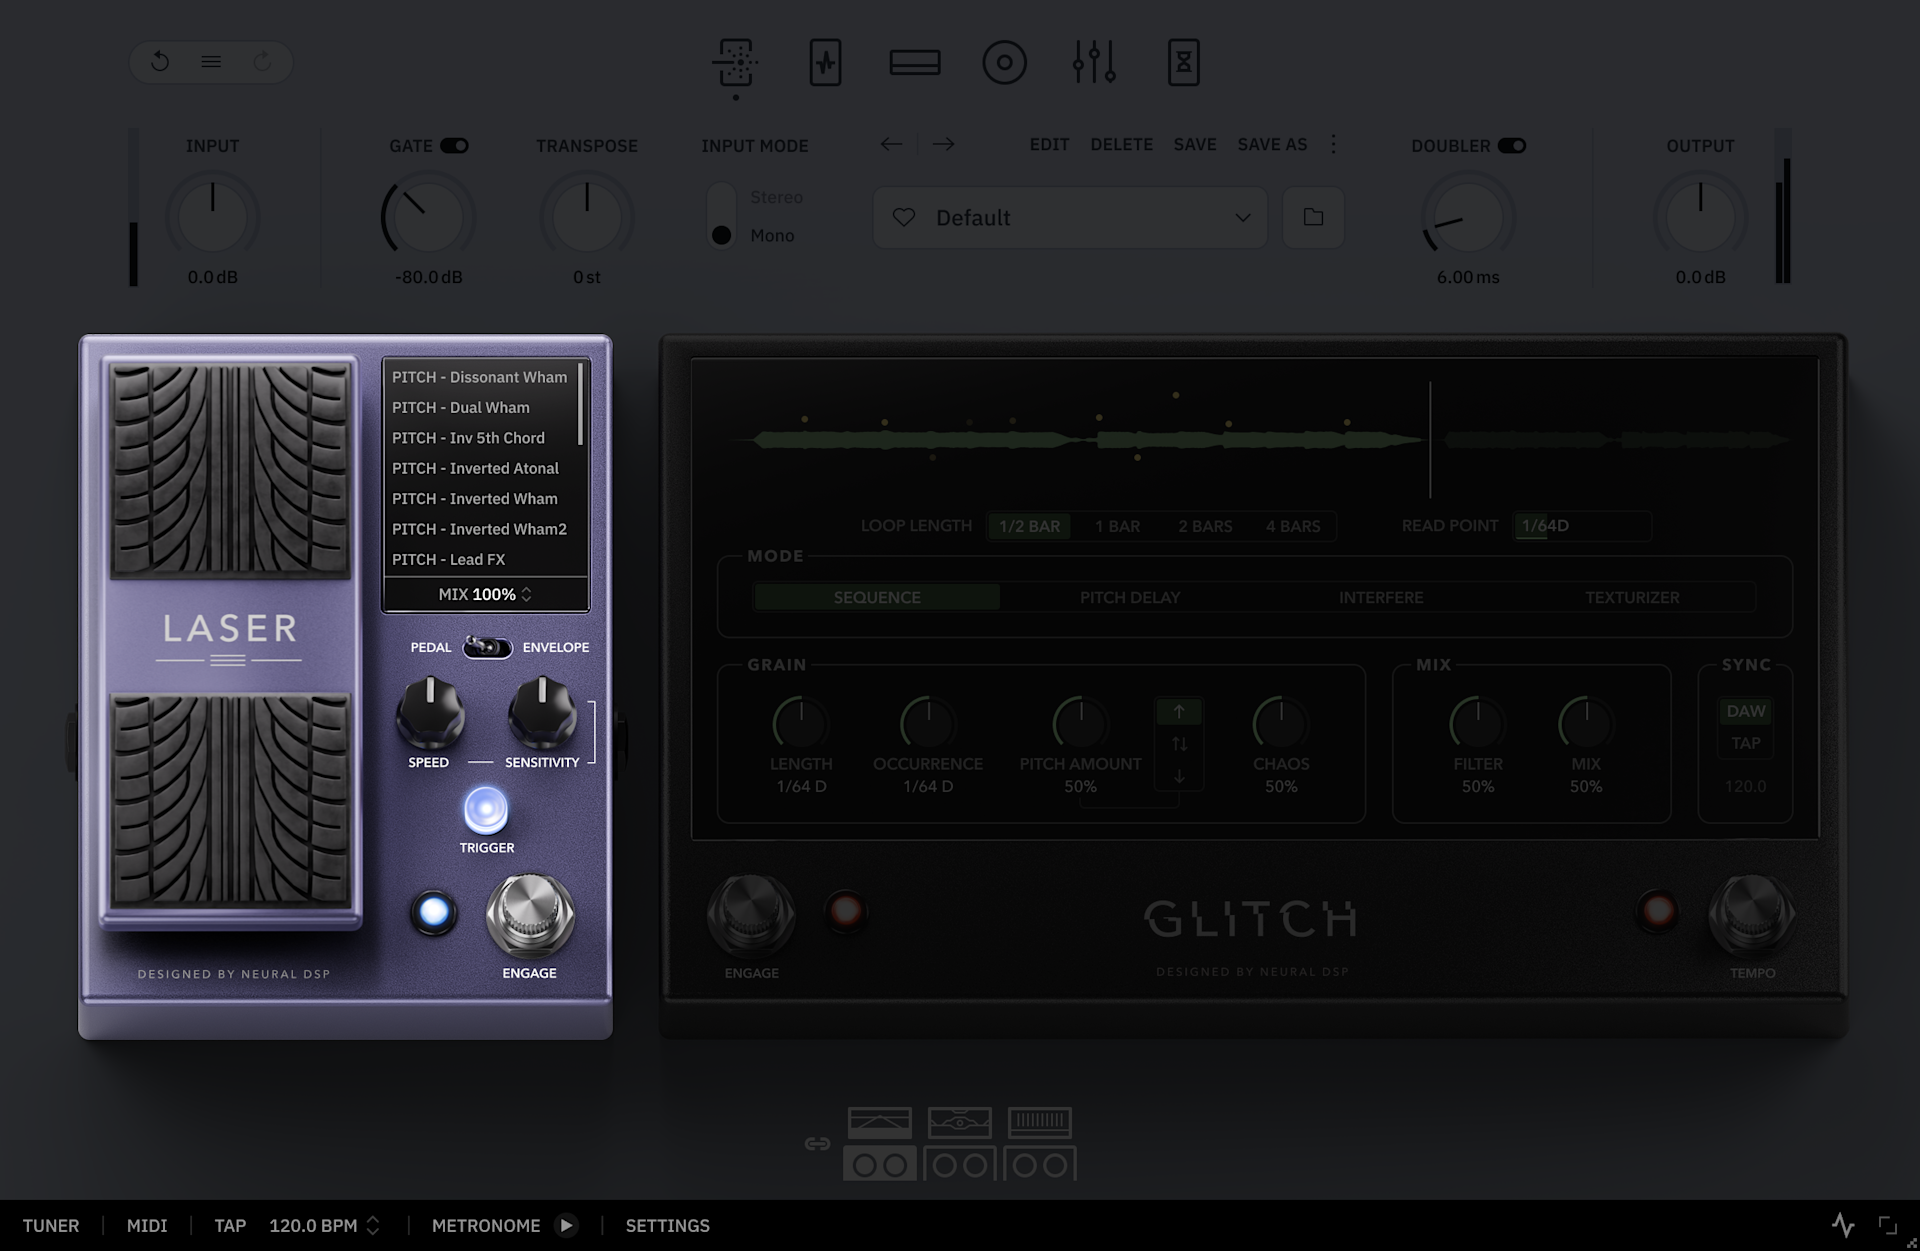
Laser

The Laser FX pedal transforms your guitar signal into distinct “laser-like” sounds. This pedal can serve as a pitch shifter, a wild ring modulator, or a lush chorus.

  1. Laser Presets: Select a preset to load on the pedal.

  2. Mode: Toggle between the two different Laser modes:

    • Pedal: This mode lets you control the effect manually with the expression pedal.

    • Envelope: This mode uses an envelope follower to track the signal’s amplitude and automatically modulate the effect – like a virtual foot moving the expression pedal for you.

  3. Speed Knob: Sets how quickly the envelope responds to changes in the input signal.

  4. Sensitivity Knob: Adjust how strongly the envelope reacts to the input signal.

  5. Trigger Button: In ‘Pedal mode’, this triggers the Expression pedal position to maximum, for as long as it is pressed.

  6. Pedal: Adjusts the Expression Pedal position, blending smoothly between heel and toe settings.

  7. Stomp switch: Click to activate/deactivate the Laser pedal.

Hints:

Set the Sensitivity to suit your guitar. If your instrument has a lower output, try increasing the Sensitivity for better response.

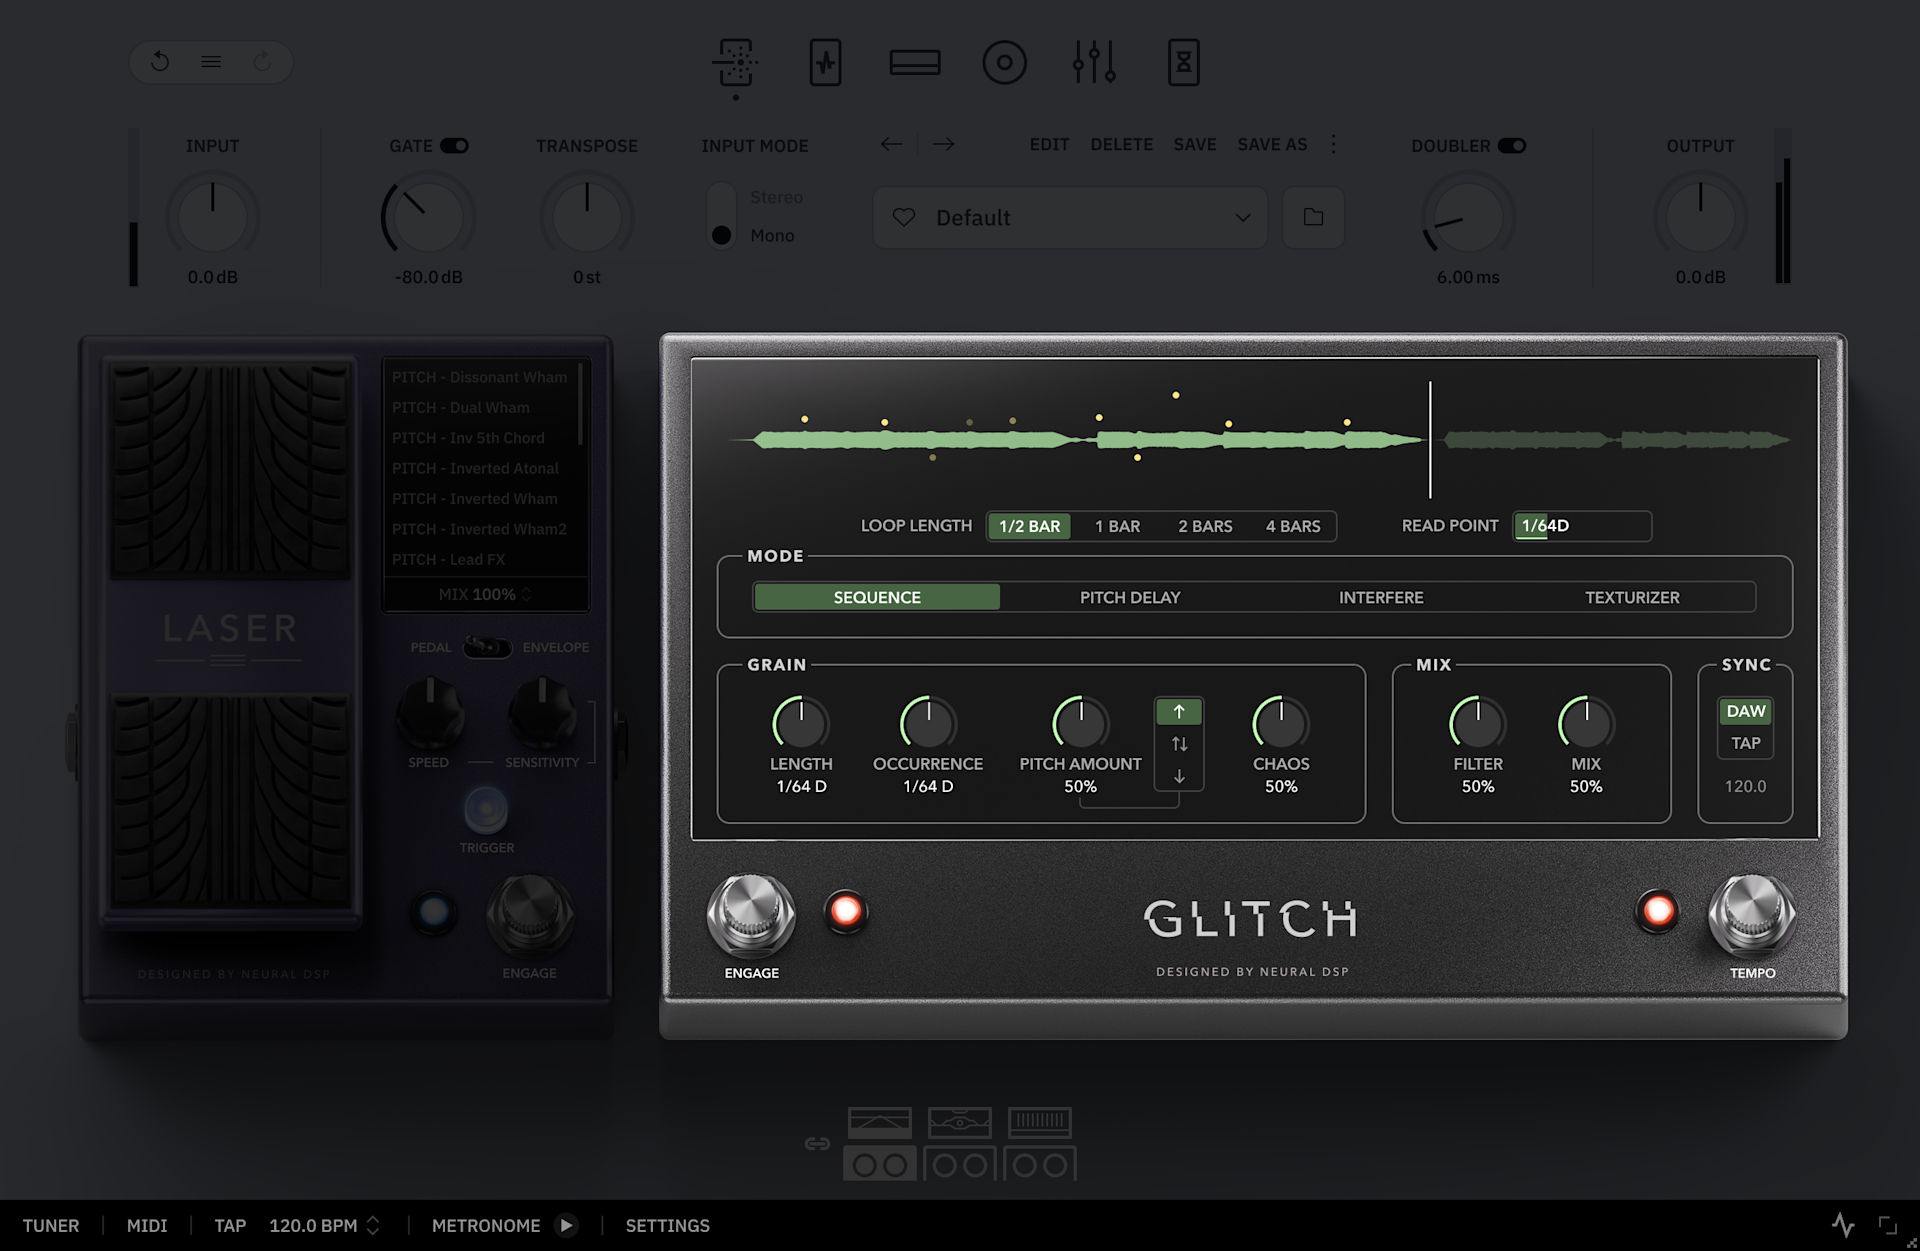
Glitch

This pedal leverages granular processing to create unpredictable glitch, stutter and texturizer effects, perfect for adding texture and rhythmic chaos to your sound.

  1. Loop Length Selector: Determines how much incoming audio is captured in memory for grain generation. A larger buffer provides a longer section of audio for the granular engine to draw from, while a smaller buffer keeps it focused on more recent sound.

  2. Read Point Slider: Controls how far behind the incoming audio the playhead reads from, determining which part of the buffer is used for grain generation. (Only active in Pitch Delay & Texturizer modes)

  3. Mode Selector: Toggles Glitch modes, changing how the pedal reacts by adjusting internal parameters:

    • Sequence: Creates long, evolving note sequences.

    • Texturizer: Produces dense “clouds” of grains for ambient textures.

    • Interfere: Works like a repeater that also adjusts the mix automatically. At higher mix levels, it can blend into—or disrupt—your playing.

    • Pitch Delay: A more classic delay-style mode. Turn up the chaos control for increased feedback.

Grain section

  1. Length Knob: Sets the length of grains in tempo subdivisions.

  2. Occurrence Knob: Sets how often grains play back based on tempo subdivisions.

  3. Pitch Amount Knob: Sets the amount of random pitch-shifting applied to the grains

  4. Pitch Pattern Selector: Controls if grains are pitched randomly up, down, or in both directions.

  5. Chaos Knob: Randomizes multiple parameters to create a more chaotic and unpredictable outcome.

Mix section

  1. Filter Knob: Filters the grains signal. Turn clockwise to cut lows, counterclockwise to cut highs.

  2. Amount Knob: Sets the balance between the dry signal and the granulated signal.

  3. Sync Selector: Selects the sync source of the pedal: host tempo or manual tap tempo input.

  4. Engage Stomp Switch: Click to activate/deactivate the Glitch pedal.

  5. Tempo Stomp Switch: Sets the internal tempo used by the pedal.

Pre FX Section

This section consists of five effects in series which can be used either separately or combined.

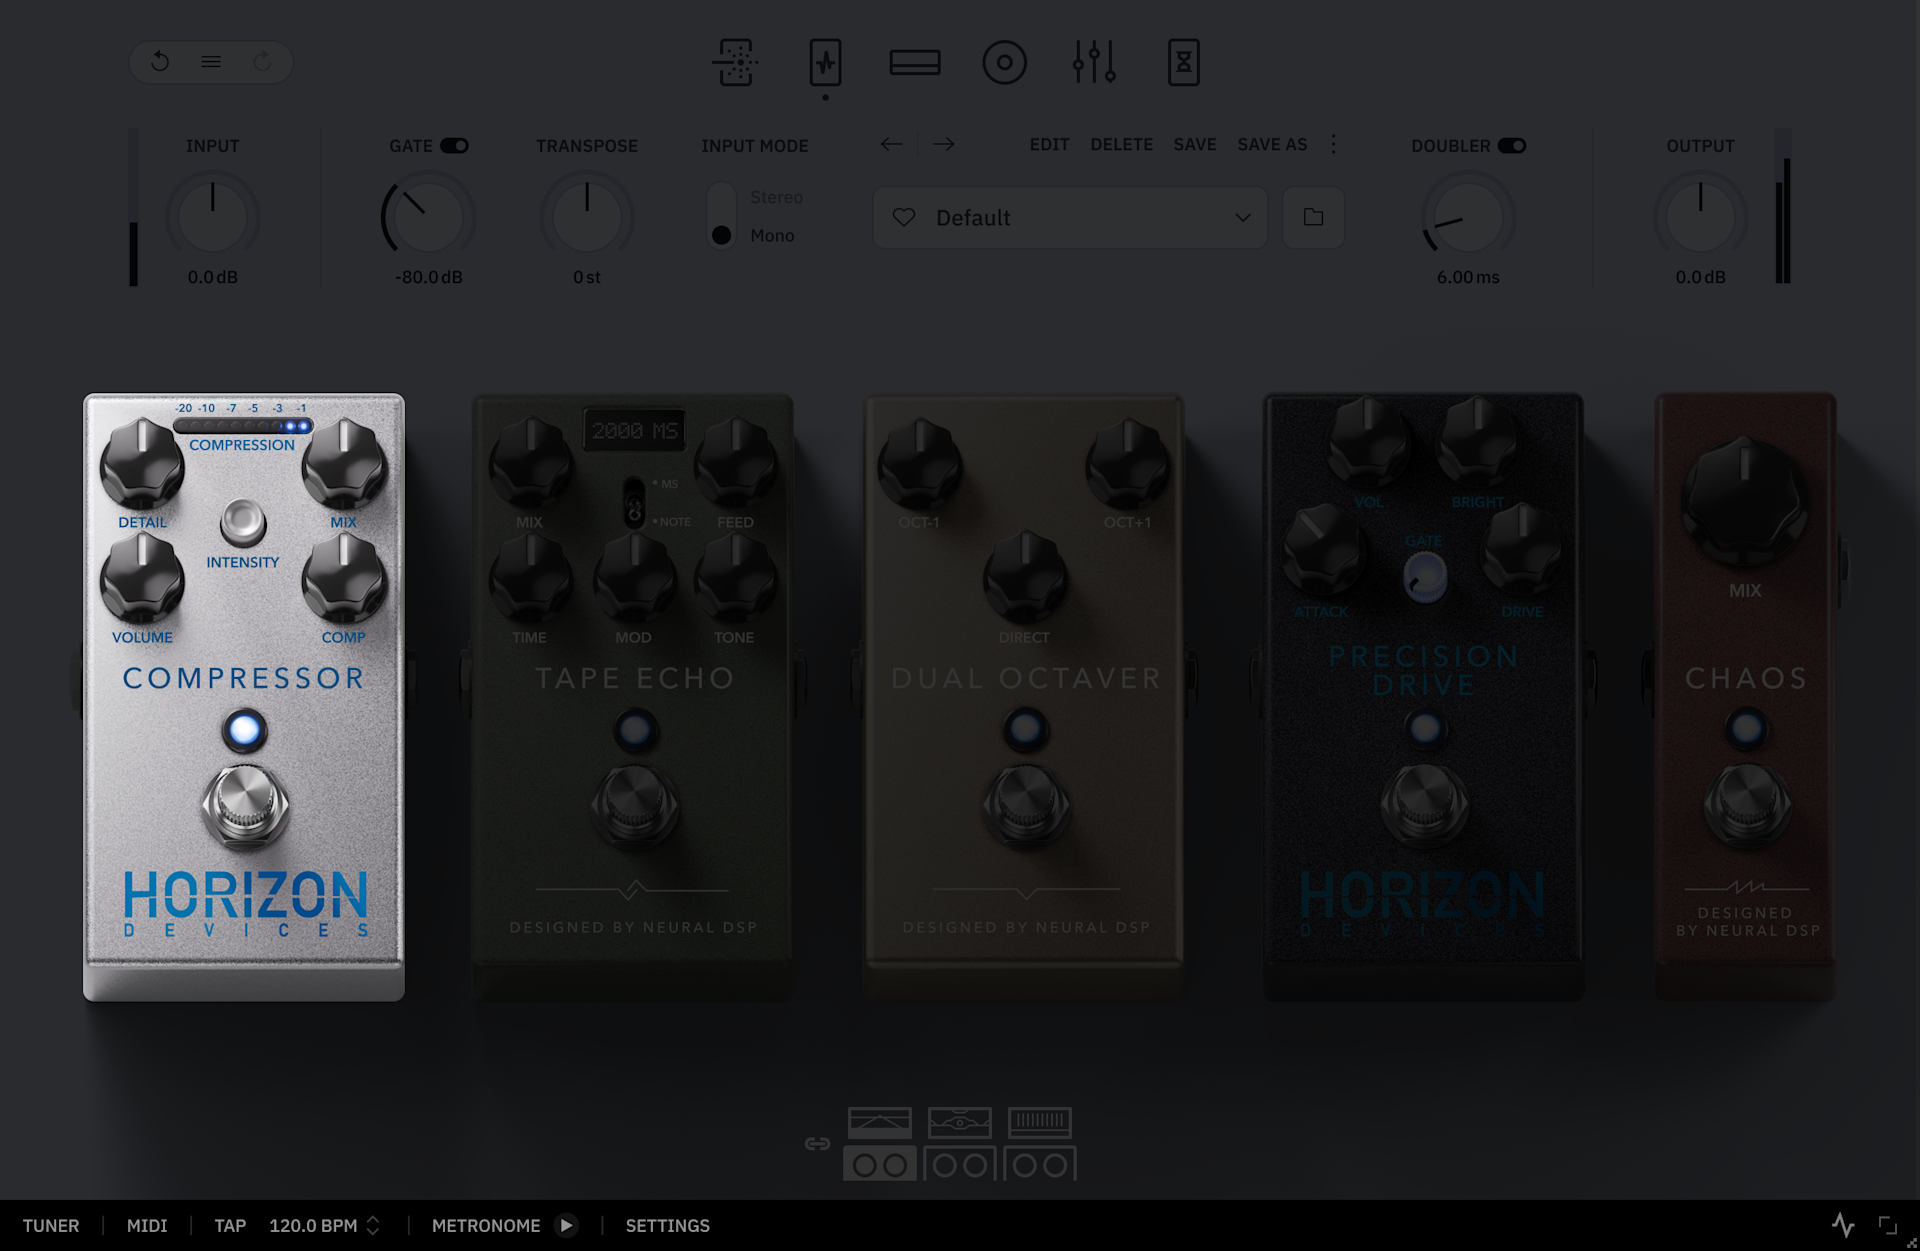
Horizon Devices® Compressor:

A faithful recreation of the Compressor pedal by Horizon Devices, based on classic FET studio compressors, with features specifically designed for guitar players.

  1. Detail Knob: Boosts or cuts high frequencies with a shelving filter. The middle position is neutral. Turn clockwise for a brighter tone, and anti-clockwise for a darker tone.

  2. Intensity Switch: Toggles between two compression ratios. Turn on for a more pronounced compression.

    • Off: Compression ratio is set to 8:1.

    • On: Compression ratio is set to 16:1.

  3. Mix Knob: Mixes the compressed and direct input signal. Turning the knob clockwise will increase the compressed signal level and decrease the direct input signal level at the same time.

  4. Volume Knob: Adjusts the output level of the pedal.

  5. Comp Knob: Controls the amount of compression.

  6. Stomp Switch: Click to activate/deactivate the Compressor pedal.

Hint:

Just like the original pedal, setting the volume knob to noon increases the output, allowing it to function as a booster.

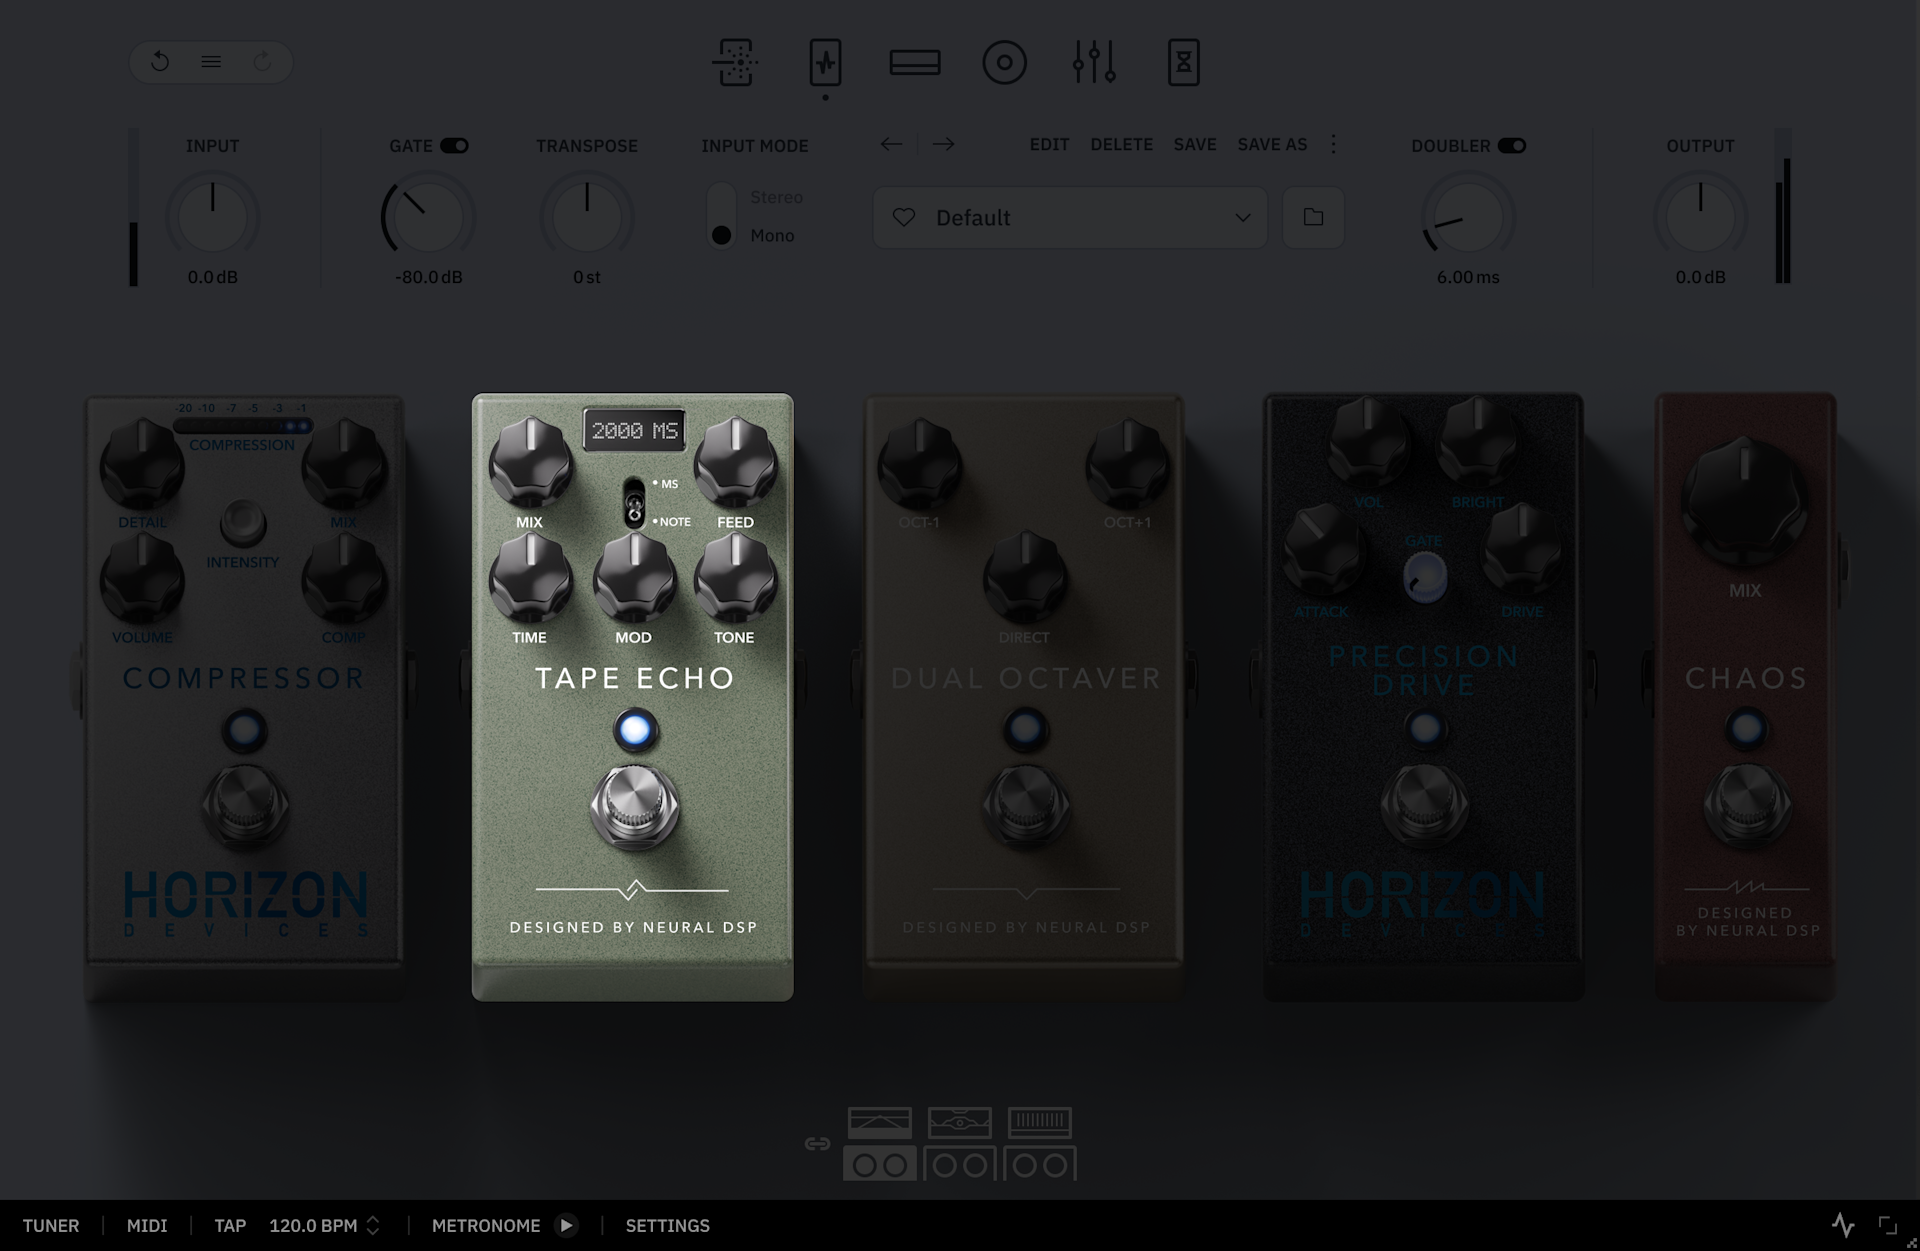
Tape Echo

A vintage-style model that accurately replicates the feel and response of classic Tape delays.

  1. Mix Knob: Controls the amount of delay effect that is added to the original input signal.

  2. Sync Switch: Toggles between the two modes: Milliseconds (MS) or musical subdivisions (Note).

  3. Feed Knob: Sets the amount of delay repetitions. The higher the value, the more repeats.

  4. Time Knob: Sets the delay time in either milliseconds (MS) or musical subdivisions (Note) depending on the Sync switch position.

  5. Mod Knob: Applies modulation to the delay signal for a tape-like fluctuation effect.

  6. Tone Knob: High-frequency shaping control.

  7. Stomp Switch: Click to activate/deactivate the Tape Echo pedal.

Hint:

Set the Tape Echo Mix to 100% and the Delay Time to the shortest setting, letting your signal pass through the tape simulation for a rich lo-fi effect.

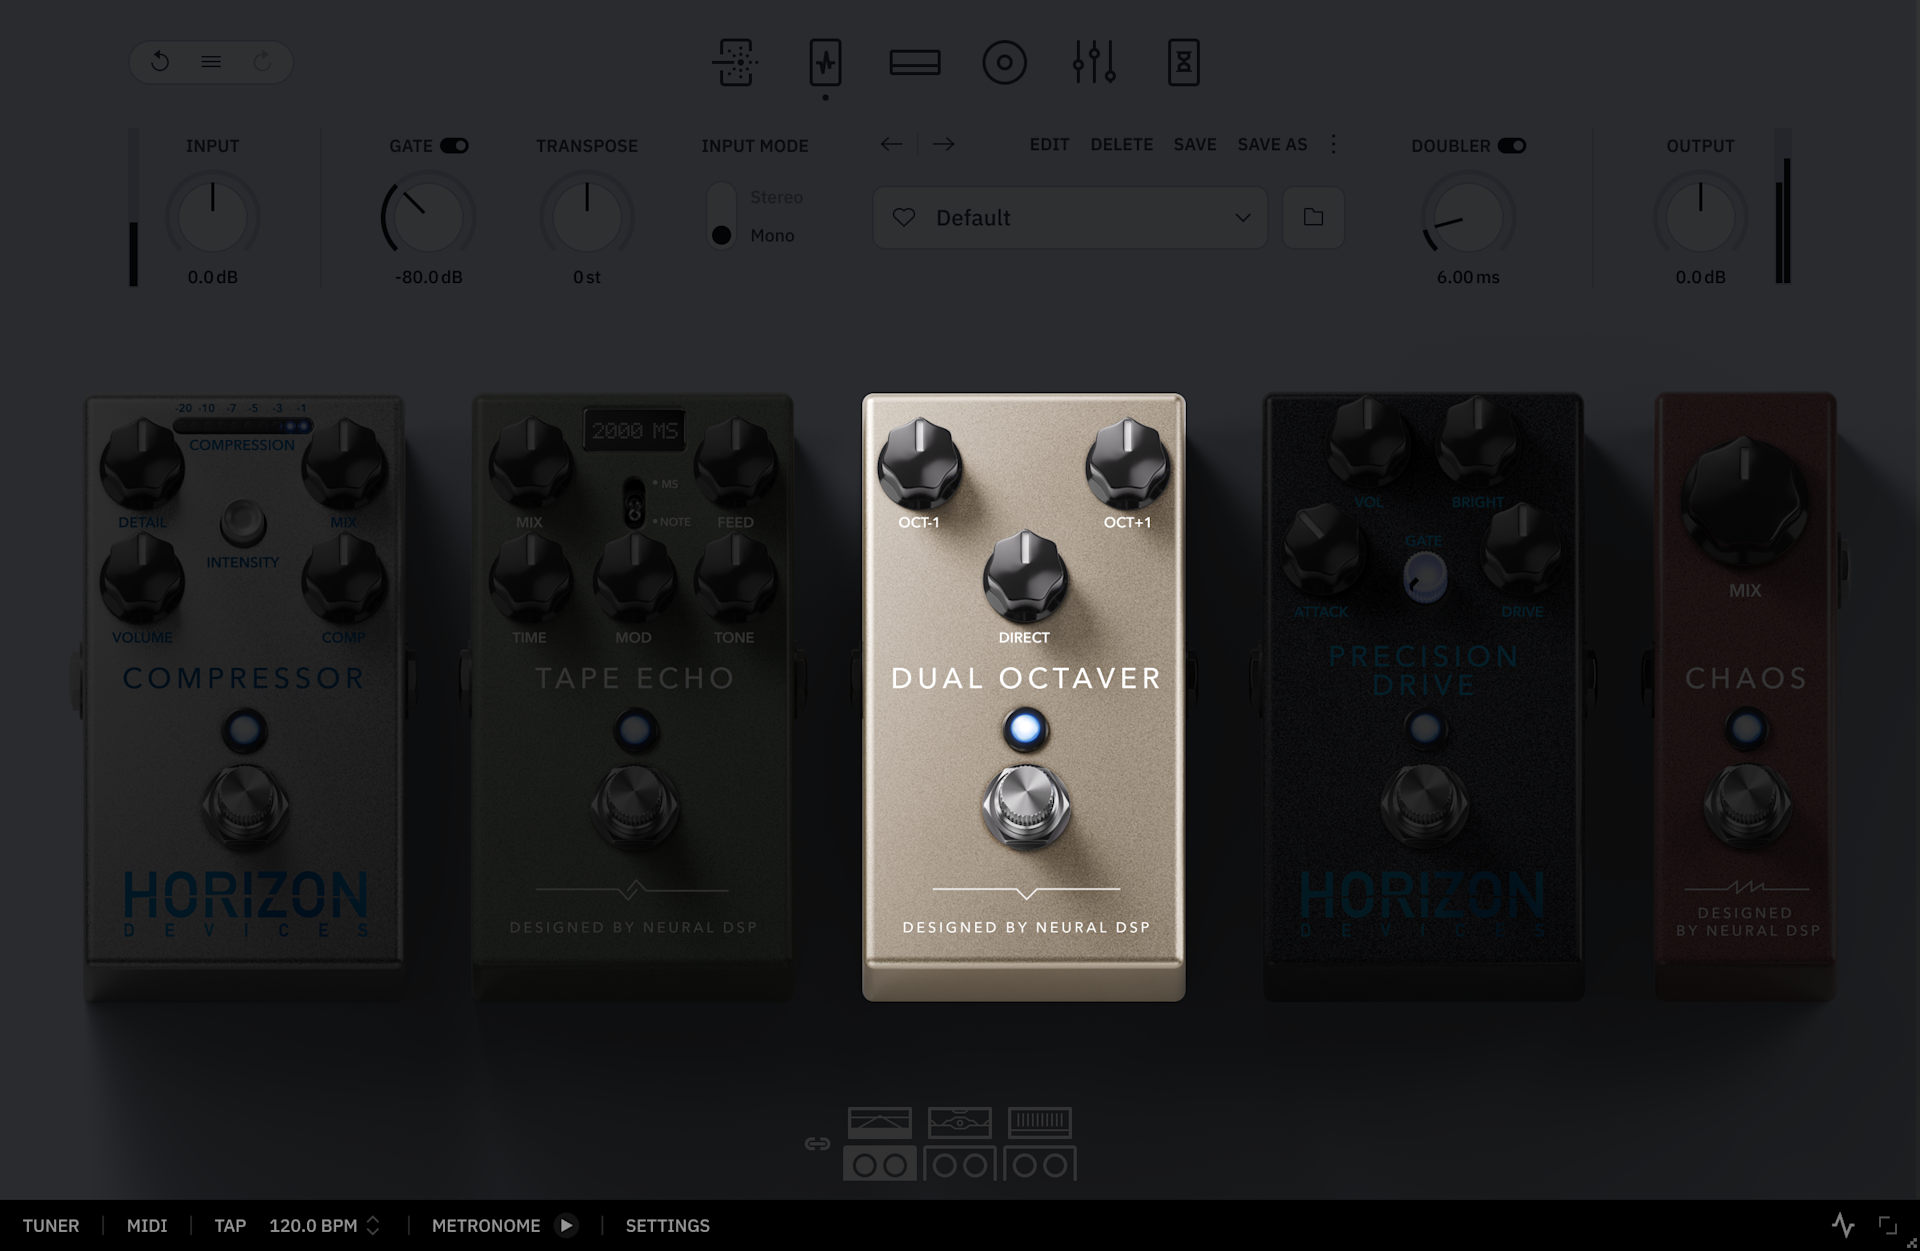
Dual Octaver 

An Octaver pedal that offers precise tracking with the ability to simultaneously shift your signal down and up by one octave.

  1. Oct -1 Knob: Adjusts the level of the low-pitched voice.

  2. Oct +1 Knob: Adjusts the level of the high-pitched voice.

  3. Direct Knob: Adjusts the level of the original signal.

  4. Stomp Switch: Click to activate/deactivate the Dual Octaver pedal.

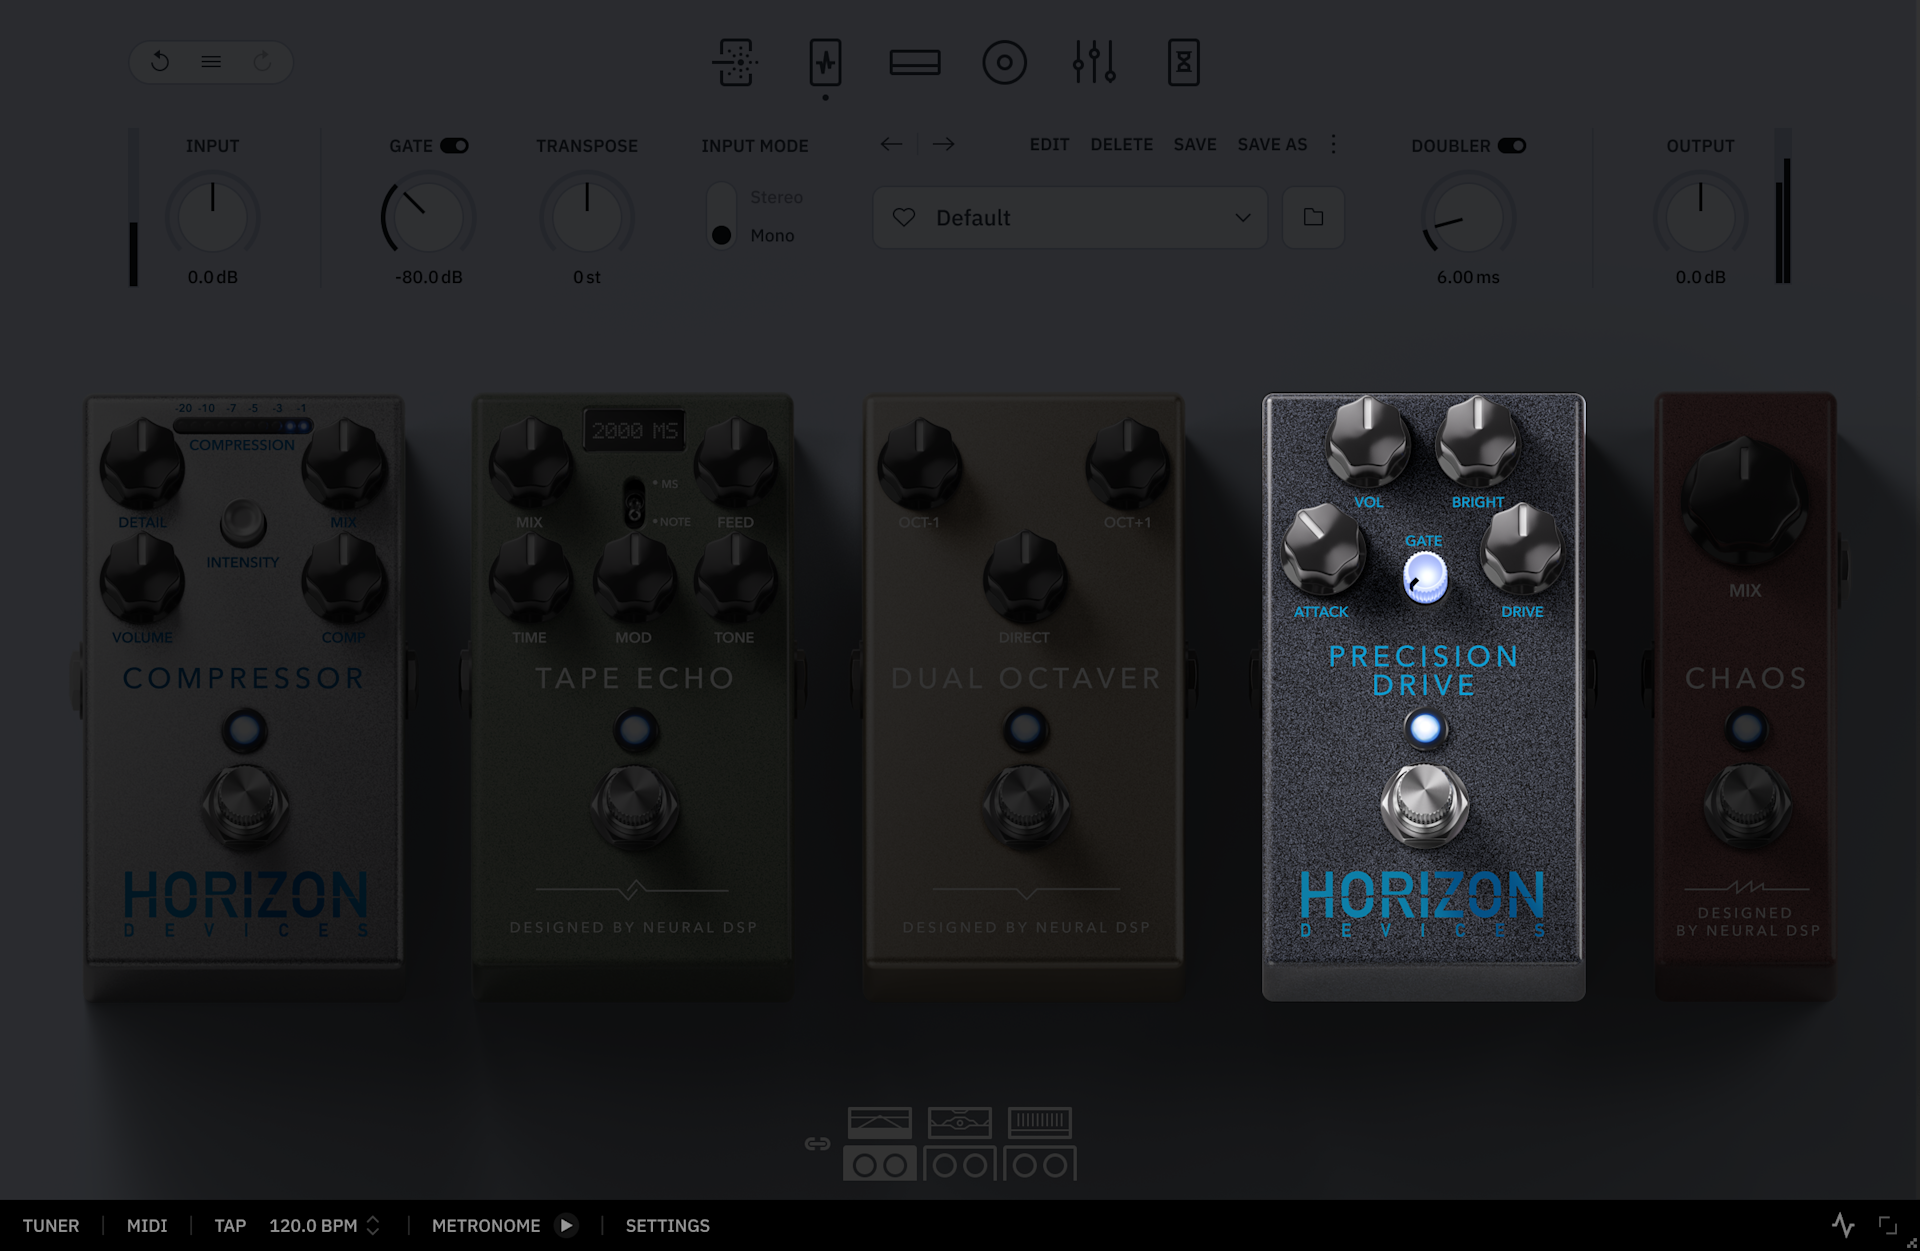
Horizon Devices® Precision Drive

An Overdrive pedal inspired by a well-known green pedal, modified for use as a boost with high-gain amps. It enhances your tone with precision and clarity, pushing your amp’s drive to new levels.

  1. Drive Knob: Adjusts the amount of overdrive.

  2. Attack Knob: Adjusts the amount of low frequencies.

  3. Gate Knob: Adjusts the sensitivity of the built-in noise gate.

  4. Stomp Switch: Click to activate/deactivate the Precision Drive pedal.

Hint:

Unlike the original hardware, turning the gate knob to 0% completely bypasses the internal noise gate.

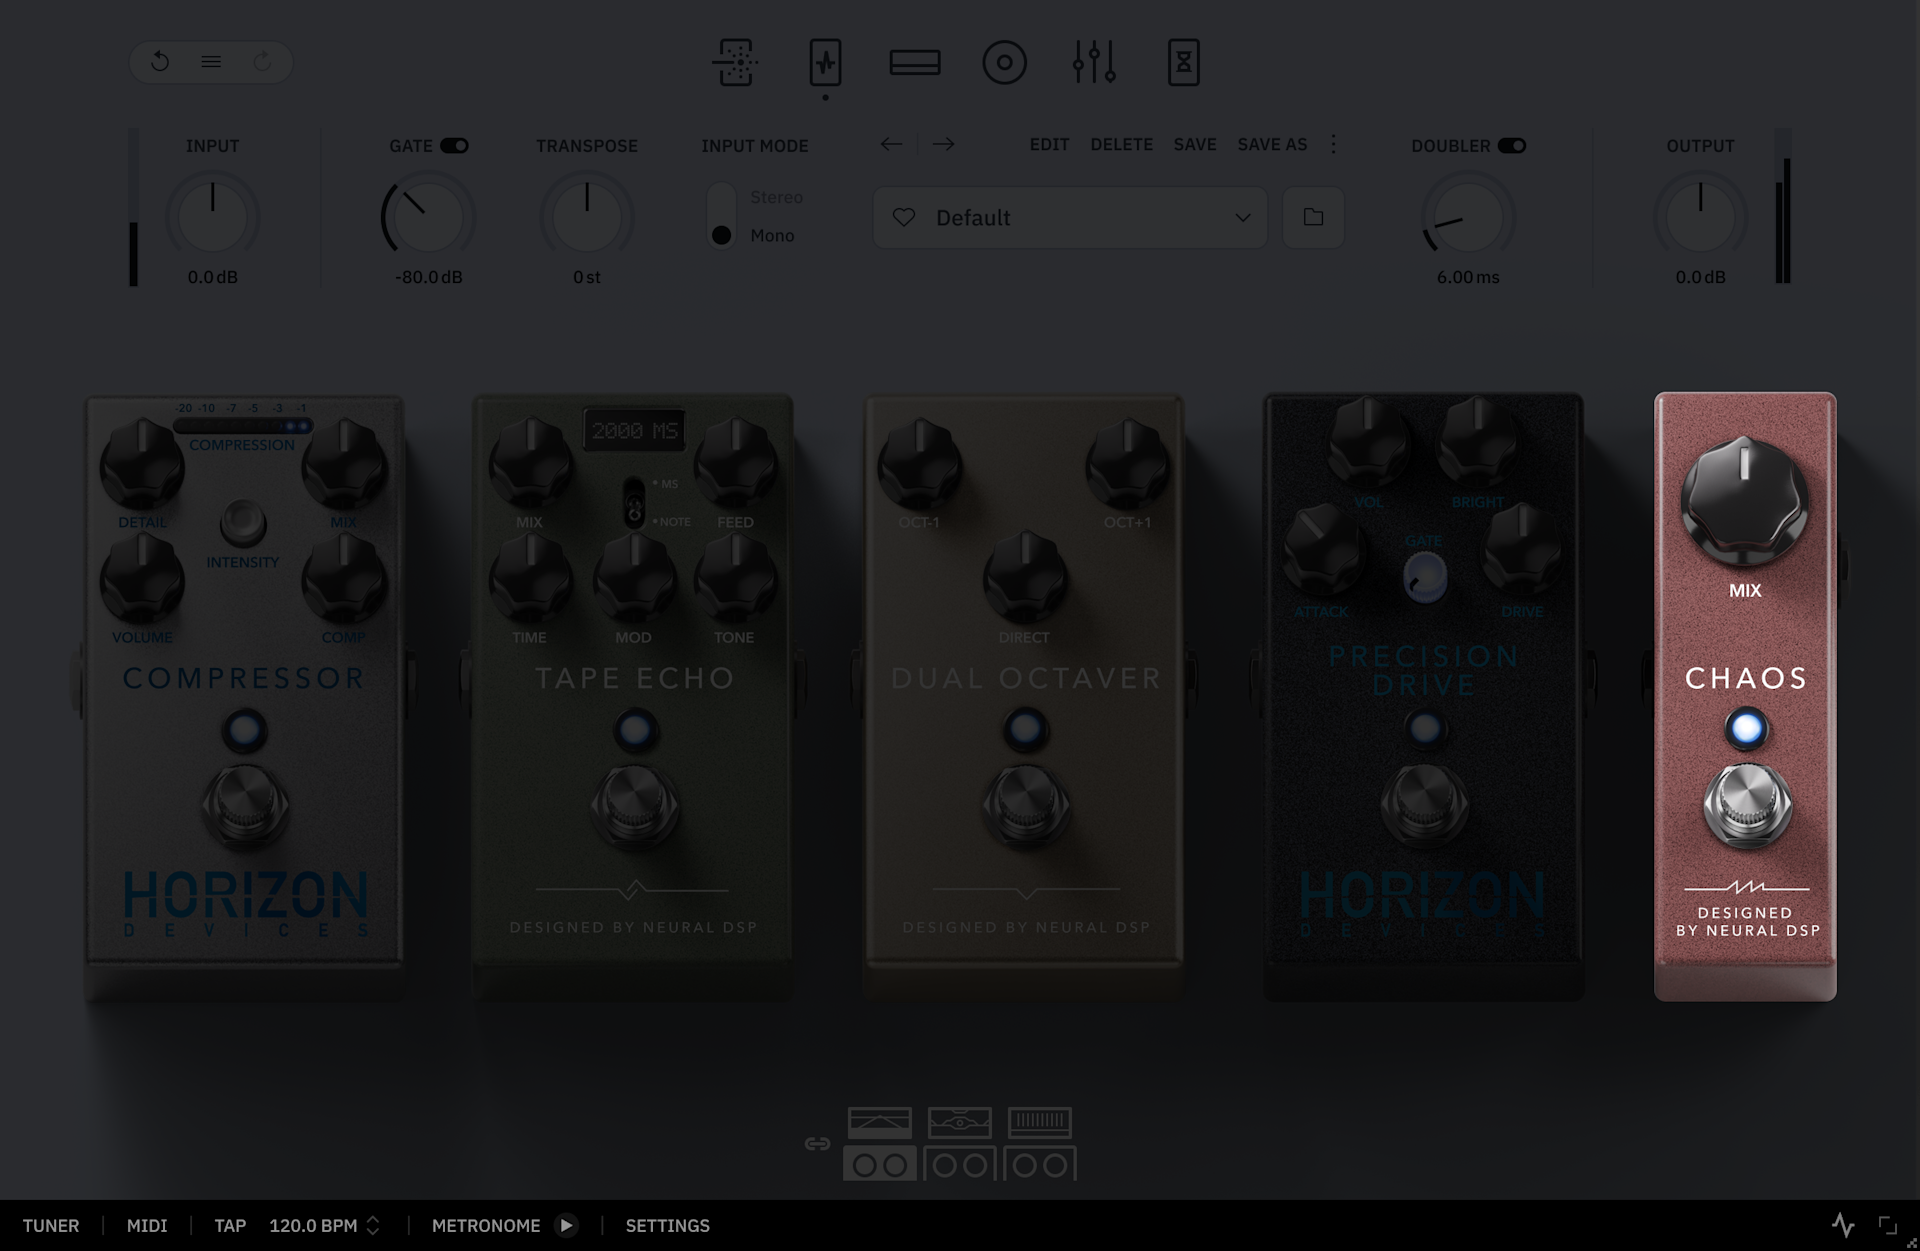
Chaos 

A unique DIY pedal custom-built for Misha, inspired by a classic distortion pedal made legendary by Swedish metal bands. This effect features a single Mix control that blends the full-on distortion signal with the original clean signal, allowing for greater precision when used in front of a high-gain amplifier.

  1. Mix Knob: Adjusts the mix between the dry and the distorted signal.

  2. Stomp Switch: Click to activate/deactivate the Chaos pedal.

Amp Section

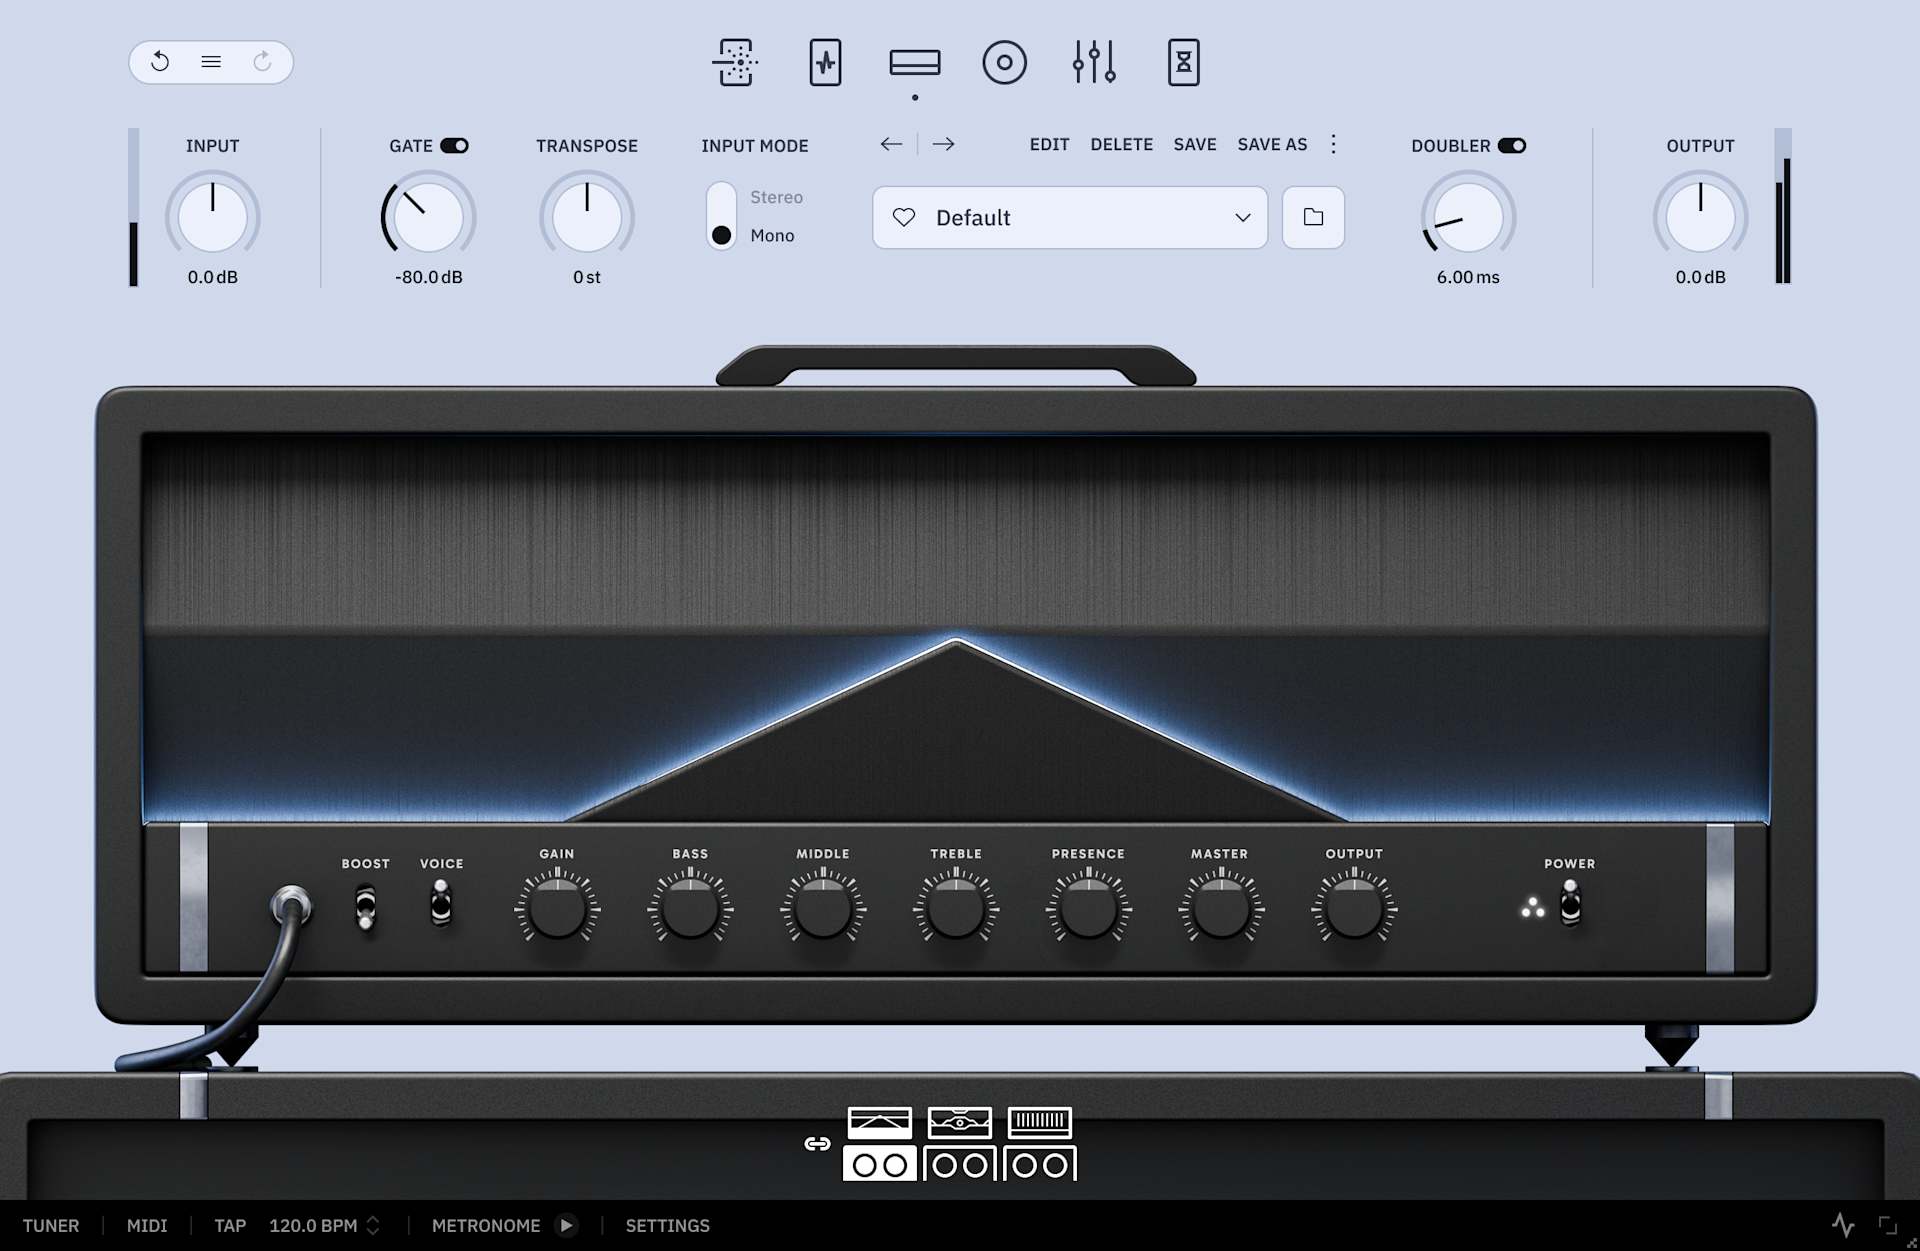
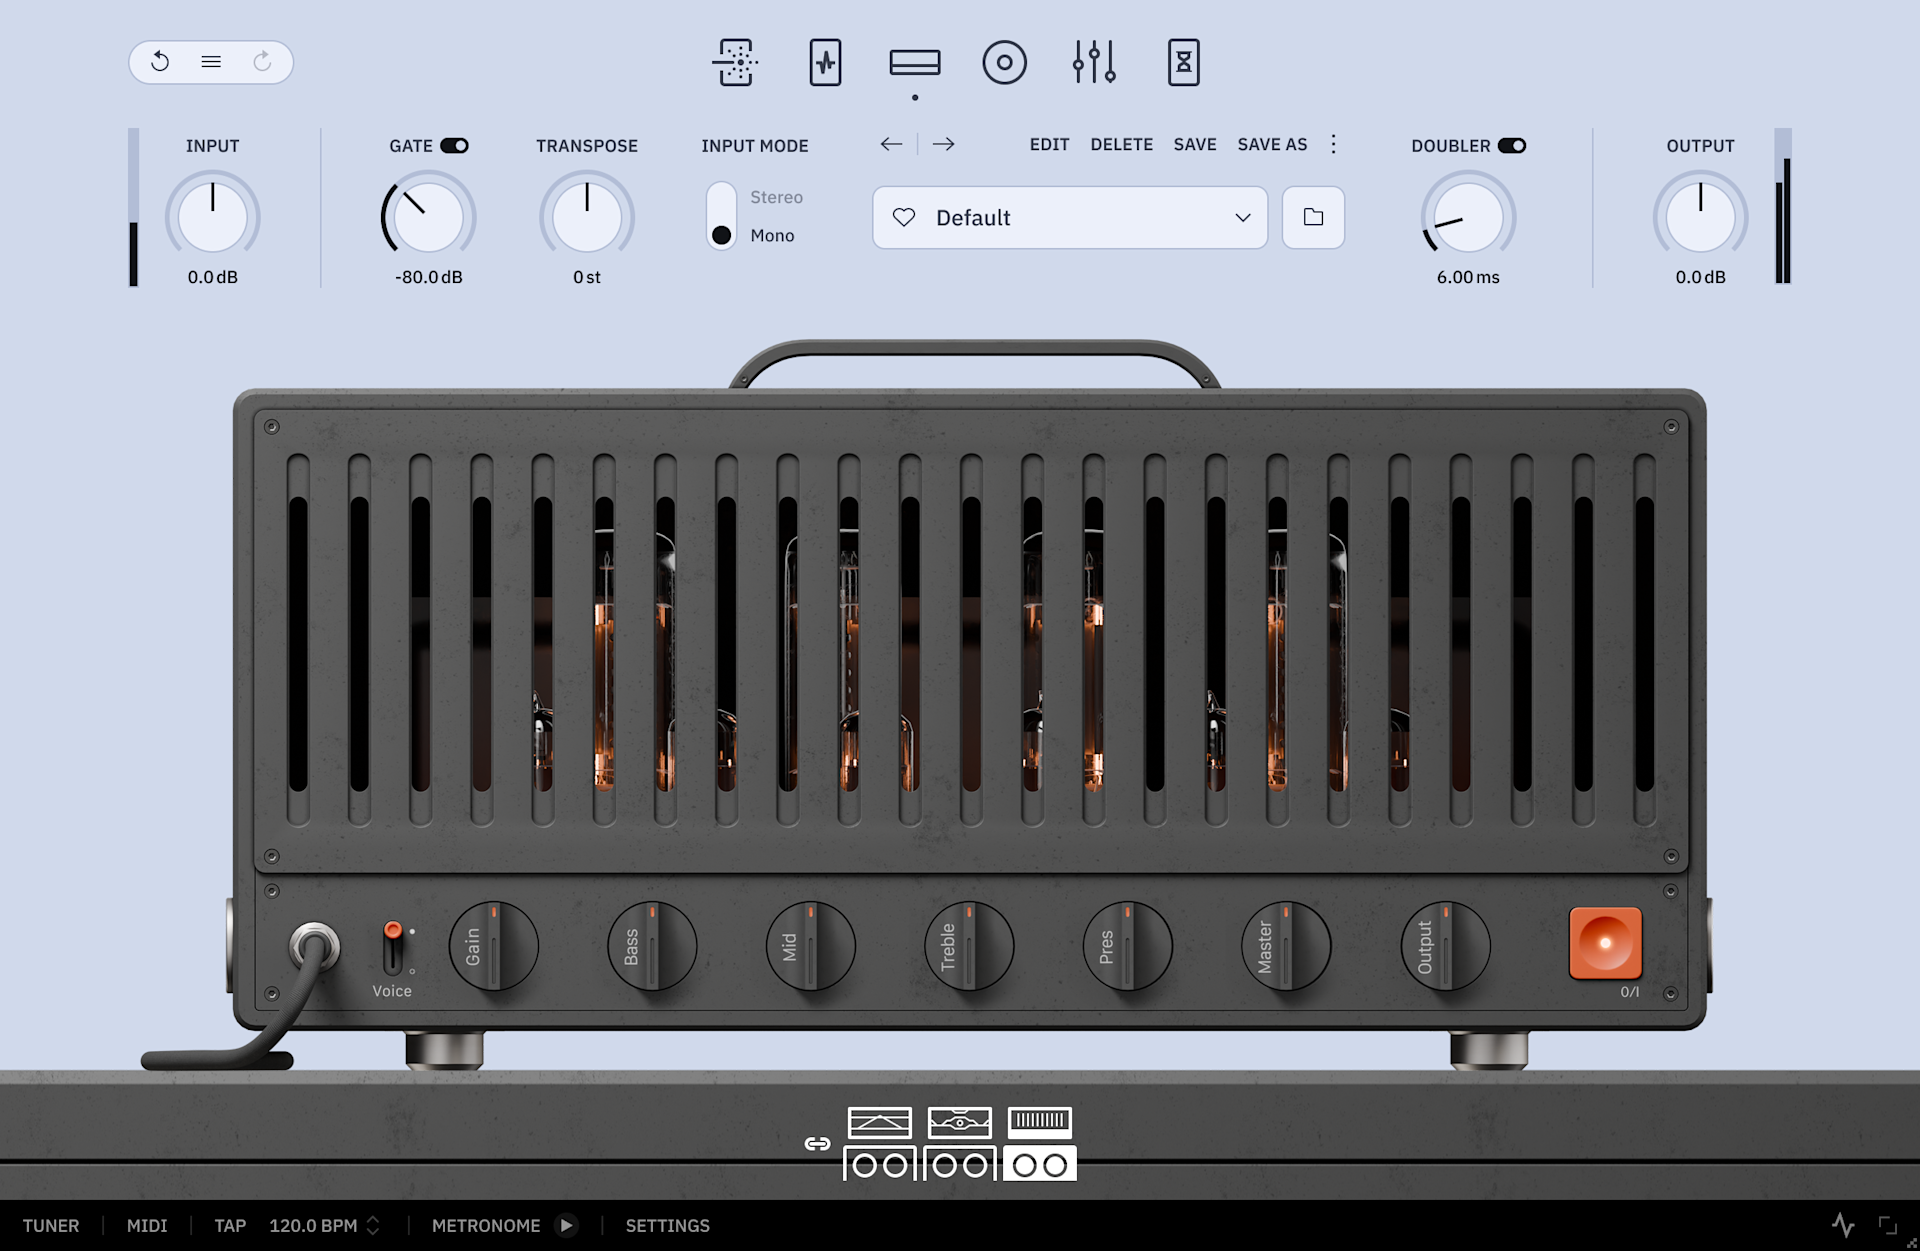
Clean Amplifier

Inspired by a modern American classic known for its rich, full-bodied cleans and massive headroom.

  1. Boost Switch: Activates a boost at the amp’s input, resulting in increased distortion.

  2. Voice Switch: Toggles between two different tone stacks, offering distinct EQ voicings.

  3. Gain Knob: Adjusts the preamp gain level, determining the amount of distortion produced.

  4. Bass Knob: Adjusts the bass-frequency response of the amp.

  5. Mid Knob: Adjusts the mid-frequency response of the amp.

  6. Treble Knob: Adjusts the high-frequency response of the amp.

  7. Presence Knob: Adjusts the high-end response of the amp.

  8. Master Knob: Sets the amp’s master level—higher settings add power amp saturation and sag.

  9. Output Knob: Controls the amp’s output level without coloring the tone.

  10. Power Switch: Click to activate/deactivate the Clean amp.

Hint:

This amp provides a naturally dark starting tone, but its EQ is very effective. Crank the Presence and Treble controls to open up the sound. Around 1 o’clock is a good starting point.

Rhythm Amplifier

This amp is a fierce blend of some of the most legendary high-gain metal circuits, reimagined and refined into one brutal-sounding machine.

  1. Voice Switch: Toggles between two different tone stacks, offering distinct EQ voicings.

  2. Gain Knob: Adjusts the preamp gain level, determining the amount of distortion produced.

  3. Bass Knob: Adjusts the bass frequency response of the amp.

  4. Middle Knob: Adjusts the mid frequency response of the amp.

  5. Treble Knob: Adjusts the high frequency response of the amp.

  6. Master Knob: Sets the amp’s master level—higher settings add power amp saturation and sag.

  7. Output Knob: Controls the amp’s output level without coloring the tone.

  8. Power Button: Click to activate/deactivate the Rhythm amp.

Hint:

To tighten the amp’s low end, use the Precision Drive pedal with a fairly high Attack setting. This reduces low-frequency fed to the amp and sharpens the response.

Lead Amplifier

Inspired by custom-modded British classics, this amp features a redesigned tonestack, purpose-built for lead playing.

  1. Voice Switch: Toggles between two different tone stacks, offering distinct EQ voicings.

  2. Gain Knob: Adjusts the preamp gain level, determining the amount of distortion produced.

  3. Bass Knob: Adjusts the bass frequency response of the amp.

  4. Middle Knob: Adjusts the mid frequency response of the amp.

  5. Treble Knob: Adjusts the high frequency response of the amp.

  6. Pres Knob: Adjusts the high-end response of the amp.

  7. Master Knob: Sets the amp’s master level—higher settings add power amp saturation and sag.

  8. Output Knob: Controls the amp’s output level without coloring the tone.

  9. Power Switch: Click to activate/deactivate the Lead amp.

Hint:

The lead amp delivers strong gain but remains very dynamic at lower settings. Reduce the gain and engage the Compressor for tight “crunch” tones.

Cab Section

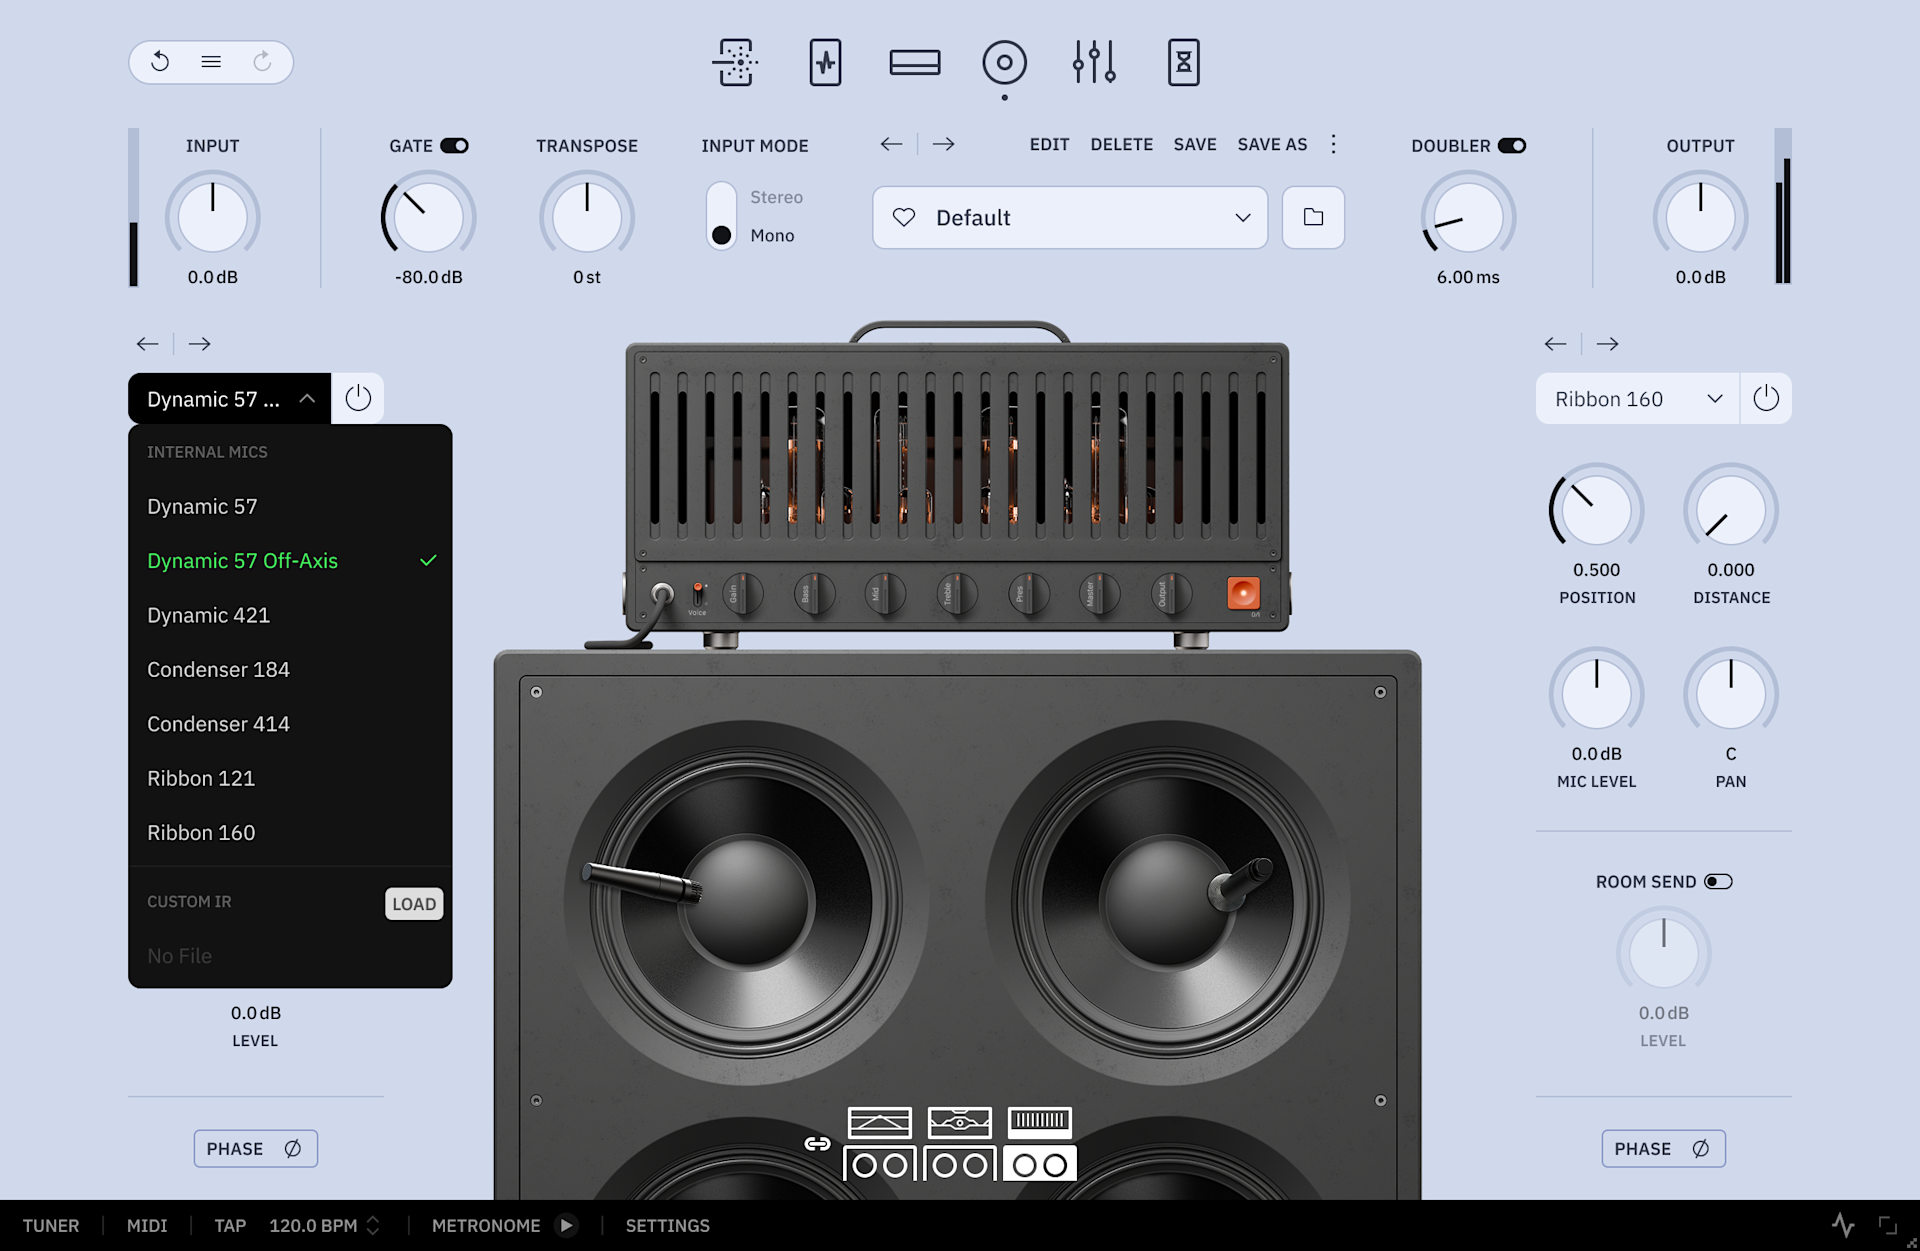
A comprehensive cabinet simulation module that features virtual mics that can be positioned around the speakers. Additionally, in this section, you can load your own Impulse Response files.

What is an Impulse Response?

An Impulse Response is the measurement of a dynamic system reacting to an input signal. This information can be stored in WAV files that can be used to recreate the sound of spaces, reverberations, and instrument speakers.

Cab Section Controls

  1. Microphone Selector Drop Down Menu: Click to select between the factory microphones or loading your own IR files.

  2. Navigation Arrows: Click to cycle through factory microphones and custom IRs.

  3. Bypass Button: Click to bypass/enable the selected microphone or custom IR.

  4. Position and Distance Knobs: Control the position and distance of the factory microphones around the speaker cone.

  5. Mic Level Knob: Controls the volume level of the selected mic/IR.

  6. Pan Knob: Controls the output panning of the selected mic/IR.

  7. Room Send Switches: Click to activate/deactivate the room reverb Send per microphone.

  8. Room Level Knobs: Determine how much signal is sent to the room reverb module. Room Send adds an algorithmic “room” ambience, giving you the sense of hearing the cabinets in a real space, similar to what a room mic might capture.

  9. Phase Button: Inverts the phase of the selected mic/IR.

How can I load custom IR files on Neural DSP plugins?

Click on the Microphone Selector and select Load next to the “Custom IR” field. After that, use the browser window to search and load your custom IR file. Once the IR is loaded, you can adjust its Level, Pan, and Phase. Using the navigation arrows above the Microphone Selector while a custom IR is loaded will cycle through all the IR files in that folder.

EQ Section

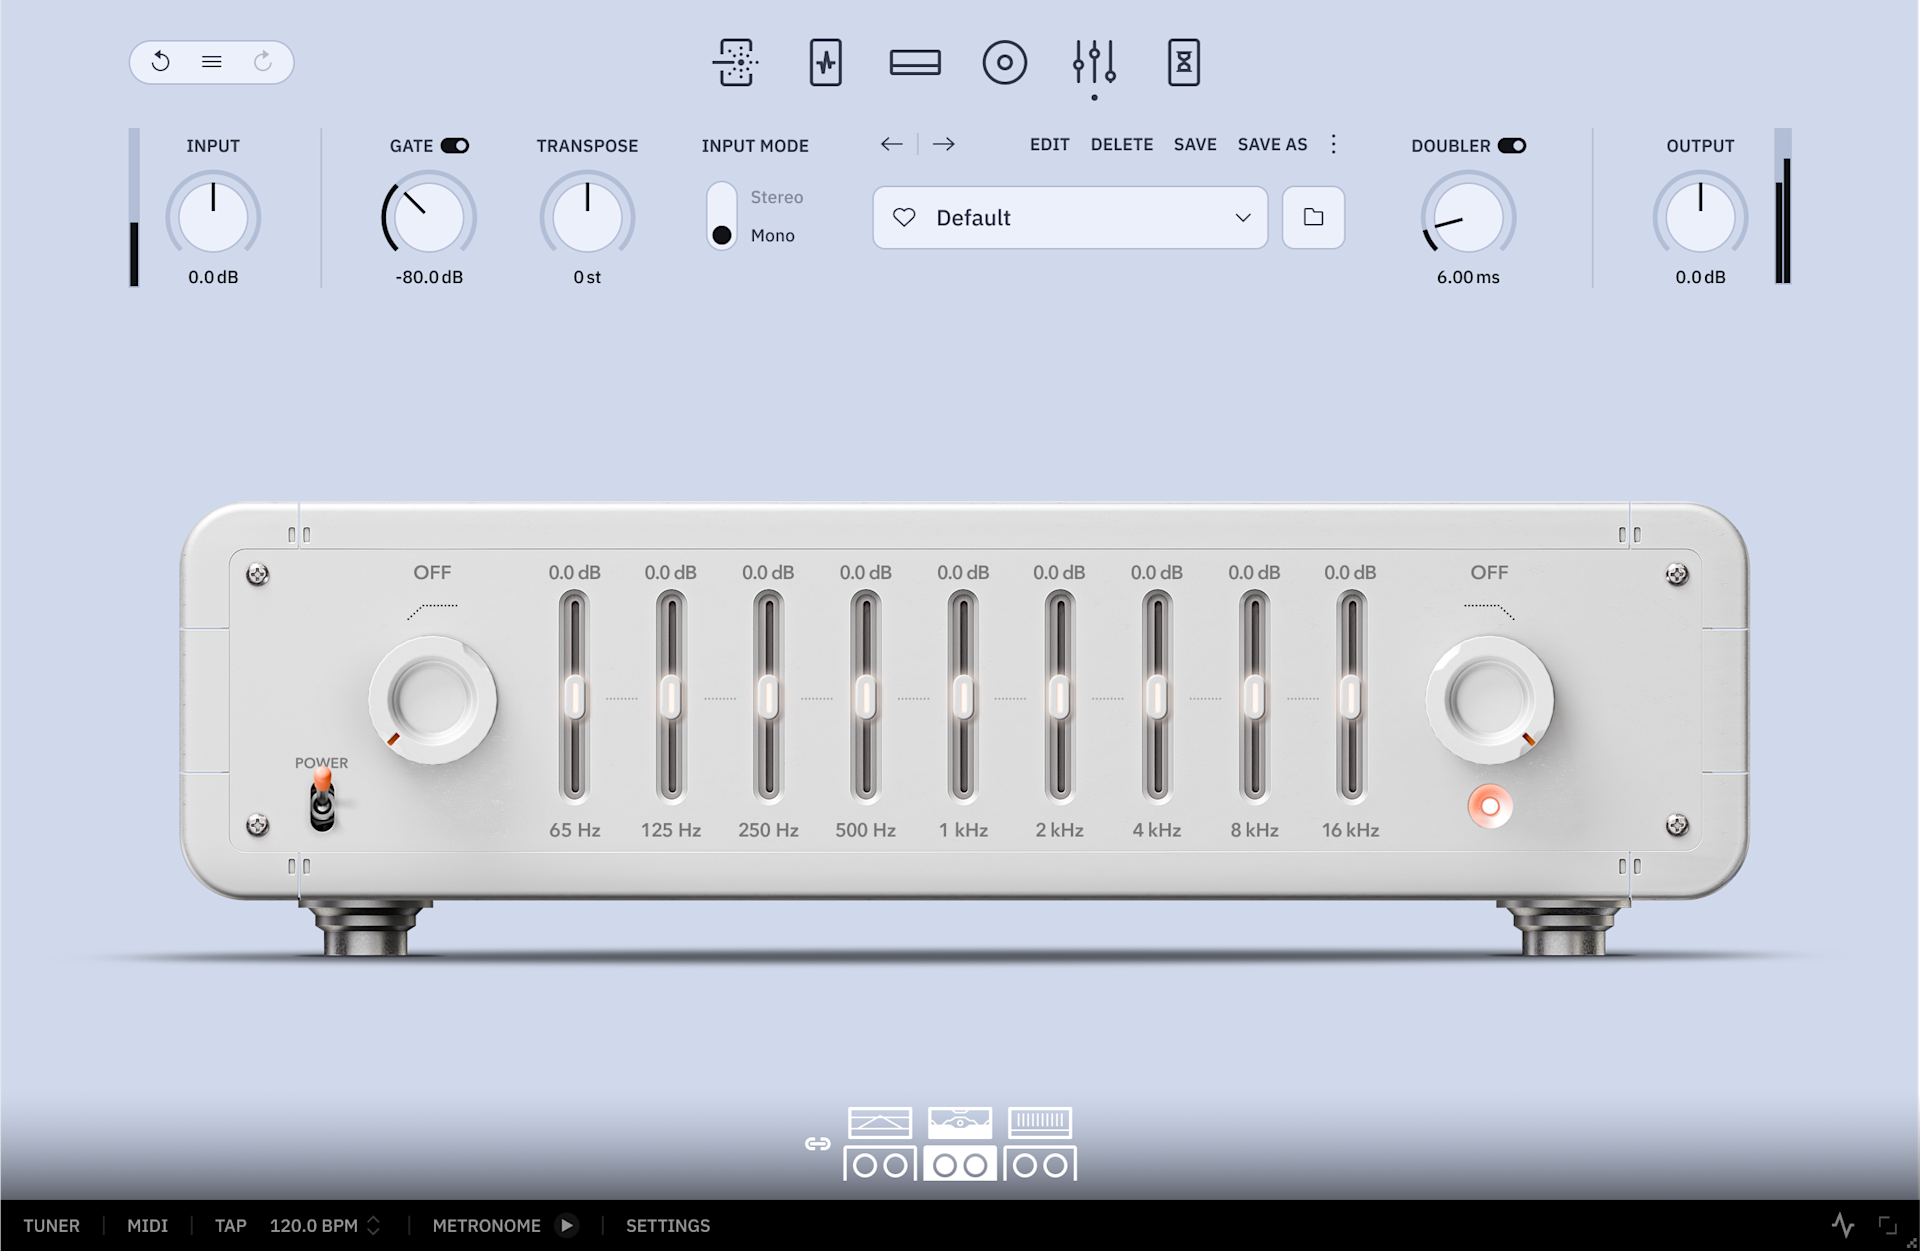
Graphic EQ

This section includes a 9-Band equalizer per amplifier, giving you precise control over different frequency ranges.

  1. Frequency Knobs: Each slider adjusts the gain of a specific range of frequencies (Bands). Click-and-drag the sliders up or down to increase or decrease their volume +/- 12dB.

  2. HPF Knob: Sets the cutoff frequency of the high-pass filter. Increase to remove low frequencies.

  3. LPF Knob: Sets the cutoff frequency of the low-pass filter. Decrease to remove high frequencies.

  4. Bypass Switch: Click to activate/deactivate the EQ module.

Post FX Section

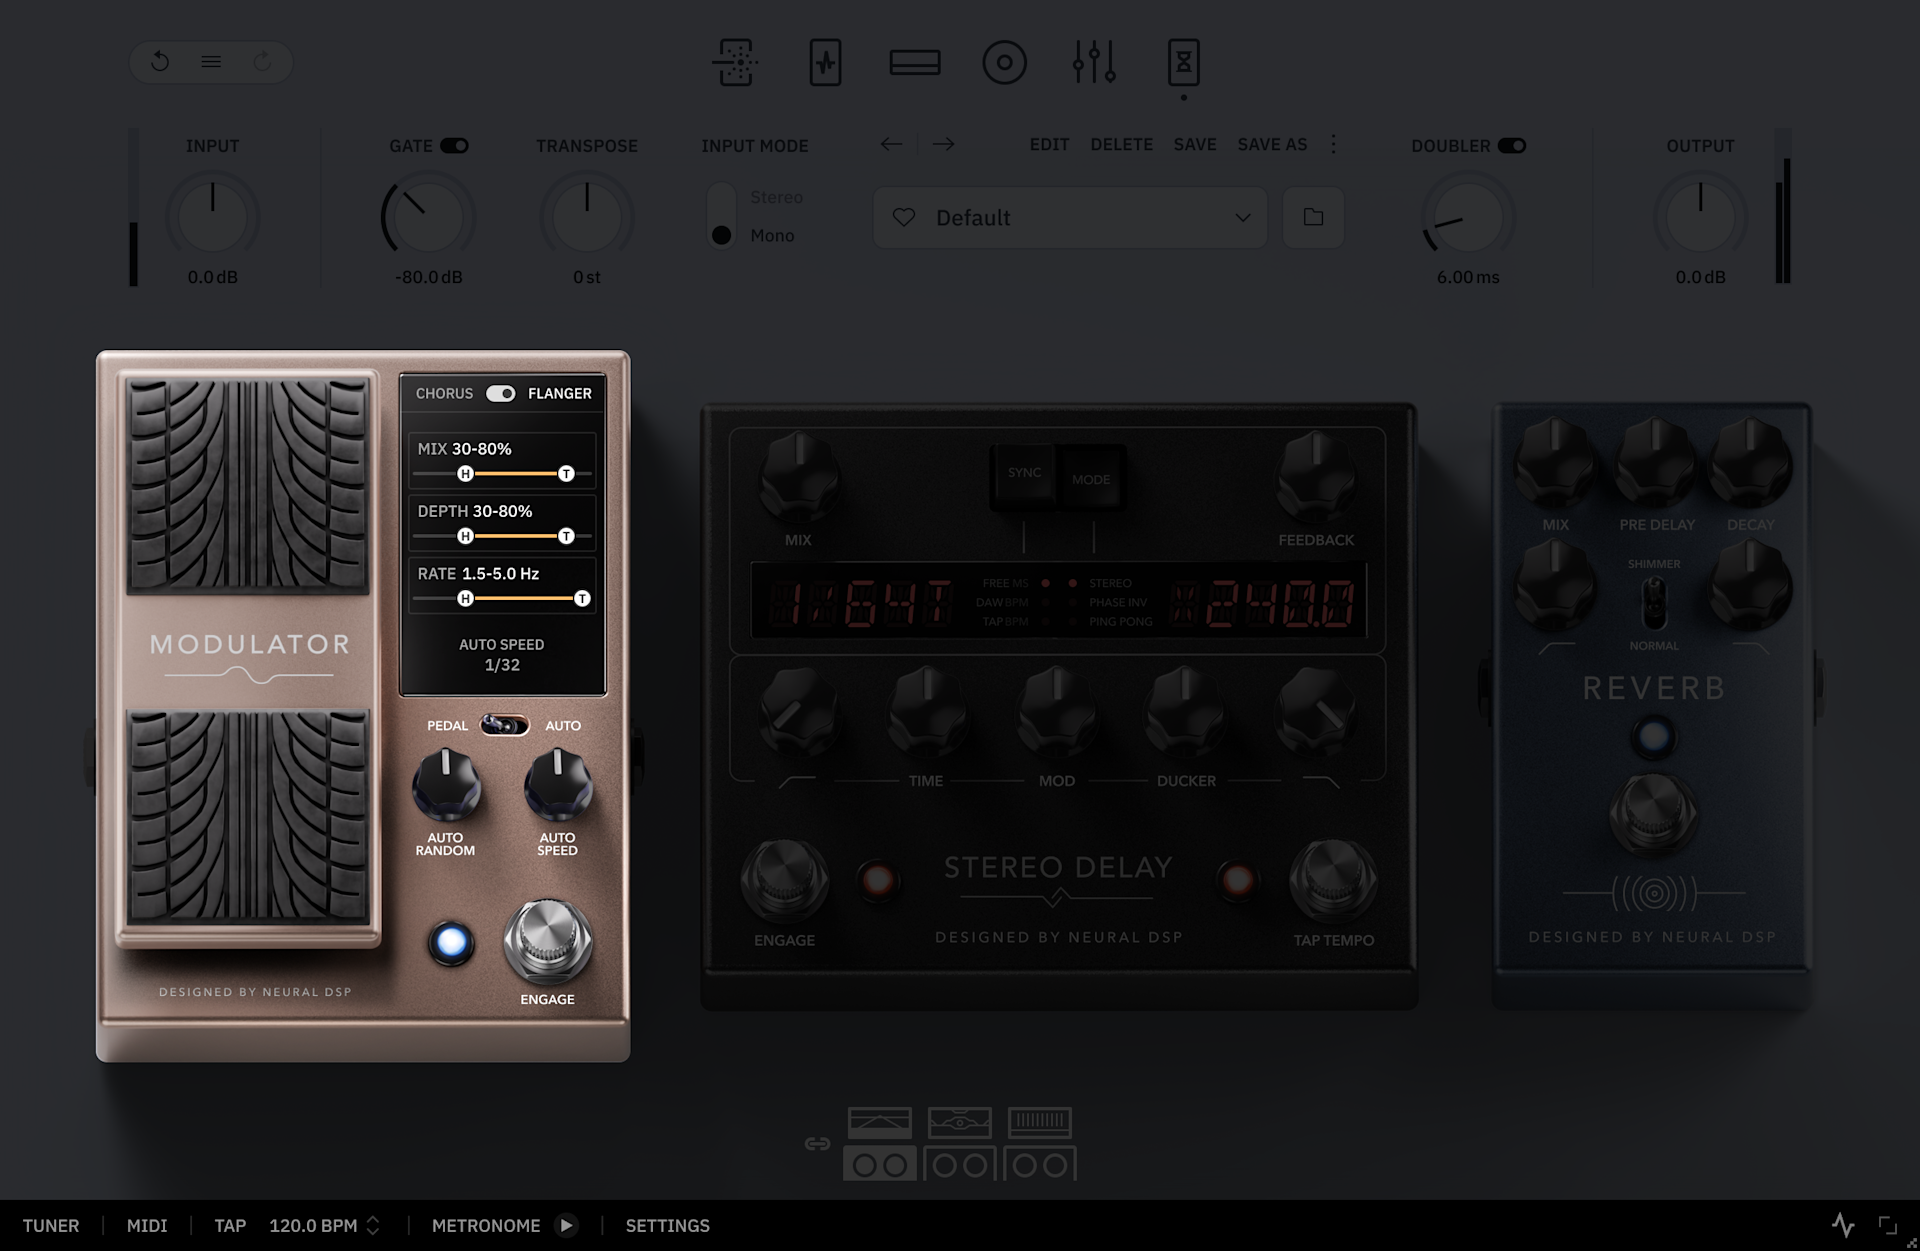
This section consists of three effects in series which can be used either separately or combined.

Modulator

Enhanced with an expression pedal, this modulation effect takes inspiration from a legendary analog unit that blends lush chorus and flanger  into one versatile unit.

  1. Expression Pedal: Adjusts the position of the pedal. Depending on the Heel and Toe settings, moving the expression pedal will simultaneously adjust the values of several controls.

  2. Mode Switch: Toggles between Chorus and Flanger modulation modes.

  3. Mix: Adjusts the Mix amount, as determined by the Heel and Toe position ranges.

  4. Depth: Adjusts the Depth amount, as determined by the Heel and Toe position ranges.

  5. Rate: Adjusts the Rate amount, as determined by the Heel and Toe position ranges.

  6. Operation Mode Switch: Toggles between two different operation modes:

    • Pedal: Controlled directly by the expression pedal, via pedal position.

    • Auto: A semi-random LFO takes over the manual pedal, acting as a ‘virtual foot’ that sweeps the expression pedal’s position from Heel to Toe in sync with the tempo.

  7. Auto Speed Knob: Controls how fast the random LFO runs in Auto mode.

  8. Auto Random Knob: Controls how often random events happen in Auto mode.

  9. Stomp Switch: Click to activate/deactivate the Modulator pedal.

Hint:

Mix, Depth, and Rate can be controlled either by the expression pedal or the “Auto” LFO. To set them up, assign different values to each parameter using the H and T range sliders. Moving the expression pedal will smoothly transition between the set values.

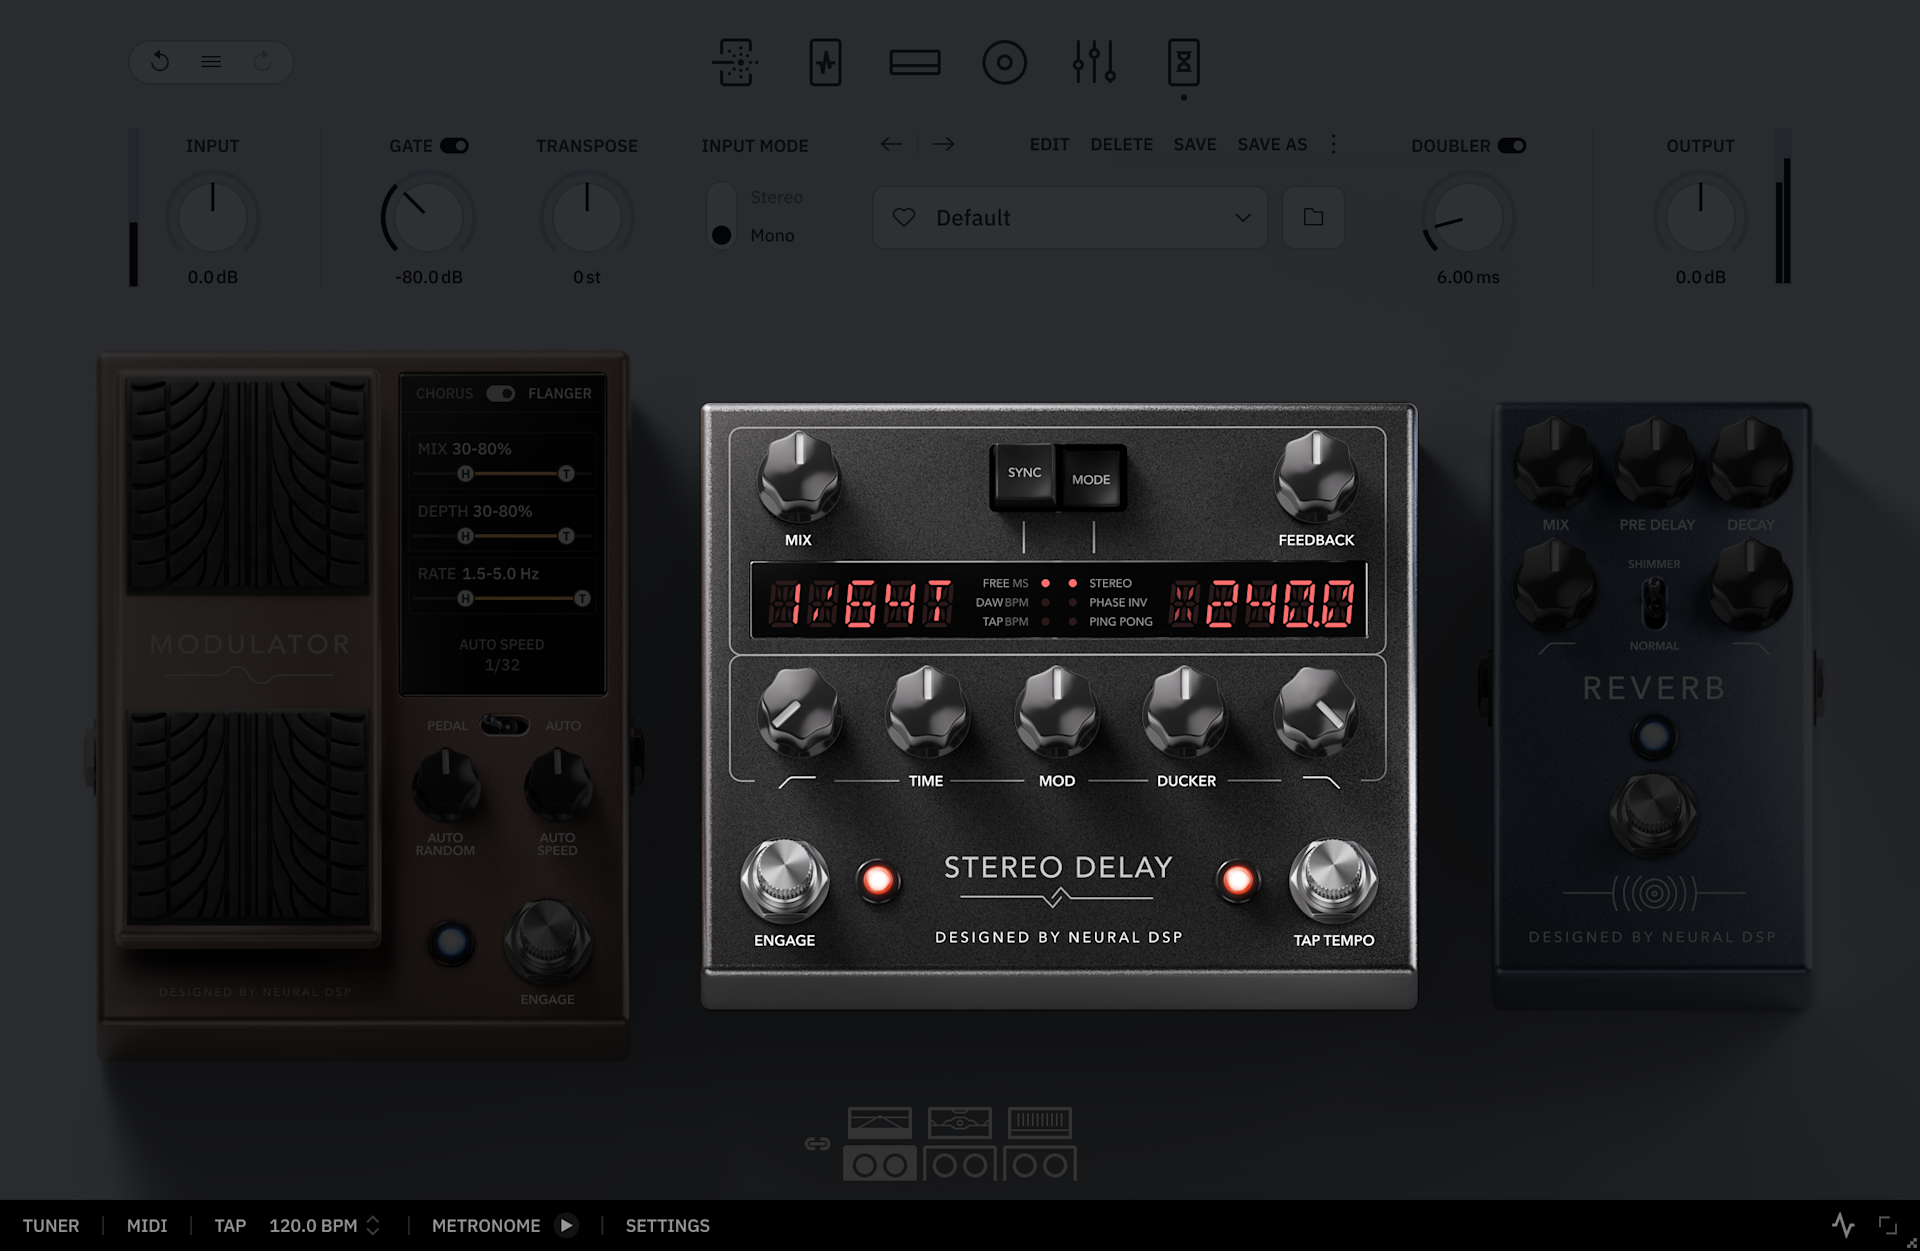
Stereo Delay

This pedal is inspired by a renowned studio classic, delivering precise digital repeats with rich, deep modulation. It features a built-in ducker control that automatically lowers the delay level when you play, keeping your tone clear and focused.

  1. Mix Knob: Adjusts the mix amount between the dry and the delayed signal.

  2. Feedback Knob: Controls how many times the echo repeats. Higher values create more repeats.

  3. Low Cut Knob: Cuts the low frequencies from the delayed signal. High settings produce a brighter sound.

  4. High Cut Knob: Cuts high frequencies from the delayed signal. Lower settings will give a darker sound.

  5. Time Knob: Sets how long it takes for the echo to repeat after the original sound.

  6. Mod Knob: Controls the amount of modulation applied to the delay signal.

  7. Ducker Knob: Controls how much the delay volume is reduced when the input is active.

  8. Sync Button: Selects delay timing mode: Free (manual), App/DAW tempo sync, or Tap tempo.

  9. Mode Button: Controls delay style: stereo, phase inverted, or ping-pong between left and right channels.

  10. Engage Stomp Switch: Click to activate/deactivate the Stereo Delay pedal.

  11. Tap Tempo Switch: Sets how long it takes for the echo to repeat after the original sound.

Hint:

The Stereo Inv. mode flips the phase of one stereo wet channel, giving the repeats a much wider feel. It sounds fantastic on its own, but be aware that when used in a mix these wide repeats may disappear if the track is collapsed to mono.

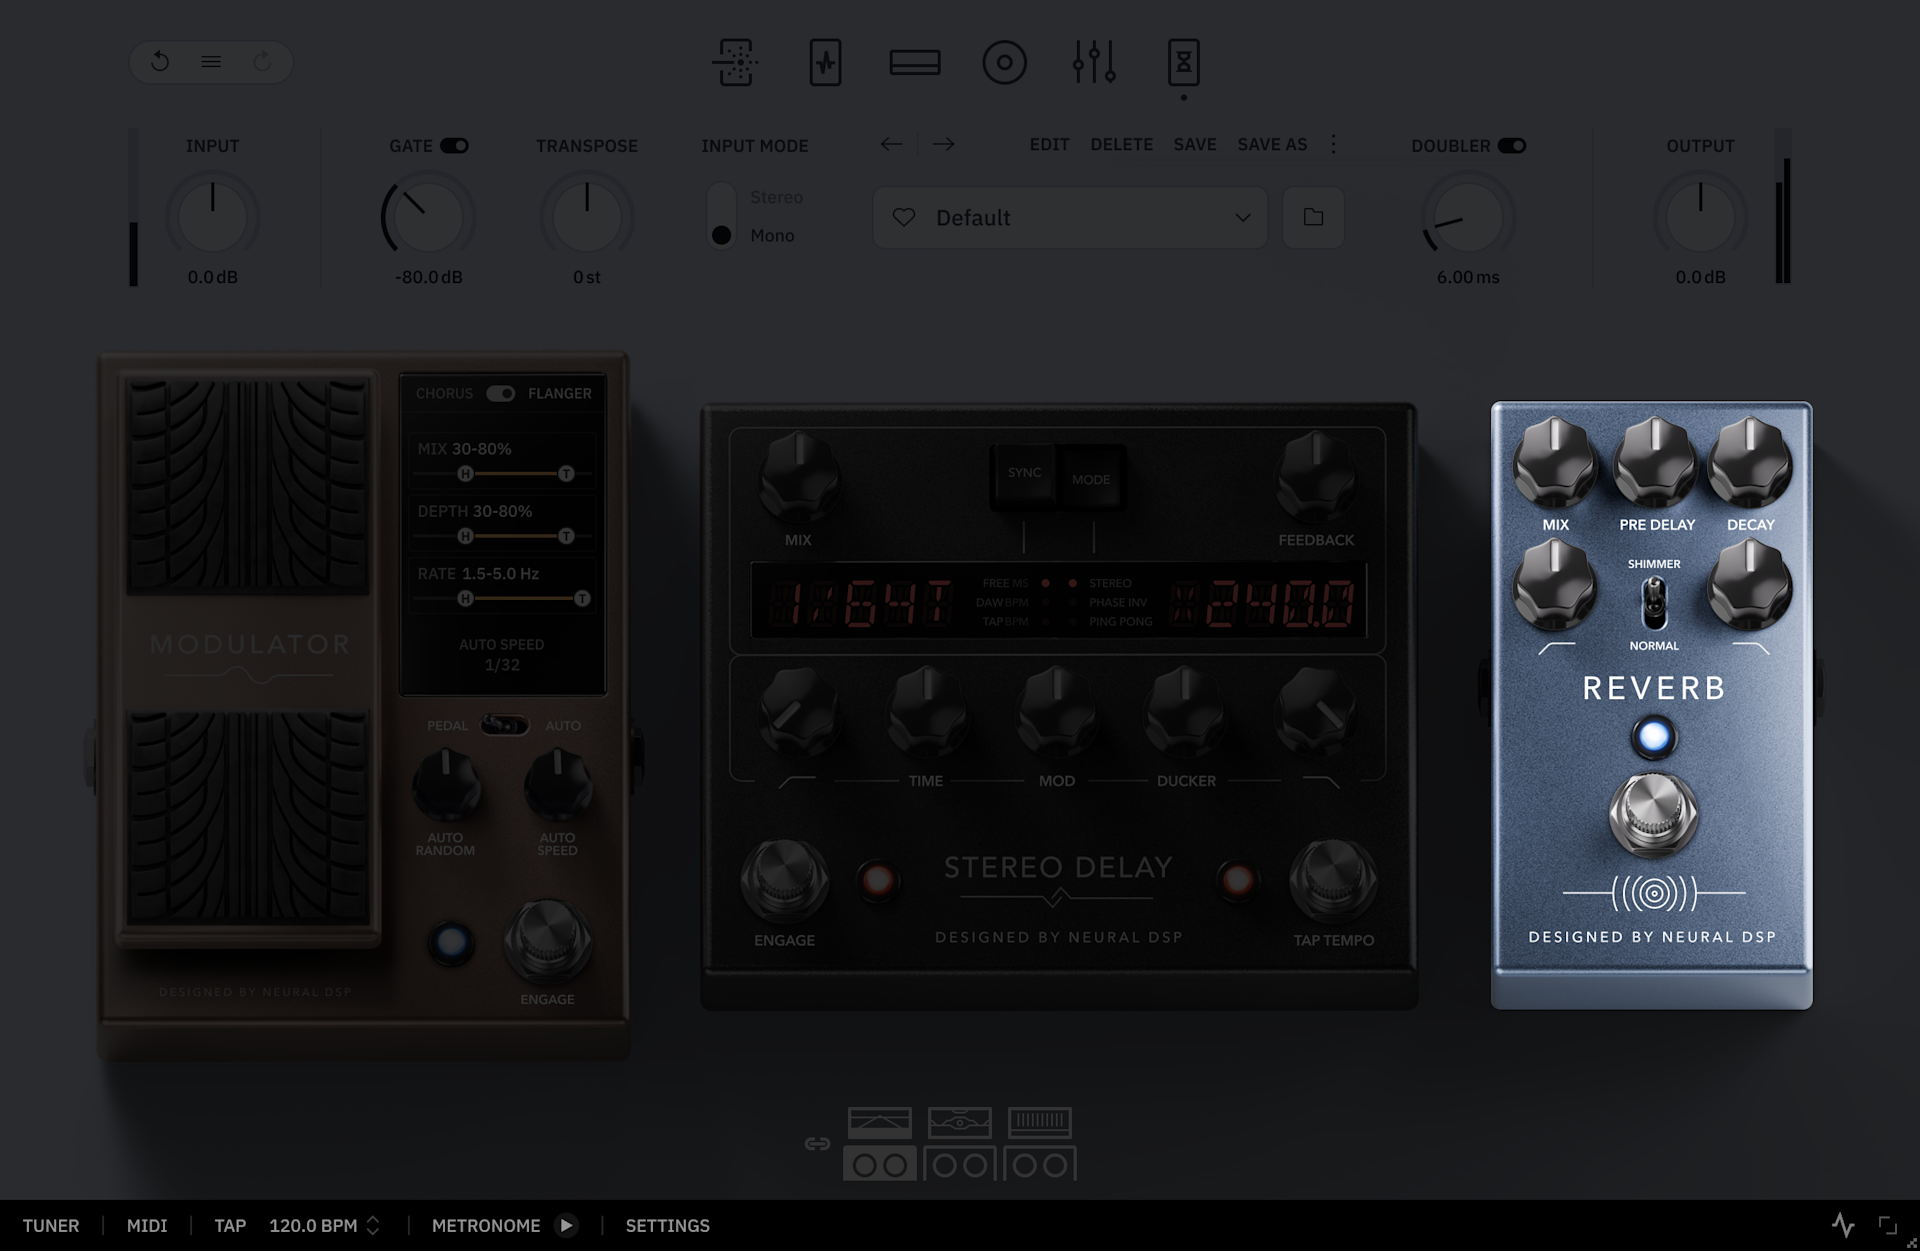
Reverb

This 2-in-1 reverb pedal combines a faithful replica of Misha’s favorite boutique unit, with an added shimmer mode.

  1. Mix Knob: Adjusts the mix amount between the dry and the reverberated signal.

  2. Pre Delay Knob: Sets the delay time before the reverberation begins.

  3. Decay Knob: Controls the length of the reverb tail.

  4. LPF Knob: Sets the cutoff frequency of the low-pass filter. Decrease to remove high frequencies.

  5. HPF Knob: Sets the cutoff frequency of the high-pass filter. Increase to remove low frequencies.

  6. Shimmer/Normal Switch: Enables shimmer, adding pitch-shifted harmonics to the reverberated sound.

  7. Engage Stomp Switch: Click to activate/deactivate the Reverb pedal.

Hint:

The Normal mode of the reverb emulates the downsampled character of the original hardware, giving the tail a warmer, more vintage feel.

03
Global Features


Utility bar

Utility Bar in Plugins

  • Input Knob: Adjusts the level of the signal being fed into the plugin.

  • Gate Knob: The noise gate helps to reduce unwanted noise or hum in your signal. The level of audio signal will be reduced when it drops below the set value.

  • Transpose Knob: Transposes the signal up or down in pitch by a constant interval (+/-12 semitones). Use it to easily change the tuning of your instrument. The transpose module is bypassed at its default position (0 st).

  • Input mode Switch: Toggles between Mono and Stereo input processing. The Doubler is disabled while in Stereo Input Mode.

  • Doubler Knob: While in Mono Input mode, the doubler can simulate a larger stereo mode. The higher the value, the wider the stereo image is.

  • Output Knob: Adjusts the level of the signal the plugin feeds out.

Parameter Lock displayed while hovering on Transpose

All top-bar Utility Controls can be preserved across presets, just hover your mouse/cursor over to it to see the Lock icon.

  • Undo/Redo and History: Revert or restore to a past state by using either the Undo/Redo icons, or by navigating the Action History list by clicking the History icon.

Preset Manager

A Preset is a saved configuration of settings and parameters that can be recalled instantly. Neural DSP factory presets are an excellent starting point for your tones. After loading a preset, you can fine-tune the parameters across the different sections of the plugin to create a new tone that suits your needs.

Presets you make can be organized into folders and subfolders, making it easier to find and manage them.

Utility Bar with Preset Bar highlighted
  • Preset Dropdown Menu: Quick preset access. Click to open a dropdown list of all the Presets available. Use the navigation arrows above to cycle through presets.

  • Favorite: Adds the selected preset to your favorites folder for quick access.

  • Preset Browser: Access to the full preset browser experience.

  • Edit: Only available for user presets, use it to update the selected preset's name or tags.

  • Delete: Click to delete the currently loaded preset (factory presets cannot be deleted)

  • Save: Used to update a preset with the latest changes (indicated by a dirty state: an *asterisk in the preset name).

  • Save As: Used to save the current configuration as a new user preset.


Clicking the More button () will display additional features:

Additional options for Preset bar
  • Import: Used to import Preset files from custom locations.

  • Reset: Click to make all parameters recall their default values.

  • Locate file: Click to find the preset's actual location in your computer. Neural DSP presets are stored as shareable, encrypted XML files.

Saving Presets

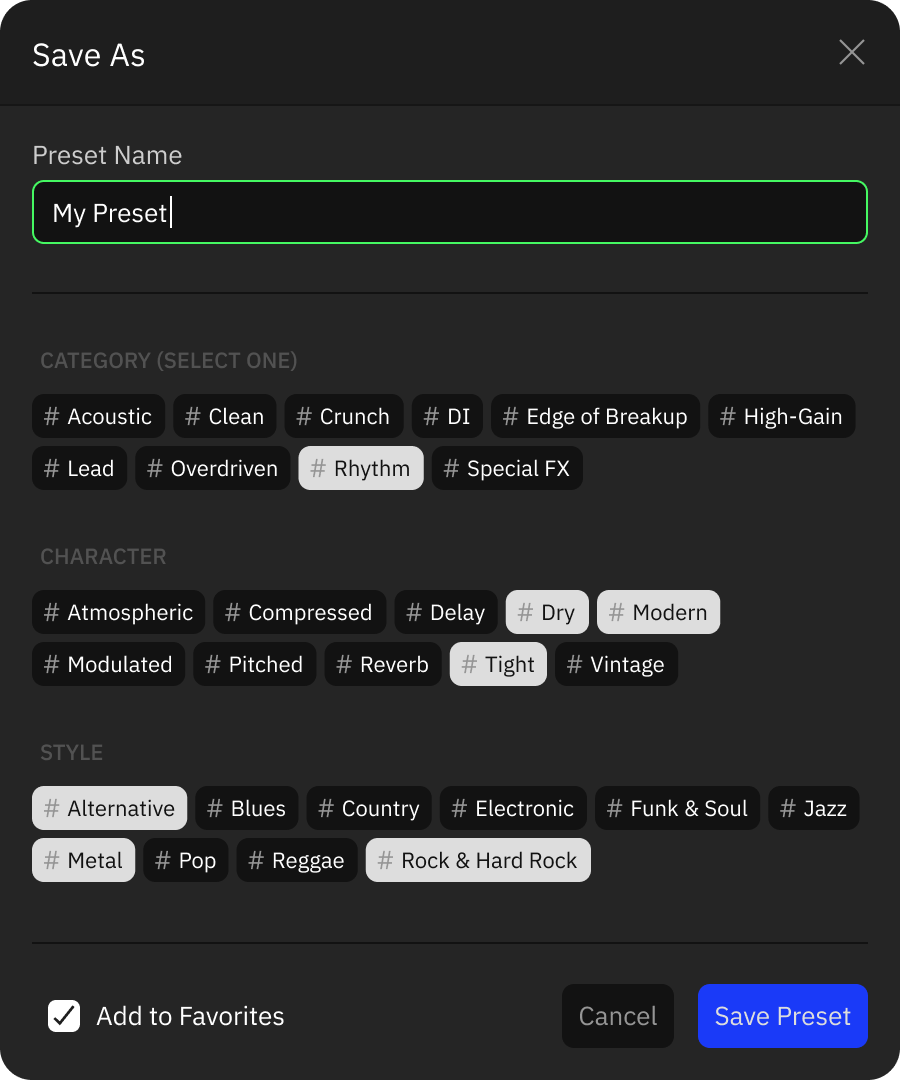
When creating or modifying sounds, you can save them as presets to access later on. The Save As window makes it easy to name, tag, and organize your presets.

Save As window with some preset tags selected

When saving a preset, the Save As window will appear with the following options:

  • Preset Name: Enter a custom name for your preset. By default, the name of the preset will match the name of the edited preset.

  • Tags: Add tags to make your presets easier to find. There are three types of tags available, each with fixed options: Category, Character, and Style.

    • Category: Choose a main category to describe the preset’s overall type (e.g. Clean, High-Gain, Lead, Rhythm, etc.) Only one category can be selected per preset.

    • Character: Add descriptive tags that define the tonal qualities or effects of the preset (e.g. Compressed, Atmospheric, Delay, Modulated, etc.) Multiple character tags can be applied.

    • Style: Select the musical style or genre the preset fits best (e.g., Metal, Pop, Jazz, Rock & Hard Rock, etc.). Multiple style tags can be applied.

  • Add to Favorites: Tick this box to automatically add the new preset to your favorites list for quick access.

About Tags

Factory presets are already tagged by default. For user presets, tags should be added manually during the saving process. Appropriate tagging helps when searching and filtering presets in the Preset Browser.

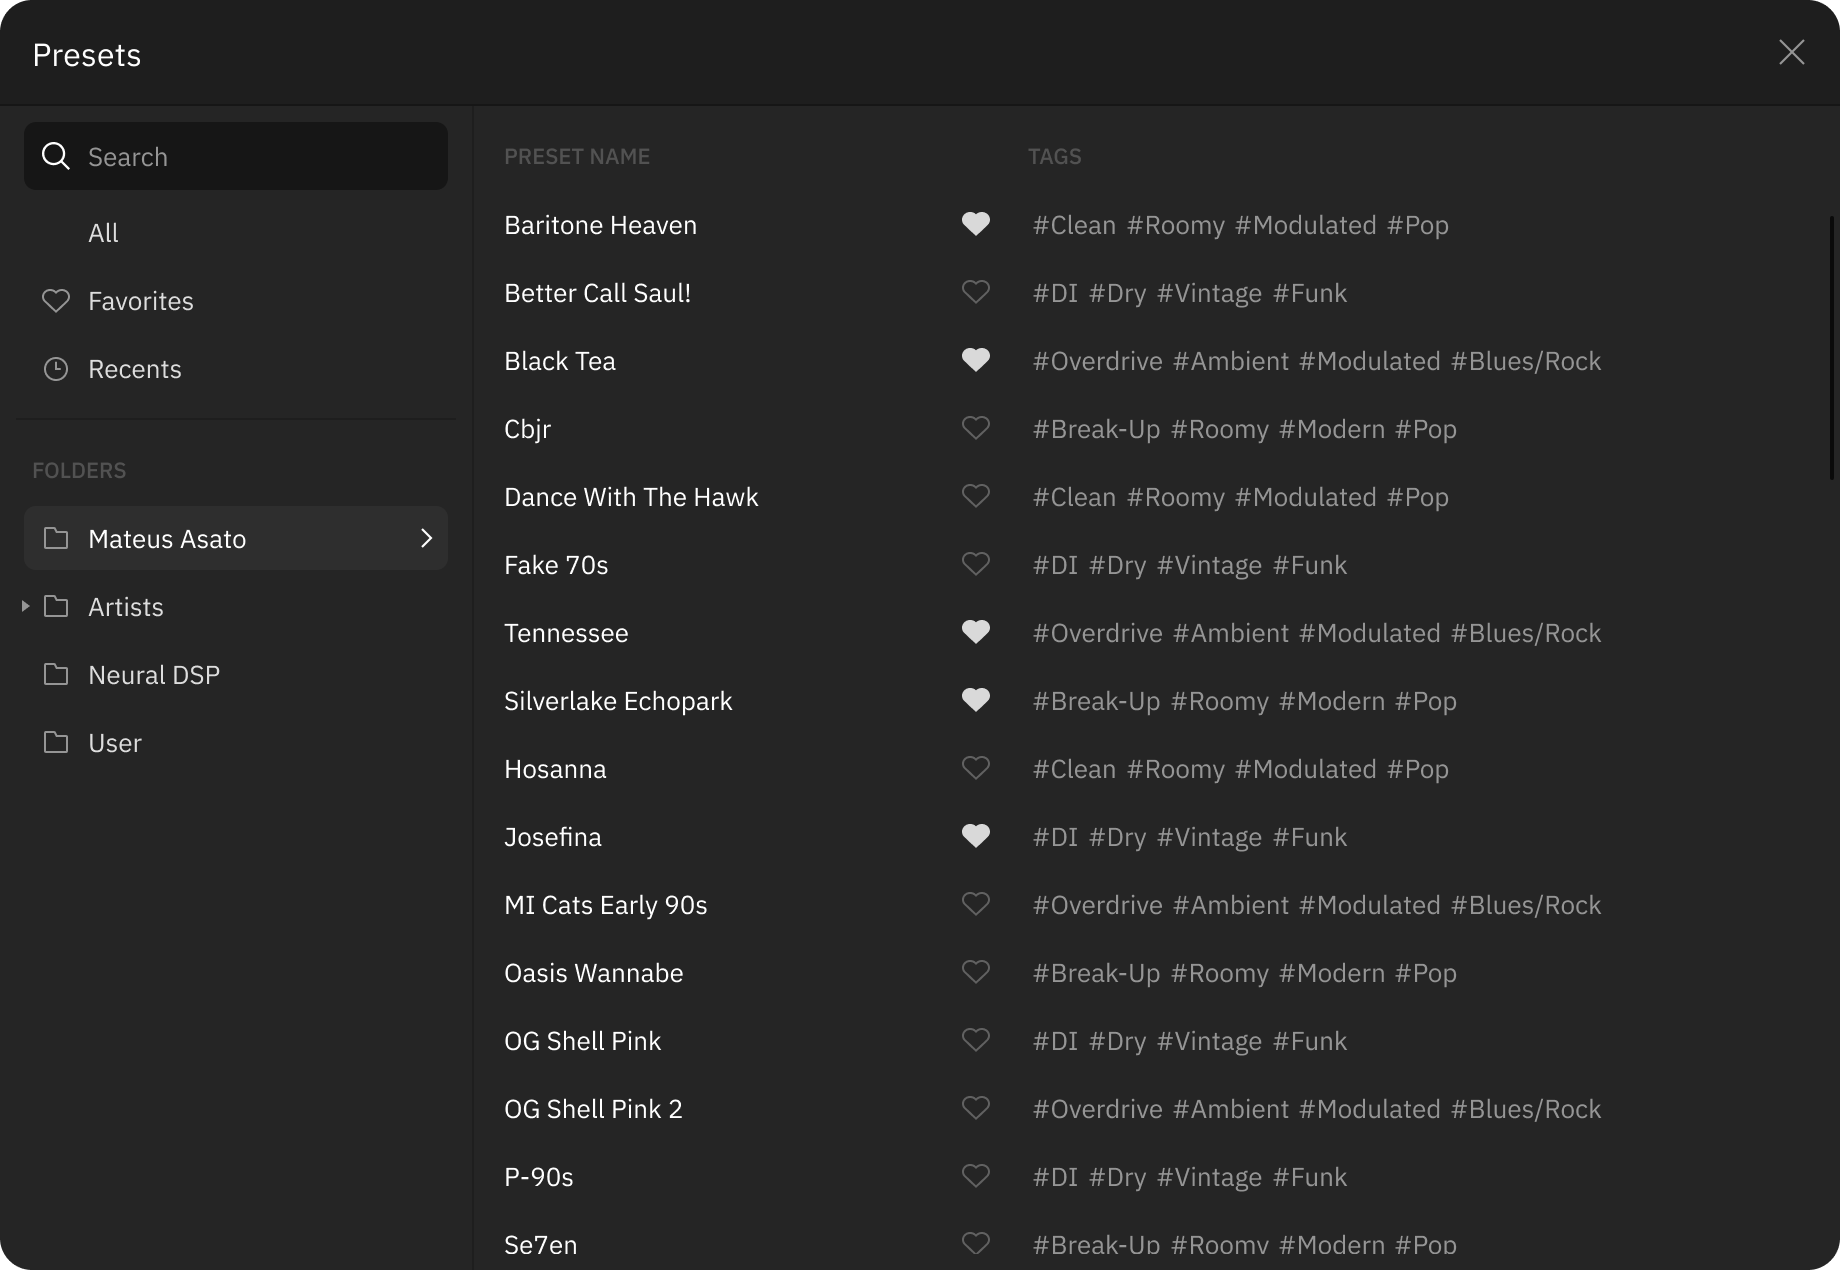
Preset Browser

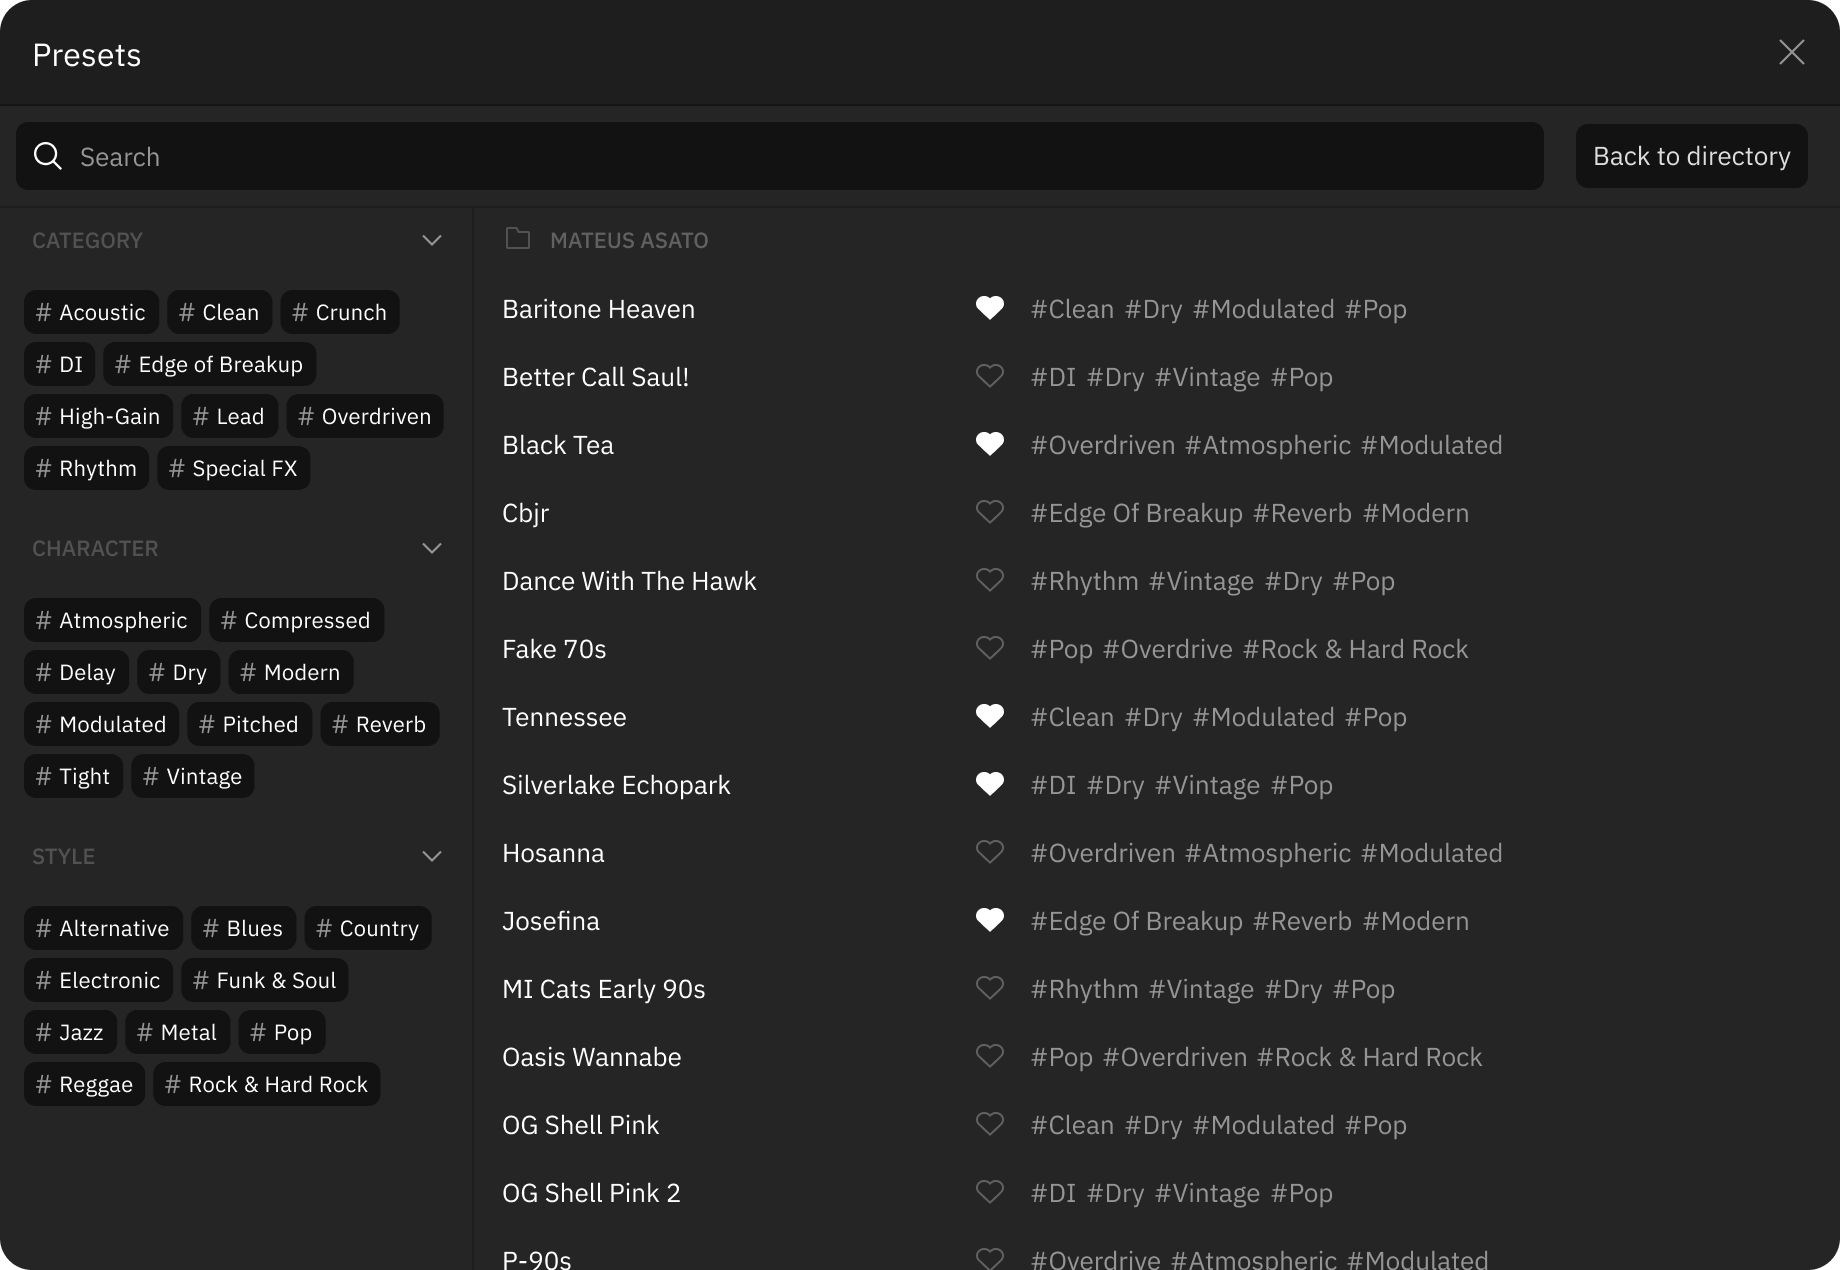
Our plugins include a preset browser that makes it easier to organize, search, and filter presets. It can be accessed by clicking the Folder icon next to the Preset dropdown. The browser has two main views.

Directory View

Directory view of Preset Browser

The Directory view is a list of presets in their specific folder. In addition to all specific folders, you can see All, Recent and Favorite presets. The list includes Tags to help describe what each preset sounds like.

Search view

Preset browser search window

The Search view is accessed by clicking the Search Bar. You can either type in queries, or use the Tags to narrow down your search. The Locate icon will take you back to the folder where that specific preset is, for editing purposes.

Tuner

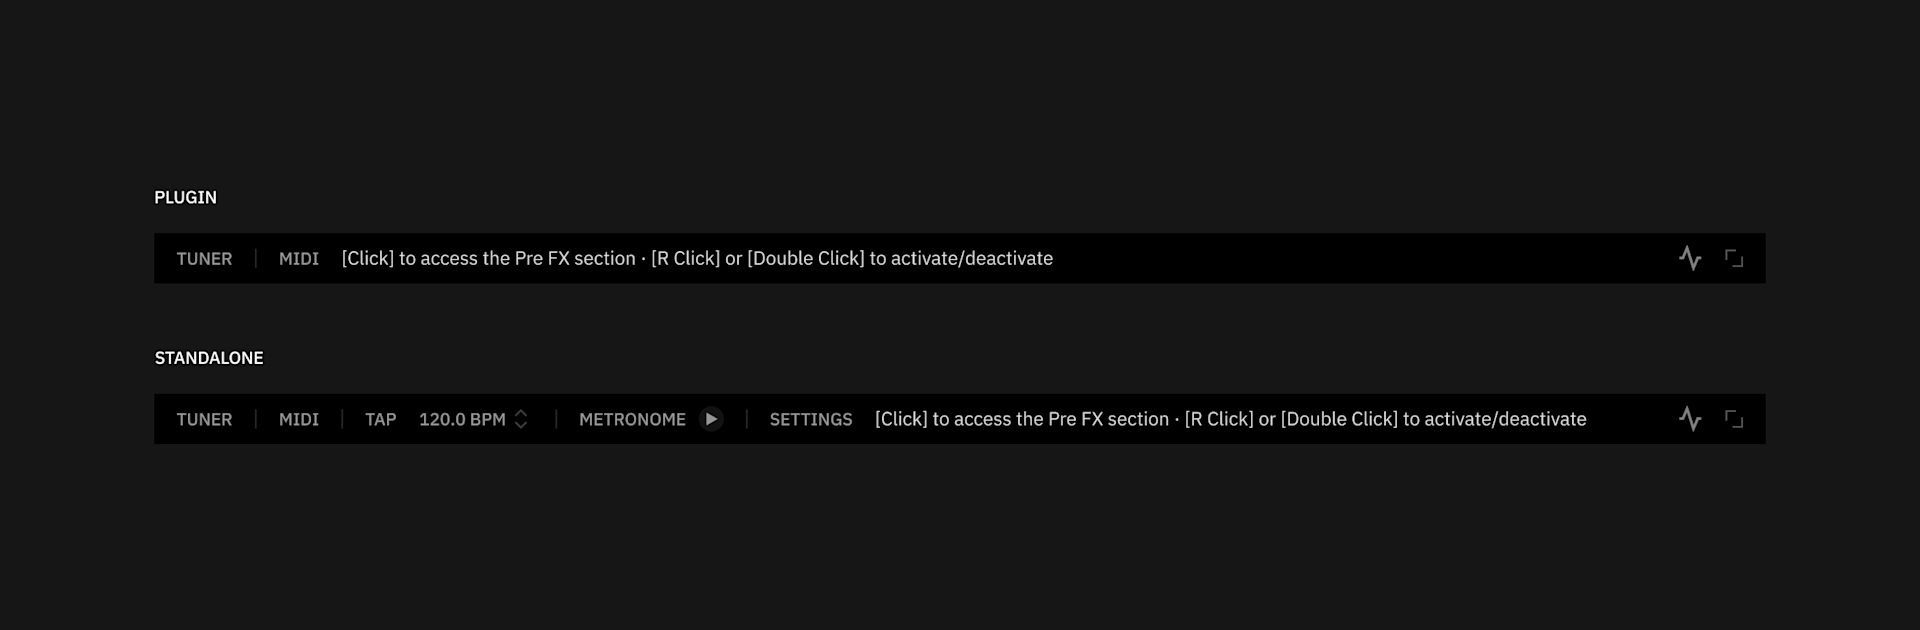
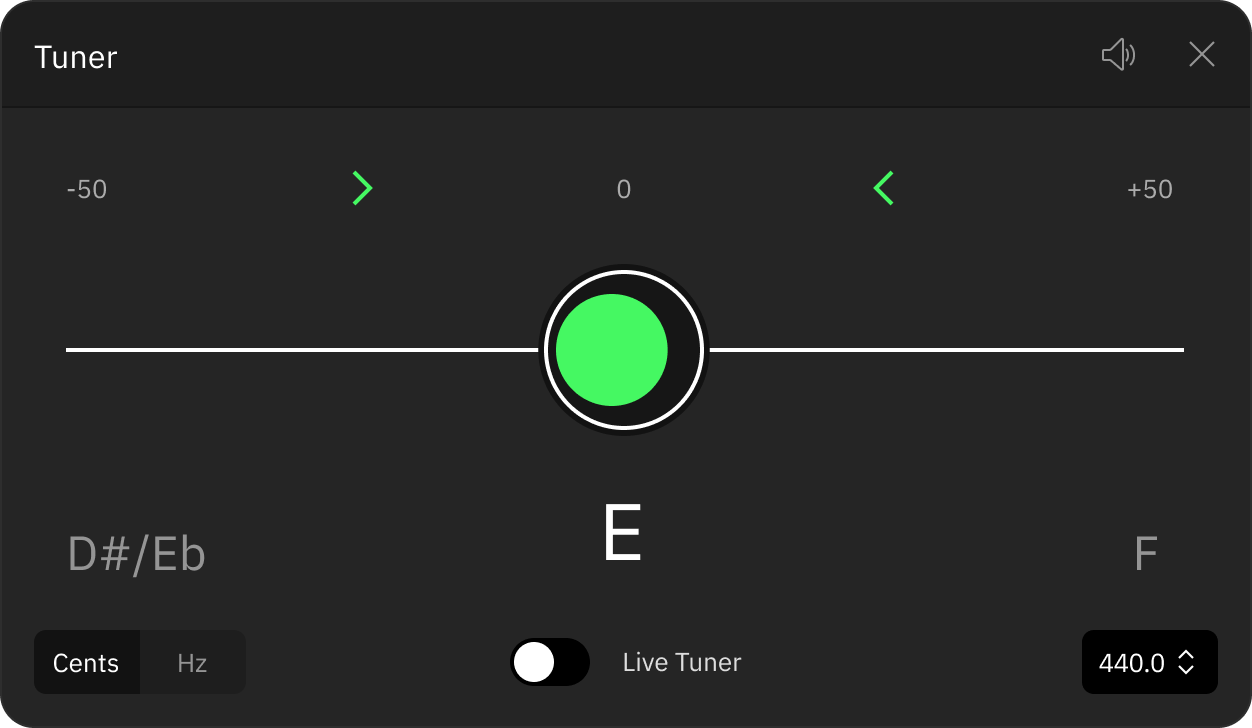
Both standalone and plugin versions feature a built-in chromatic tuner. It works by detecting the pitch of the note that is being played and then displaying it on the screen.

Tuner window
  • Tuning: Displays the note that is being played and its current pitch.

  • Mute: Mutes the DI signal monitoring. This setting is recalled upon opening new instances of the plugin.

  • Mode: Toggles the pitch values between Cents or Hz.

  • Live Tuner: Enables a compact tuner that is displayed in the footer. You can also use ⌘ or CTRL + Click on the Tuner button in the footer to toggle the Live Tuner on and off.

  • Frequency: Adjusts the reference pitch (420 - 460 Hz)

Metronome

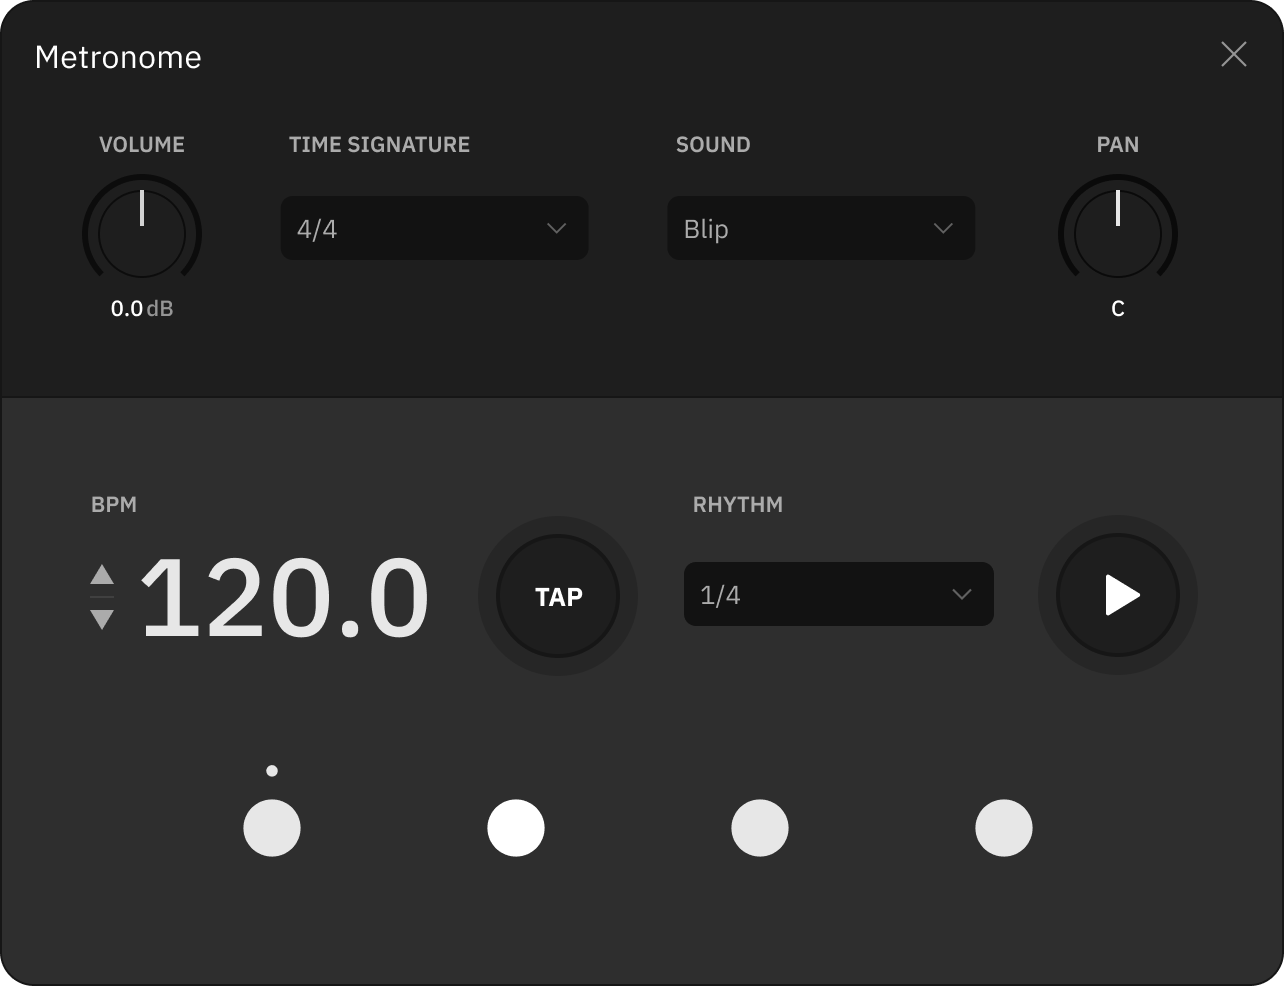
The standalone app features a built-in Metronome. It works by producing a steady pulse to help you to practice and play in time. Playback for the metronome can be quickly started or stopped by clicking the Play button in the bottom bar.

Metronome window

  • Volume: Adjusts the output level of the metronome's playback.

  • Time signature: Navigate time signatures. Includes compound and complex variations.

  • Sound: Set your preferred sound for the metronome beats.

  • BPM: Displays the current beat tempo. Click-and-drag it up and down, or use the arrows, to increase or decrease the BPM value (40 - 240 BPM).

  • Pan: Adjust the output panning of the metronome beats.

  • Tap: Set the tempo by clicking. The BPM value is set as the interval between the last two clicks.

  • Rhythm: Determines how many pulses can be heard per beat.

  • Beat LEDs: Click to customize the different accents, or whether a beat will be played or not.

MIDI

Neural DSP plugins can be controlled by external MIDI devices and DAW commands. This allows you to connect MIDI controllers such as footswitches and expression pedals to control parameters and UI components within the plugin. Any MIDI device capable of sending Control Change, Program Change or Note messages to your computer will be compatible with Neural DSP plugins.


MIDI Device setup

Follow these steps to set up a MIDI controller to use with our plugins:

  1. Connect your device to your computer. Depending on your device, this might be done via USB (straight into your computer using a USB Cable) or MIDI Out to MIDI In (into a MIDI interface using a MIDI cable).

  2. Although most MIDI controllers are plug-and-play devices, some require driver software to be installed before they can be used. Double-check the user manual for your specific controller to see if this is necessary.

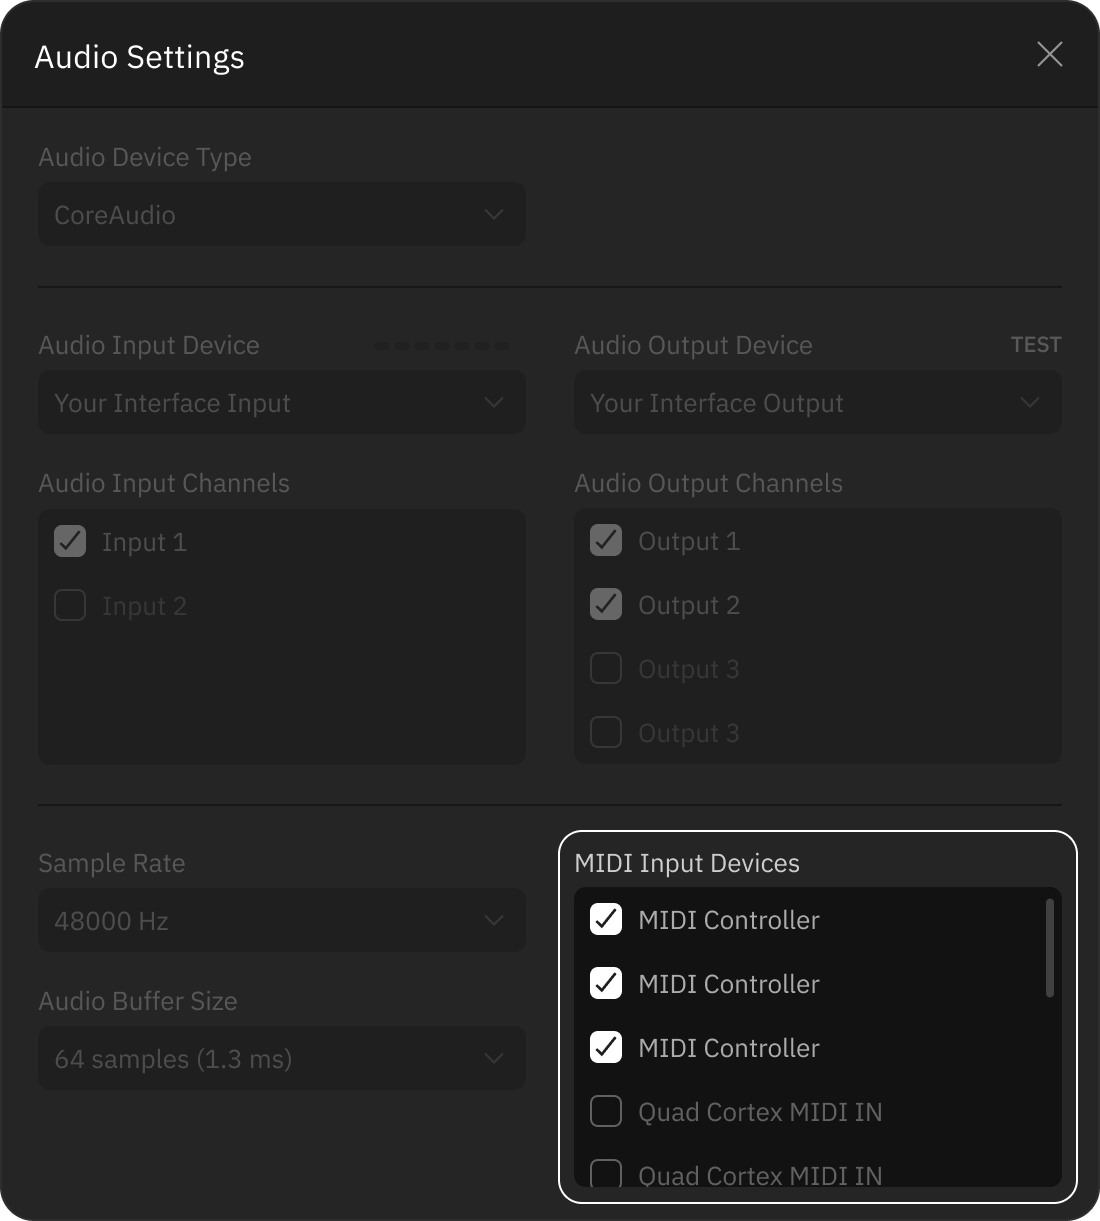
  3. Once your MIDI controller is connected to your computer, check that it is recognized by your plugin standalone app. Click Settings in the bottom bar and check if the controller appears in the MIDI Input Devices menu.

  4. To use MIDI controllers with a DAW, look for its MIDI settings menu and enable your MIDI controller as a MIDI Input device. (Optional)

Audio settings with MIDI Input Devices highlighted


MIDI Learn

Using the MIDI Learn function is the quickest and easiest way to map MIDI messages on your plugin. To do so:

  1. Right-click a parameter that you wish to control and click Enable MIDI Learn.

  2. Press the button or move the pedal/slider on the MIDI controller that you want to use to control that parameter. The plugin will then automatically assign the button or pedal to the chosen parameter, which will now be highlighted in the interface.

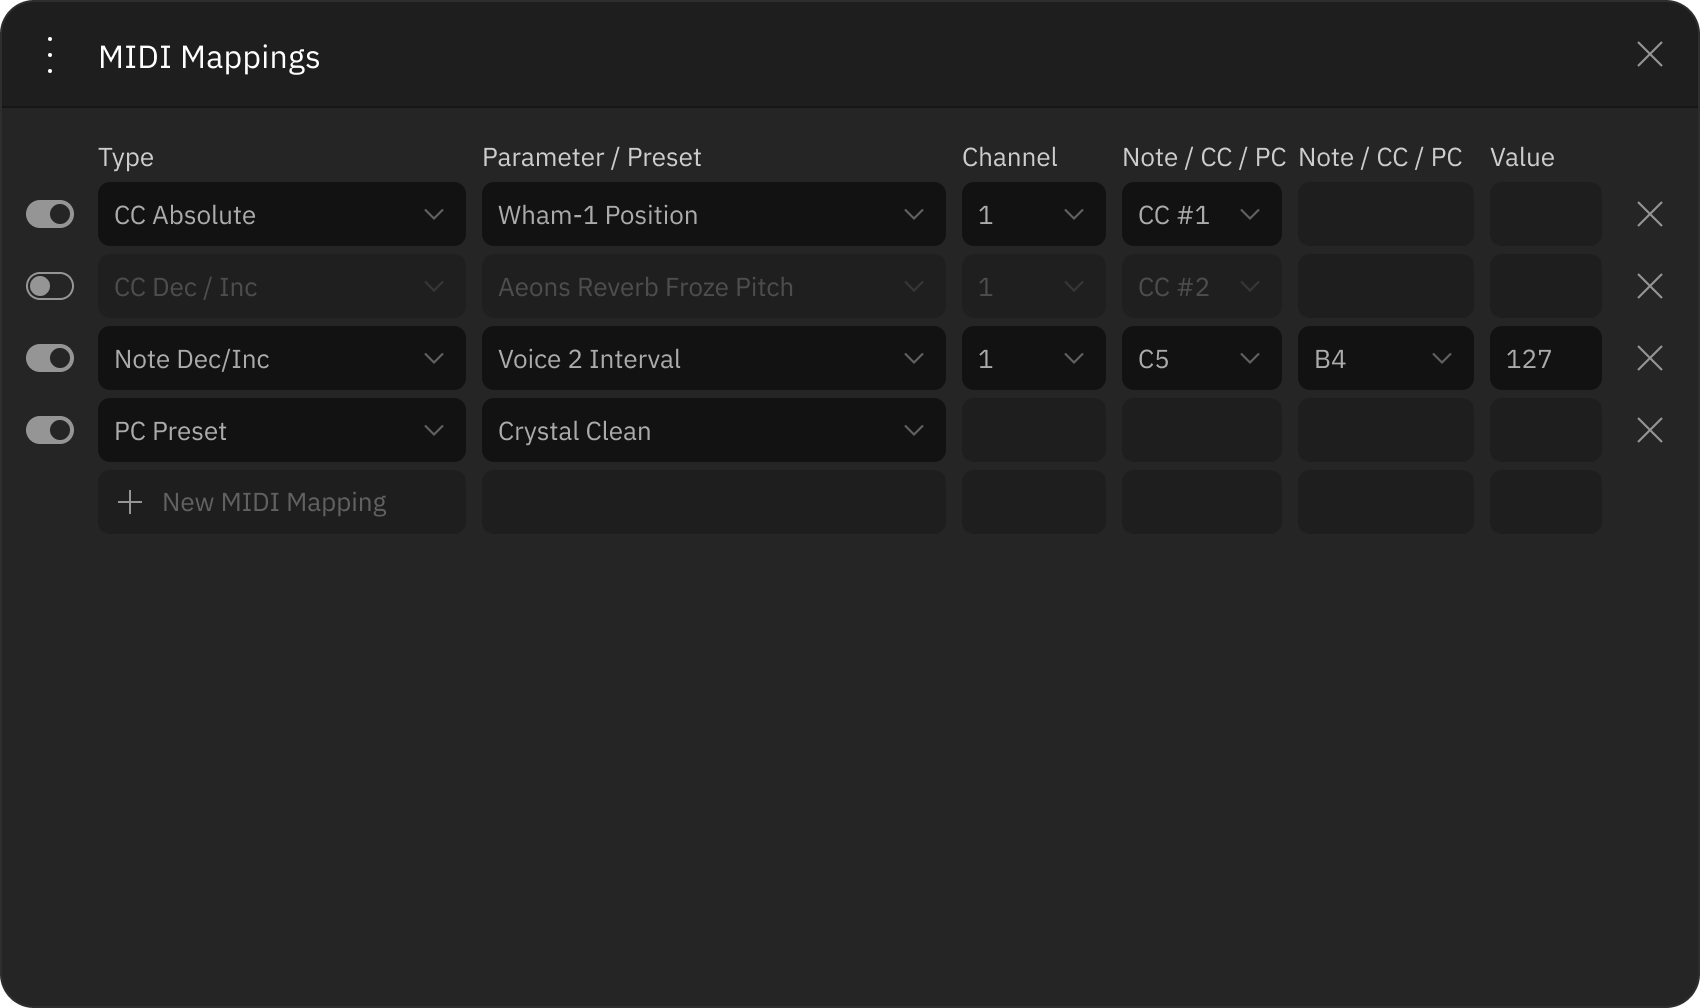
  3. All the assigned MIDI messages will be registered in the MIDI Mappings window in the bottom bar.


MIDI Mappings

In the MIDI Mappings window, you can view and modify all the MIDI messages you have assigned to your plugin.

To add a new MIDI message, click on “New MIDI Mapping” located on the left side of the empty row. This will allow you to manually map a MIDI message to a parameter. You can also save and load MIDI Mapping Preset XML files.

midiMapping window

Making your Mac® a Bluetooth MIDI host

  1. Open the “Audio MIDI Setup” app.

  2. Click on Window > Show MIDI Studio.

  3. In the MIDI Studio window, click on “Open Bluetooth Configuration...”. Set your Bluetooth MIDI device peripheral in pairing mode.

  4. Select the peripheral in the list of devices, then click “Connect”.

Once your Bluetooth MIDI controller is connected to your computer, check that it is recognized by your plugin standalone app. Click on Settings in the Footer and check if the controller appears in the MIDI Input Devices menu.

04
Installation and Setup

New to plugins? This is your guide to the basics. Read on to learn what you need to start using your Neural DSP plugin.

Basic requirements

Getting set up is very simple, but there are a few things you will need before you begin:

  1. Any Windows® PC or Apple Mac® capable of multitrack audio processing. Make sure your computer meets the minimum required specifications:

    Mac

    • Intel Core i3 Processor (i3-4130 / i5-2500 or higher)

    • Apple Silicon (M1 or higher)
      8GB of RAM or more

    • macOS® 13 Ventura (or higher)


    Windows
    • Intel Core i3 Processor (i3-4130 / i5-2500 or higher)

    • AMD Quad-Core Processor (R5 2200G or higher)

    • 8GB of RAM or more

    • Windows® 10 (or higher)

  2. An audio interface to connect your instrument to your computer via USB, Thunderbolt or PCIe. Neural DSP hardware such as Quad Cortex can be used as USB interfaces.

  3. Studio monitors or headphones. Having the sound play back from the computer speakers is not recommended due to quality and latency issues.

  4. iLok License Manager: A free app that allows you to manage all your plugin licenses in one place and transfer them between different computers.

Supported DAWs

DAWs, short for “Digital Audio Workstations”, are music production software programs that have a comprehensive set of tools for recording, editing, and mixing digital audio.

All Neural DSP plugins include a standalone app version, meaning that you don’t need a DAW to use them. However, if you are planning on recording your playing, you will need to install your plugins to your DAW.

A complete installation setup will automatically install all the different plugin formats:

APP: Standalone app.
AU
: Plugin format developed by Apple for use on macOS®.
VST2: Multi-platform format compatible across multiple DAWs on both macOS® and Windows® devices.
VST3: An improved version of the VST2 format that only uses resources during monitoring/playback. It’s also available on both macOS® and Windows® devices.
AAX: Pro Tools native format. It can only be used on Avid Pro Tools.

Most DAWs automatically scan for new plugins upon launch. If you cannot find the plugins in your DAW’s plugin manager, manually rescan the plugin folder to locate the missing files. Our plugins are compatible with a wide range of DAWs. Below is a list of DAWs we have tested:

Ableton Live 12 (VST, Audio Unit)
Pro Tools 2024 (AAX)
Logic Pro 11 (Audio Unit)
Cubase 13 (VST)
Reaper 7 (VST, Audio Unit)
Presonus Studio One 7 (VST, Audio Unit)
Reason 12 (VST)
FL Studio 21 (VST)
Cakewalk by Bandlab (VST)

Note that even if your DAW is not listed above, it might still work. If you encounter any compatibility issues, don’t hesitate to contact support@neuraldsp.com for further assistance.

Once your plugins are available in your DAW, create a new project, insert a new audio track, arm it for recording, and load the plugin onto the track.

Default file locations

Neural DSP plugins will be installed in default locations for each plugin format unless a different custom location is selected in the process.

MacOS®

By default, the plugin files are installed in the following directories: 

AU: Macintosh HD/Library/Audio/Plug-ins/Components
VST2: Macintosh HD/Library/Audio/Plug-ins/VST
VST3: Macintosh HD/Library/Audio/Plug-ins/VST3
AAX: Macintosh HD/Library/Application Support/Avid/Audio/Plug-ins
Standalone App: Macintosh HD/Applications/Neural DSP
Preset Files: Macintosh HD/Library/Audio/Presets/Neural DSP
Settings Files: <User Folder>/Library/Application Support/Neural DSP
Manual: Macintosh HD/Library/Application Support/Neural DSP


Windows®

By default, the plugin files are installed in the following directories: 

VST2: C:\Program Files\VSTPlugins
VST3: C:\Program Files\Common Files\VST3
AAX: C:\Program Files\Common Files\Avid\Audio\Plug-Ins
Standalone App: C:\Program Files\Neural DSP
Preset Files: C:\ProgramData\Neural DSP
Settings Files: C:\Users\<Your profile>\AppData\Roaming\Neural DSP
Manual: C:\Program Files\Neural DSP

License activation

In order to use Neural DSP plugins, you will need an iLok account and the iLok license Manager application installed on your computer. iLok is completely free to use.

iLok setup

  1. Go to iLok’s account registration page and fill out the required fields in the registration form.

  2. A confirmation email will be sent to the email address provided during registration. Open the confirmation email in your inbox and click on the verification link.

  3. Download iLok License Manager and install it on your computer. After that, open the app and login using your iLok account email address and password.

  4. Link your iLok account to your Neural DSP account by entering your iLok username in your account settings. This will ensure that purchased licenses are deposited automatically in your iLok account after checkout.


Once a plugin is installed and launched for the first time, an iLok dialog will appear.

  • If you want to start the 14-day trial: Click the Try button. You will be prompted to enter, or confirm your account information and the plugin trial will begin.

  • If you've purchased the plugin: Click the Activate button. Login to your iLok account when prompted and activate the license on your machine. Your Perpetual License then will be activated.


You do not need an iLok USB dongle to use Neural DSP plugins as they can be activated directly onto computers. Note that a single license can be activated on 3 different computers at the same time as long as the same iLok account is used on all of them.

Licenses can be deactivated from computers that are not in use and transferred to other devices. This process can be repeated indefinitely.

Setting up your plugin

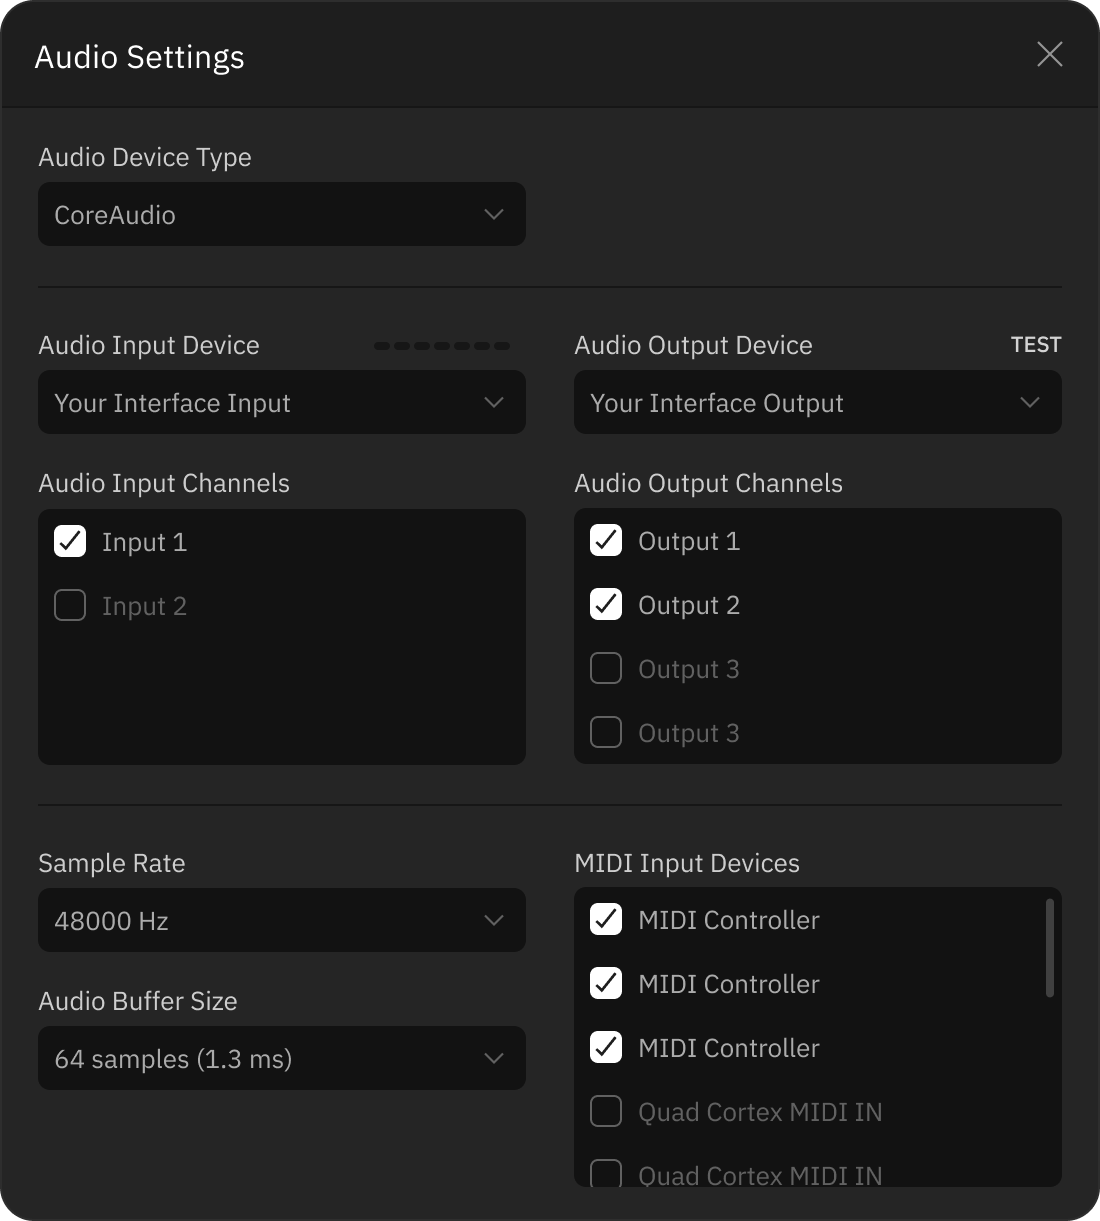
Once you have installed and activated your plugin, you can set it up and start using it. To get started, launch the plugin’s standalone app and click Settings in the footer.

Standalone plugins' Settings screen

Use the following settings to optimize your plugin’s performance and achieve the best possible tone.

  • Audio device type: All available audio drivers on your computer are listed here. For most audio recording applications on Windows®, ASIO is the preferred driver format. CoreAudio is the recommended option on macOS®.

  • Audio device: Choose the audio interface that your instrument is connected to.

  • Audio input channels: Select the interface input(s) your instrument is connected to.

  • Audio output channels: Select the interface output(s) that you use for monitoring.

  • Sample rate: We recommend 48000 Hz unless a different rate is required for your session.

  • Audio buffer settings: Set it to 128 samples or lower. Increase the buffer size to 256 samples or higher if you experience performance issues.

What is latency?

When monitoring plugins in real-time, you may experience a slight delay between playing a note on your instrument and hearing the sound through your headphones or studio monitors. This delay is called latency. Decreasing the buffer size reduces the latency, but demands more from your computer’s processing power.

How do I change these settings in a DAW audio session?

To set up audio settings for plugins within a DAW, open the audio settings section of your DAW’s preference menu. From there, you can select your audio interface, set the I/O channels, adjust the sample rate and buffer size.

Uninstalling Neural DSP software

To uninstall Neural DSP software on macOS®, delete the files manually in their respective folders.

On Windows®, Neural DSP software can be uninstalled either from the Control Panel or by selecting the “Remove” option from the setup installer.

Get in touch

Neural DSP Technologies is happy to provide professional technical support via email to all registered users, absolutely free of charge.

Before contacting us, we recommend searching our support and knowledge base sections below to see if the answer to your question has already been published.

Support

Knowledge Base

If you cannot find a solution for your problem on the pages above, please contact support@neuraldsp.com to help you further.


Corporate contact

Neural DSP Technologies OY
Merimiehenkatu 36 D
00150, Helsinki, Finland

05
Acknowledgements

Special thanks to...

Aaron Geldert / Adam Diakowski / Adam “Nolly” Getgood / Adnan Ayub / Aleksi Peussa / Avihai Eini / Brian Arne / Christopher Walker / Craig Rollo / Daniel Blanco Bernales / Domenico Pellegrino / Felix Eichas / Francisco Cresp / François Barrillon / Greg Ramirez / Henri Penttinen / Jacopo Lovatello / Joonas Tuovinen / Juan Herrera / Jussi Kaloinen / Jussi Saarelainen / Rafael Castillo / Tantep Sinjanakhom / Tarek Al Sibai / Theofilos Petsas / Thomas Sherson / Yevgen Chebotarenko

Beta testing

Aadil Panhwar / Aaron Williams / Alex Meunier / Brock Jon / Charlie Robbins / Chris Alford / Chuck Hirstius / David Porter / Derya Nagle / Matias Baeza / Mykyta Perfiliev / Patryk Siewiera / Phil Pluskota