NeuralDSP logoNeuralDSP logo
Mantra

01
Mantra

Vocal production is rarely simple. Multiple plugins. Complex chains. Latency.

Mantra changes that.

Pitch correction, noise gate, de-esser, compressors, saturation, harmonies, and effects - all in one plugin.

No cluttered sessions. No complicated routing. Just a smarter, faster, and more musical workflow.

Record, mix, and shape vocals from start to finish without ever breaking your flow. It's effortless to use, and it sounds incredible.

We proudly present to you, Mantra.

Video walkthrough

02
Plugin components

The different sections in the Plugin are accessible via the top navigation.

Correction Section

This section consists of seven Processing Modules in series which can be used either separately or combined. The Visualizer consists of a central display area that provides real-time feedback of your audio signal, as well as information related to the Module you have currently selected. The Processing Modules are arranged along the bottom section of the user interface for easy access and control.

Clicking on any adjustable parameter activates Focus, represented by a frame surrounding the control, enabling keyboard-based interaction for precise, accessibility-oriented control.

While a parameter is in Focus the following keyboard functions are available

Value Entry: Type a numeric value and press Enter to apply it.

Arrow Keys: Use the ↑ / ↓ or ← / → keys to increase or decrease values on vertical and horizontal sliders.

Tab: Moves focus to the next parameter.

Shift + Tab: Moves focus to the previous parameter.

Tune - Real-time pitch correction module

  • Correction Meter: Shows the amount of pitch correction applied in cents. 

  • Attack Slider: Determines how fast the pitch correction is applied to the signal. Higher values apply more pitch correction.

  • Retune Switch: Activate/deactivate the pitch correction. Disabling Retune still allows you to use the Pitch and Formant Shift functions. 

  • Tolerance Slider: Adjusts the sensitivity of the pitch analysis. Lower values increase the pitch correction sensitivity.

  • Humanize Slider: Dynamically reduces the correction applied based on the note duration to maintain a more natural modulation. Increase to get a more human feeling in the pitch correction.

  • Pitch Shift Slider: Pitch the signal up or down by semitone increments (Chromatic) or constant intervals (Scale)

  • Formant Shift Slider: Adjusts harmonic frequencies applied to the signal without affecting the pitch.

Note

The Tune module is disabled when the plugin’s Input Mode is set to Stereo.

Gate - Noise gate module

  • Gate Meter: The indicator turns light blue when the gate is closed and grey when open. 

  • Opening Slider: Sets the primary threshold level above which the gate opens, allowing the signal to pass through. Higher values increase sensitivity.

  • Closing Slider: Sets the secondary threshold level at which the gate will close.

  • Hold Time Slider: Determines how long the gate remains open after the signal reaches the Opening threshold. Higher values result in a longer open duration.

Sculpt - Automatic EQ and dynamic processing module

Sculpt is your fast-track to clarity and balance. It analyzes the frequency content of the input audio and applies a customized EQ curve to match your chosen target response. Harsh frequencies are smoothly tamed, and a spectral compressor helps control dynamics and reduce sibilance.

Click Start analysis and begin playing a portion of your vocal signal for a few seconds, so that Sculpt can analyze its frequency content.

Note

Sculpt analysis data is saved per plugin instance and is not linked to Presets. Sculpt parameter adjustments made after the analysis, however, can be saved and recalled by Presets. To reuse the same analysis on multiple tracks, duplicate the plugin instance from one track to another.

  • Target Dropdown: Displays the selected target curve. Click to open a dropdown list of different target curves to find the best fit for your vocals.

  • Reset Switch: Undoes the analysis. Use this when you want to re-analyze the vocals and update the EQ curve.

  • EQ Slider: Adjusts the overall EQ amount applied to the signal. This acts as a global control to scale how strongly Sculpt affects your vocal timbre.

  • Tilt Slider: Globally tilts the Sculpt EQ curve to brighten or darken the tone.

  • Dyn Slider: Controls the amount of spectral compression applied to match the target curve (Only available in Mixing mode).

  • Output slider: Adjusts the output level of the Sculpt module.

De-Esser - Sibilance suppressor module

Designed to reduce harsh sibilant sounds (such as “s” and “t”) commonly found in the upper frequency range of vocals, the De-Esser works by isolating a targeted frequency band using high-pass and low-pass filters. This isolated band serves as a trigger to attenuate excessive sibilance when detected.

  • De-Esser Meter: The meter shows the amount of sibilance attenuation applied to the signal, measured in decibels (dB).

  • Amount Slider: Controls how much de-essing is applied to the signal. Adjust to balance the effective sibilance reduction without overly dulling the vocals.

  • Intensity Slider: Sets the aggressiveness of the de-essing effect. Choose between Soft, Medium, or Hard settings to best suit your vocal track.

  • Low Cut Slider: Sets the lowest frequency at which the module begins detecting sibilance.

  • High Cut Slider: Sets the highest frequency at which the module stops detecting sibilance.

  • Filter Link Switch: Click to maintain a fixed range between the Low Cut and High Cut frequencies when adjusting either one. 

  • Monitoring Switch: Isolates and plays back only the detected sibilances.

EQ - Parametric Equalizer module with multiple filters

  • Low Shelf EQ Band: Boosts or attenuates frequencies below the selected frequency with a gradual slope.

  • EQ Bands 1-4: Set of Bell/Peaking filters used to boost or attenuate specific range of frequencies.

  • High Shelf EQ Band: Boosts or attenuates frequencies above the selected frequency with a gradual slope.

  • High Cut EQ Band: Removes high-frequency content from the signal, allowing frequencies below the cutoff to pass through. 

  • Frequency Slider: Adjusts the frequency of the selected band, ranging from 20Hz to 20kHz. 

  • Gain Slider: Adjusts the gain level of the selected EQ band. Increase to boost the frequency level, decrease to reduce it. 

  • Q Slider: Adjusts the bandwidth (Resonance) of the selected EQ band. Available for EQ Bands 1–4 and Shelves. Higher Q values narrow the frequency range

  • Audition Switch: Soloes the selected EQ band, muting all others. Useful for isolating and fine-tuning specific frequencies.

  • EQ Band Bypass Switch: Activates/deactivates the selected EQ band. Can also be controlled by Right clicking a band in the Visualizer.

  • Display Range Switch: Sets the maximum visible gain scale for EQ Curve. Can be set to either 12dB (for fine adjustments) or 24dB.

  • Output Gain Slider: Adjusts the output level of the EQ module.

Notes

Selecting the EQ will display the EQ Curve on the Visualizer. All bands can be controlled from here by dragging and pressing different modifiers:

Frequency: Option/Alt

Gain: ⌘/Ctrl

Q: Scroll wheel/gesture

Audition: Shift

Reset band: Double click

Bypass: Right click

Compressor - Multimode compressor module

The Compressor module provides versatile dynamic range control, inspired by both analog and digital designs widely used in vocal production. It features three distinct modes, allowing you to shape compression to match any musical style.

  • Type: Toggle between different compressor types: Tube (Based on the Teletronix® LA2A®), Stress (Based on the Empirical Lab® Distressor®), Multi (Multi-Band Compression).

  • Compression Slider: Adjusts the amount of compression applied to the signal.

Tube

Smooth, classic compression with added harmonic distortion and slower time constants. Perfect for subtle gain control during vocal tracking.

  • Mode: Toggle between softer (Comp) and more aggressive (Limit) compression ratios.

  • Tube Gain: Sets the amount of distortion applied to the signal. Automatically compensated in loudness.

Stress

FET-style compression with added harmonic distortion at higher settings, ideal for a gritty, aggressive sound.

  • Ratio: Adjusts the compression intensity by selecting between three different reduction ratios (4:1, 6:1, or 10:1).

  • Time: Scales the duration of the attack and release for Faster or Slower response.

Multi

Modern multiband compressor that offers both upward and downward compression, ideal for precise and aggressive dynamic control and shaping.

  • Preset: Sets different compression values for the Low, Mid and High frequency bands (OTT, Balanced, or Mid Focused).

  • Time: Scales the duration of the attack and release for Faster or Slower response.

Note

Each compressor Module has its own dedicated Compression and Output sliders.

Saturation - Multimode distortion module

The Saturation module offers a wide range of tonal options, ideal for adding warmth, character, or grit to your vocals. With three distinct modes, you can adjust the saturation to suit various musical styles and production needs.

  • Type: Toggle between saturation types: 

    • Tape: Classic saturation of an overdriven tape machine, adding vintage charm to the signal.

    • Tube: Hardware tube distortion unit (Inspired by the Thermionic® Culture Vulture® in Triode mode), delivering smooth, harmonic warmth.

    • Digital: More aggressive, modern tone with sample rate reduction and subtle bit crushing.

  • Low Cut Slider: Prevents low-frequency content from being affected by the saturation.

  • Gain Slider: Adjusts the amount of saturation applied to the input signal. Higher values increase saturation intensity. The saturation gain is automatically compensated to maintain a consistent output level, regardless of the setting.

  • Output Slider: Adjusts the output level of the Saturation prior to the Mix control.

Harmonies Section

The Harmonies section features a central Visualizer that displays the DI Level in the center, along with the various harmony Voice Tokens positioned across the stereo field. The vertical placement of each Voice Token indicates Level, while the horizontal placement reflects Width/Pan values.

Note

Voice Tokens can be controlled directly from the visualizer:

Level and Width/Pan: Click and drag

Reset: Double click

Bypass: Right click

Voicing Library

“Voicing” refers to the arrangement of musical notes in a chord structure. The Voicing Library provides a wide collection of popular chord voicings. Selecting a voicing from the list will automatically assign interval values to the voice pairs.

  • Triads: Set of three notes stacked in consecutive thirds.

  • Seventh chords: Combination of a triad and an interval of a seventh.

  • Drops: Voicings created by dropping notes of a chord one octave down.

  • Tensions: Notes that serve as extensions of a seventh chord.

  • Tone Clusters: Set of notes stacked in consecutive semitones.

  • Others: A selection of suspended voicings, power chords, and unisons.

Note

The voicing library is not available when the Scale is set to Chromatic.

Harmonies list

By default, voices in Mantra are managed in 4 Pairs (Left/Right).

  • Main Vocals mute: Mute/Unmute the main Vocals

  • MIDI Mode Switch: In this mode, incoming MIDI notes are assigned to individual voices or voice pairs. Ideal for real-time harmony generation using a MIDI clip or live MIDI input, allowing harmonies to follow chord progressions dynamically. You can read more about this in the corresponding chapter.

  • Pair 1-4 Switches: Click to select a voice pair for editing. Right click vocal pairs to activate/deactivate them.

  • Link/Unlink Switches: Sets whether voices in each Pair will be edited together or independently.

  • Voice Audition Switch: Click to isolate the selected voice pair. When unlinked, each voice can be soloed independently.

  • Main Vocals Level: Adjusts the Main Vocals level.

Voice Pair parameters

  • Semitone/Interval Slider: Adjusts pitch of the selected voice(s).

    • Chromatic Scale: Pitch ranges from -12 to +12 semitones. 

    • Major/Minor Scales: Pitch is set using musical intervals.

  • Octave Switch: Shifts the selected voice(s) one octave up or down. Octaves are also indicated in Voice Tokens by + and - icons.

  • Level Slider: Controls the volume level of the selected voice(s).

  • Width/Pan Slider: Adjusts stereo width (linked) or panning (unlinked) of the selected voice(s).

  • Formant Shift/Formant Offset slider: Adjusts the harmonic profile (formants) of the selected voice(s) without altering its pitch (Mixing mode only).

  • Bypass Switch: Click to activate/deactivate the selected voice(s).

Global Settings

  • Randomize Pitch Slider: Increase to apply random pitch variation to the voice pairs, adding subtle to pronounced detuning.

  • Randomize Time Slider: Increase to apply random timing variation to the voices, introducing slight delays between them.

  • Low Cut Slider: Increase to remove low-frequency content from the voices.

  • High Cut Slider: Decrease to remove high-frequency content from the voices.

  • Global Level Slider: Scales the output level of all voices simultaneously. At 100%, the level of all voices is fully scaled.

  • Global Width Slider: Scales the panning of all voices simultaneously. At 0%, the spread of all voices collapses to mono.

  • Scale Snap Switch: Quantizes voice pitch to the closest note within the selected musical scale.

  • Lock Switch: Locking preserves the current Harmonies settings when navigating through presets.

  • Bypass: Click to activate/deactivate the Harmonies section.

Post FX Section

The Post FX section includes three multimode effects: Delay, Reverb, and Modulation, as well as a dedicated Doubler effect.

The multimode modules are configured as send effects, running in parallel to the signals from both the Correction and Harmonies sections. This allows you to blend the direct and processed signals with greater flexibility.

Delay - Multimode Delay module

The Delay module offers four distinct delay modes, each with its own sonic character. While all modes share a common set of parameters, some include additional, mode-specific controls that enhance their unique behavior.

  • Delay Active Switch: Click to activate/deactivate the Delay module.

  • Type: Toggle between delay types: Analog, Circular, Tape, or Digital.

    • Analog: Classic delay effect that produces a warm tone, with each repeat becoming progressively softer and more diffused.

    • Circular: Multitap delay featuring pre-configured levels and panning for each tap.

    • Tape: Vintage tape machine emulation effect that delivers warm, saturated echoes with natural degradation on each repeat.

  • Dual: Independent delay modules for the left and right channels.

Time Slider: Sets the delay time.

  • Sync Switch: Toggles between the following two states:

    • Free: The delay repeats will follow the internal delay time (ms) set by the Time slider.

    • Sync: In Sync mode, delay repeats follow the DAW tempo and use musical subdivisions selected via the Time slider.

  • Feedback Slider: Controls how much of the delayed signal is fed back. Higher values increase delay repeats.

  • Mod Slider: Applies modulation to the delay time. Higher values create pitch movement and a swirling, chorus-like effect.

  • Low Cut Slider: Increase to remove low-frequency content from the delay signal.

  • High Cut Slider: Decrease to remove high-frequency content from the delay signal.

  • Main Vocal Mix Slider: Adjusts the amount of delay effect applied to the Main Vocal signal.

  • Harmonies Mix Slider: Adjusts the amount of delay effect applied to the Harmonies signal.

  • Duck: Adjusts how much the delay signal is attenuated when the ducker effect is active. Higher values result in stronger attenuation.

Analog and Tape Delay specific parameters

  • Drive Slider: Adjusts the saturation level applied to the delay repeats.

  • Width Slider: Adjusts the stereo width of the delay effect. Higher values result in a wider stereo image.

  • Ping Pong Switch: Click to activate. When enabled, the delay repeats alternately between the left and right channels, creating a bouncing stereo effect.

Circular Delay specific parameters

  • Tap Selector: Select between one and six taps to set the number of delay repetitions. Each tap contributes to the rhythmic pattern and spatial placement of the echoes.

  • Diffusion Slider: Controls the amount of diffusion applied to the delay repeats. Higher values blur the echoes, creating a smoother, more reverb-like texture.

Dual Delay specific parameters

  • Time L-R Sliders: Set the delay time independently for the left and right channels. Time can be set in Free mode (milliseconds) or Sync mode (note divisions synced to your DAW tempo).

Reverb - Multimode Reverb module

The Reverb module adds space and depth to your vocals, helping them sit naturally in the mix or stand out with added atmosphere.

Reverb Active Switch: Click to activate/deactivate the Reverb module.

  • Type: Toggle between reverb types: Hall, Plate, or Ambiance.

    • Hall: Modeled after a classic studio digital reverb, offering lush, expansive tails.

    • Plate: Emulates the bright, metallic reflections of vintage plate reverb units.

    • Ambiance: A short, natural-sounding reverb that replicates the feel of an intimate room.

  • Pre Delay Slider: Sets the time between the direct input signal and the first audible reflection, helping to preserve vocal clarity.

  • Decay Slider: Controls the length of the reverb tail. Higher values produce longer, more sustained reverb effects.

  • Reverb Size: Adjusts the perceived size of the Reverb effect (only on Ambiance mode).

  • Low Cut Slider: Increase to remove low-frequency content from the reverb signal.

  • High Cut Slider: Decrease to remove high-frequency content from the reverb signal.

  • Main Vocal Mix Slider: Adjusts the amount of reverb effect applied to the Main Vocal signal.

  • Harmonies Mix Slider: Adjusts the amount of reverb effect applied to the Harmonies signal.

  • Duck: Adjusts how much the reverb signal is attenuated when the ducker effect is active. Higher values result in stronger attenuation.

Modulation - Multimode Modulation module

The Modulation module includes three distinct effect types, ranging from subtle stereo widening to more pronounced, sweeping effects.

  • Modulation Active Switch: Click to activate/deactivate the Delay module.

  • Type: Toggle between modulation types: Chorus, Flanger, or Phaser.

    • Chorus: An effect created by duplicating the input signal and applying slight delay variations to it.

    • Flanger: A sweeping effect created by combining the original signal with a delayed copy, where the delay time is continuously modulated.

    • Phaser: An effect created by shifting the phase of specific frequencies within the signal, producing a sweeping, swirling sound.

  • Width Slider: Adjusts the stereo width by shifting the phase between the left and right channels. Higher settings create a wider, more spacious effect.

  • Manual Slider: Sets the center frequency of the phaser’s sweep, allowing precise tonal control (only on Phaser mode).

  • Rate Slider: Sets the modulation speed.

  • Sync Switch: Toggles between the following two states:

    • Free: The modulation speed will follow the internal rate time (ms) set by the Rate slider. 

    • Sync: The modulation speed will sync to the DAW tempo value (BPM) following the musical subdivisions set by the Rate slider.

  • Depth Slider: Controls the intensity of the modulation. Higher values result in more pronounced movement.

  • Main Vocal Mix Slider: Adjusts the amount of modulation effect applied to the Main Vocal signal.

  • Harmonies Mix Slider: Adjusts the amount of modulation effect applied to the Harmonies signal.

Doubler - Real-time doubling effect module

The Doubler effect emulates the sound of double-tracked vocals by duplicating the direct input signal and sending copies to the left channel and right channel. These duplicates are dynamically offset in time, creating a wider stereo image.

  • Doubler Active Switch: Click to activate/deactivate the Doubler module.

  • Spread Slider: Controls the stereo width of the duplicated signals. Higher values produce a wider stereo effect. The original vocal remains centered, while additional voices are panned left and right.

  • Level Slider: Adjusts the volume level of the Doubler signal.

03
Global Features

Utility bar

  • Input Knob: Adjusts the level of the signal being fed into the plugin.

  • Input Mode Switch: Toggles between Mono and Stereo input processing. The Tune module, the Harmonies section and the Doubler are disabled while in Stereo Input Mode. 

  • Monitoring Switch: Toggles between Tracking and Mixing modes:

    • Tracking: Provides minimal latency for real-time performance or recording. Sculpt’s DYN slider and the Harmonies’ Formant Offset slider are disabled in Tracking mode.

    • Mixing: Prioritizes pitch accuracy and sound quality for mixing and post-processing.

  • Reference Pitch: Sets the plugin’s tuning reference, adjustable between 420 Hz and 460 Hz (440 Hz Default).

  • Root and Scale Dropdowns: Determine the root note and the scale used for pitch correction (Tune module) and harmony generation (Harmonies section).

  • Limiter Knob: When the limiter is activated, the output signal is prevented from exceeding the set threshold level, effectively avoiding clipping and distortion. Lower threshold values apply stronger limiting to the signal. 

  • Output Knob: Adjusts the level of the signal the plugin feeds out.

All top-bar Utility Controls can be preserved across presets, just hover your mouse/cursor over to it to see the Lock icon.

Preset Explorer

A Preset is a saved configuration of settings and parameters that can be recalled instantly. Neural DSP factory presets are an excellent starting point for your tones. After loading a preset, you can fine-tune the parameters across the different sections of the plugin to create a new tone that suits your needs.

Presets you make can be organized into folders and subfolders, making it easier to find and manage them.

  • Preset Dropdown Menu: Quick preset access. Click to open a dropdown list of all the Presets available. Use the navigation arrows above to cycle through presets.

  • Favorite: Adds the selected preset to your favorites folder for quick access.

  • Preset Browser: Access to the full preset browser experience.

  • Edit: Only available for user presets, use it to update the selected preset's name or tags.

  • Delete: Click to delete the currently loaded preset (factory presets cannot be deleted)

  • Save: Used to update a preset with the latest changes (indicated by a dirty state: an *asterisk in the preset name).

  • Save As: Used to save the current configuration as a new user preset.


Clicking the More button (⋮) will display additional features:

  • Import: Used to import Preset files from custom locations.

  • Reset: Click to make all parameters recall their default values.

  • Locate file: Click to find the preset's actual location in your computer. Neural DSP presets are stored as shareable, encrypted XML files.

Saving Presets

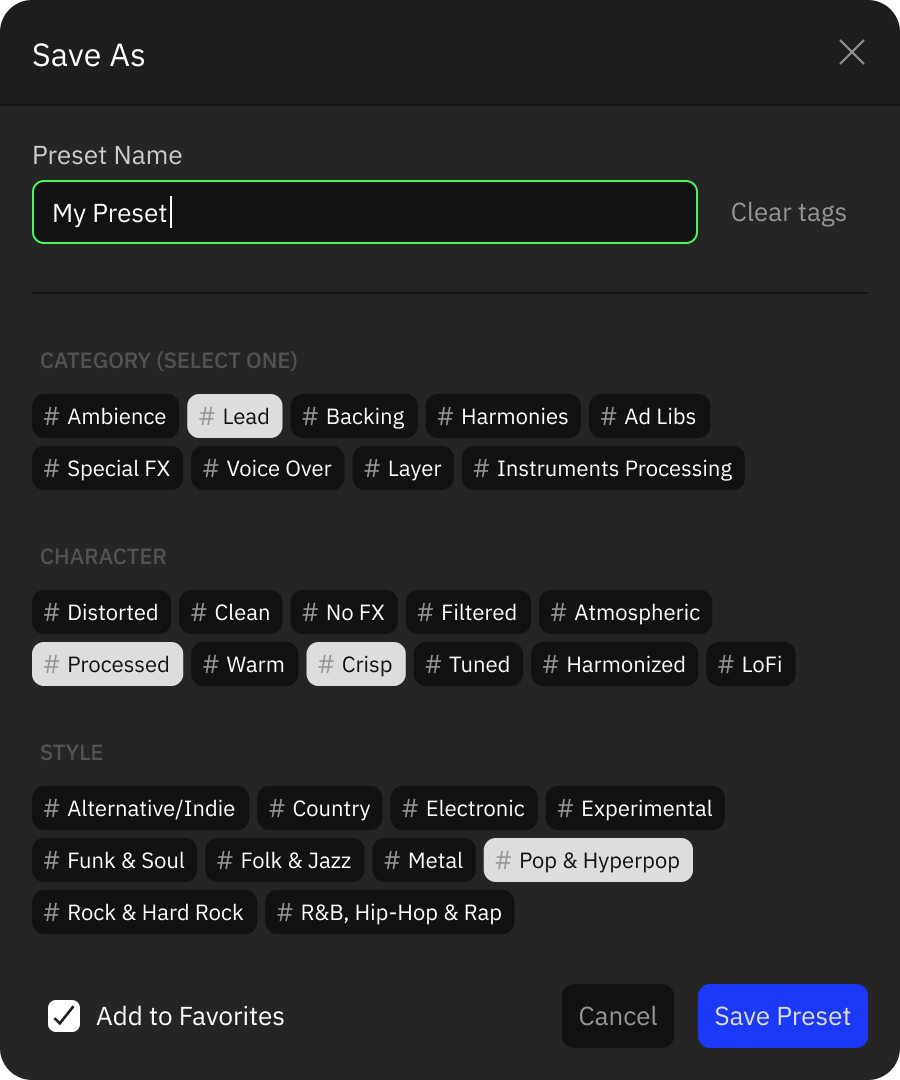
When creating or modifying sounds, you can save them as presets to access later on. The Save As window makes it easy to name, tag, and organize your presets.

mantra-Save-As

When saving a preset, the Save As window will appear with the following options:

  • Preset Name: Enter a custom name for your preset. By default, the name of the preset will match the name of the edited preset.

  • Tags: Add tags to make your presets easier to find. There are three types of tags available, each with fixed options: Category, Character, and Style.

    • Category: Choose a main category to describe the preset’s overall type (e.g. Clean, High-Gain, Lead, Rhythm, etc.) Only one category can be selected per preset.

    • Character: Add descriptive tags that define the tonal qualities or effects of the preset (e.g. Compressed, Atmospheric, Delay, Modulated, etc.) Multiple character tags can be applied.

    • Style: Select the musical style or genre the preset fits best (e.g., Metal, Pop, Jazz, Rock & Hard Rock, etc.). Multiple style tags can be applied.

  • Add to Favorites: Tick this box to automatically add the new preset to your favorites list for quick access.

About Tags

Factory presets are already tagged by default. For user presets, tags should be added manually during the saving process. Appropriate tagging helps when searching and filtering presets in the Preset Browser.

MIDI

Mantra’s Harmonies module can be controlled via external MIDI. This lets you send MIDI messages from a keyboard to select the notes generated by the Harmonies module, creating more complex and evolving harmonies that follow your chord progressions. In this chapter, we’ll guide you through setting up an external MIDI controller for the standalone version of the plugin (for instructions on setting up within your DAW, consult your DAW’s user manual.)

Setting up your MIDI keyboard (standalone app only)

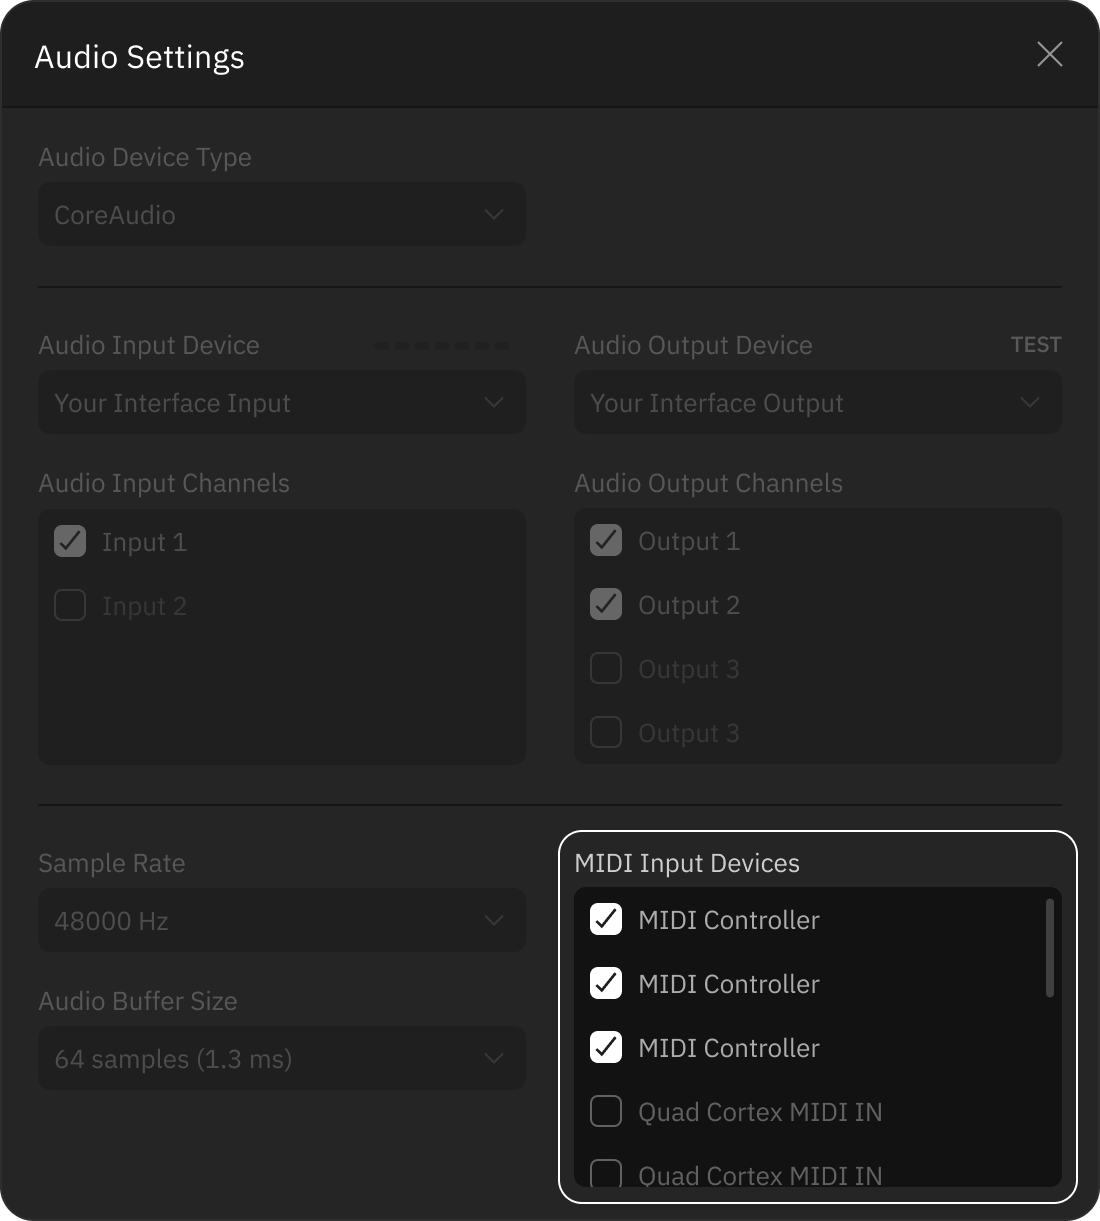
To enable Mantra to receive MIDI messages from a keyboard or controller, you first need to activate it in the Audio Settings window. 

Audio settings with MIDI Input Devices highlighted

In the bottom-right corner of this window, you’ll find a scrollable MIDI Output Device list showing all MIDI devices connected to your computer. Select your preferred device, then close the window.

Then, toggle MIDI mode on in the Harmonies section. 

Once MIDI mode is on, incoming notes are assigned to individual Harmonies voices or voice pairs, making real-time harmony generation possible with MIDI clips or live input. This allows harmonies to respond dynamically to your chord progressions.

Making your Mac® a Bluetooth MIDI host

  1. Open the “Audio MIDI Setup” app.

  2. Click on Window > Show MIDI Studio.

  3. In the MIDI Studio window, click on “Open Bluetooth

  4. Configuration...”. Set your Bluetooth MIDI device peripheral in pairing mode.

  5. Select the peripheral in the list of devices, then click “Connect”.

Once your Bluetooth MIDI controller is connected to your computer, check that it is recognized by your plugin standalone app. Click on Settings in the Footer and check if the controller appears in the MIDI Input Devices menu.

04
Installation and Setup

New to plugins? This is your guide to the basics. Read on to learn what you need to start using your Neural DSP plugin.

Basic requirements

Getting set up is very simple, but there are a few things you will need before you begin:

  1. Any Windows® PC or Apple Mac® capable of multitrack audio processing. Make sure your computer meets the minimum required specifications:

    Mac

    • Intel Core i3 Processor (i3-4130 / i5-2500 or higher)

    • Apple Silicon (M1 or higher)
      8GB of RAM or more

    • macOS® 13 Ventura (or higher)


    Windows
    • Intel Core i3 Processor (i3-4130 / i5-2500 or higher)

    • AMD Quad-Core Processor (R5 2200G or higher)

    • 8GB of RAM or more

    • Windows® 10 (or higher)

  2. An audio interface to connect your instrument to your computer via USB, Thunderbolt or PCIe. Neural DSP hardware such as Quad Cortex can be used as USB interfaces.

  3. Studio monitors or headphones. Having the sound play back from the computer speakers is not recommended due to quality and latency issues.

  4. iLok License Manager: A free app that allows you to manage all your
    plugin licenses in one place and transfer them between different computers.

Supported DAWs

DAWs, short for “Digital Audio Workstations”, are music production software programs that have a comprehensive set of tools for recording, editing, and mixing digital audio.

All Neural DSP plugins include a standalone app version, meaning that you don’t need a DAW to use them. However, if you are planning on recording your playing, you will need to install your plugins to your DAW.

A complete installation setup will automatically install all the different plugin formats:

APP: Standalone app.
AU
: Plugin format developed by Apple for use on macOS®.
VST2: Multi-platform format compatible across multiple DAWs on both macOS® and Windows® devices.
VST3: An improved version of the VST2 format that only uses resources during monitoring/playback. It’s also available on both macOS® and Windows® devices.
AAX: Pro Tools native format. It can only be used on Avid Pro Tools.

Most DAWs automatically scan for new plugins upon launch. If you cannot find the plugins in your DAW’s plugin manager, manually rescan the plugin folder to locate the missing files. Our plugins are compatible with a wide range of DAWs. Below is a list of DAWs we have tested:

Ableton Live 12 (VST, Audio Unit)
Pro Tools 2024 (AAX)
Logic Pro 11 (Audio Unit)
Cubase 13 (VST)
Reaper 7 (VST, Audio Unit)
Presonus Studio One 7 (VST, Audio Unit)
Reason 12 (VST)
FL Studio 21 (VST)
Cakewalk by Bandlab (VST)

Note that even if your DAW is not listed above, it might still work. If you encounter any compatibility issues, don’t hesitate to contact support@neuraldsp.com for further assistance.

Once your plugins are available in your DAW, create a new project, insert a new audio track, arm it for recording, and load the plugin onto the track.

Default file locations

Neural DSP plugins will be installed in default locations for each plugin format unless a different custom location is selected in the process.

MacOS®

By default, the plugin files are installed in the following directories: 

AU: Macintosh HD/Library/Audio/Plug-ins/Components
VST2: Macintosh HD/Library/Audio/Plug-ins/VST
VST3: Macintosh HD/Library/Audio/Plug-ins/VST3
AAX: Macintosh HD/Library/Application Support/Avid/Audio/Plug-ins
Standalone App: Macintosh HD/Applications/Neural DSP
Preset Files: Macintosh HD/Library/Audio/Presets/Neural DSP
Settings Files: <User Folder>/Library/Application Support/Neural DSP
Manual: Macintosh HD/Library/Application Support/Neural DSP


Windows®

By default, the plugin files are installed in the following directories: 

VST2: C:\Program Files\VSTPlugins
VST3: C:\Program Files\Common Files\VST3
AAX: C:\Program Files\Common Files\Avid\Audio\Plug-Ins
Standalone App: C:\Program Files\Neural DSP
Preset Files: C:\ProgramData\Neural DSP
Settings Files: C:\Users\<Your profile>\AppData\Roaming\Neural DSP
Manual: C:\Program Files\Neural DSP

License activation

In order to use Neural DSP plugins, you will need an iLok account and the iLok license Manager application installed on your computer. iLok is completely free to use.

iLok setup

  1. Go to iLok’s account registration page and fill out the required fields in the registration form.

  2. A confirmation email will be sent to the email address provided during registration. Open the confirmation email in your inbox and click on the verification link.

  3. Download iLok License Manager and install it on your computer. After that, open the app and login using your iLok account email address and password.

  4. Link your iLok account to your Neural DSP account by entering your iLok username in your account settings. This will ensure that purchased licenses are deposited automatically in your iLok account after checkout.


Once a plugin is installed and launched for the first time, an iLok dialog will appear.

  • If you want to start the 14-day trial: Click the Try button. You will be prompted to enter, or confirm your account information and the plugin trial will begin.

  • If you've purchased the plugin: Click the Activate button. Login to your iLok account when prompted and activate the license onyour machine. Your Perpetual License then will be activated.


You do not need an iLok USB dongle to use Neural DSP plugins as they can be activated directly onto computers. Note that a single license can be activated on 3 different computers at the same time as long as the same iLok account is used on all of them.

Licenses can be deactivated from computers that are not in use and transferred to other devices. This process can be repeated indefinitely.

Setting up your plugin

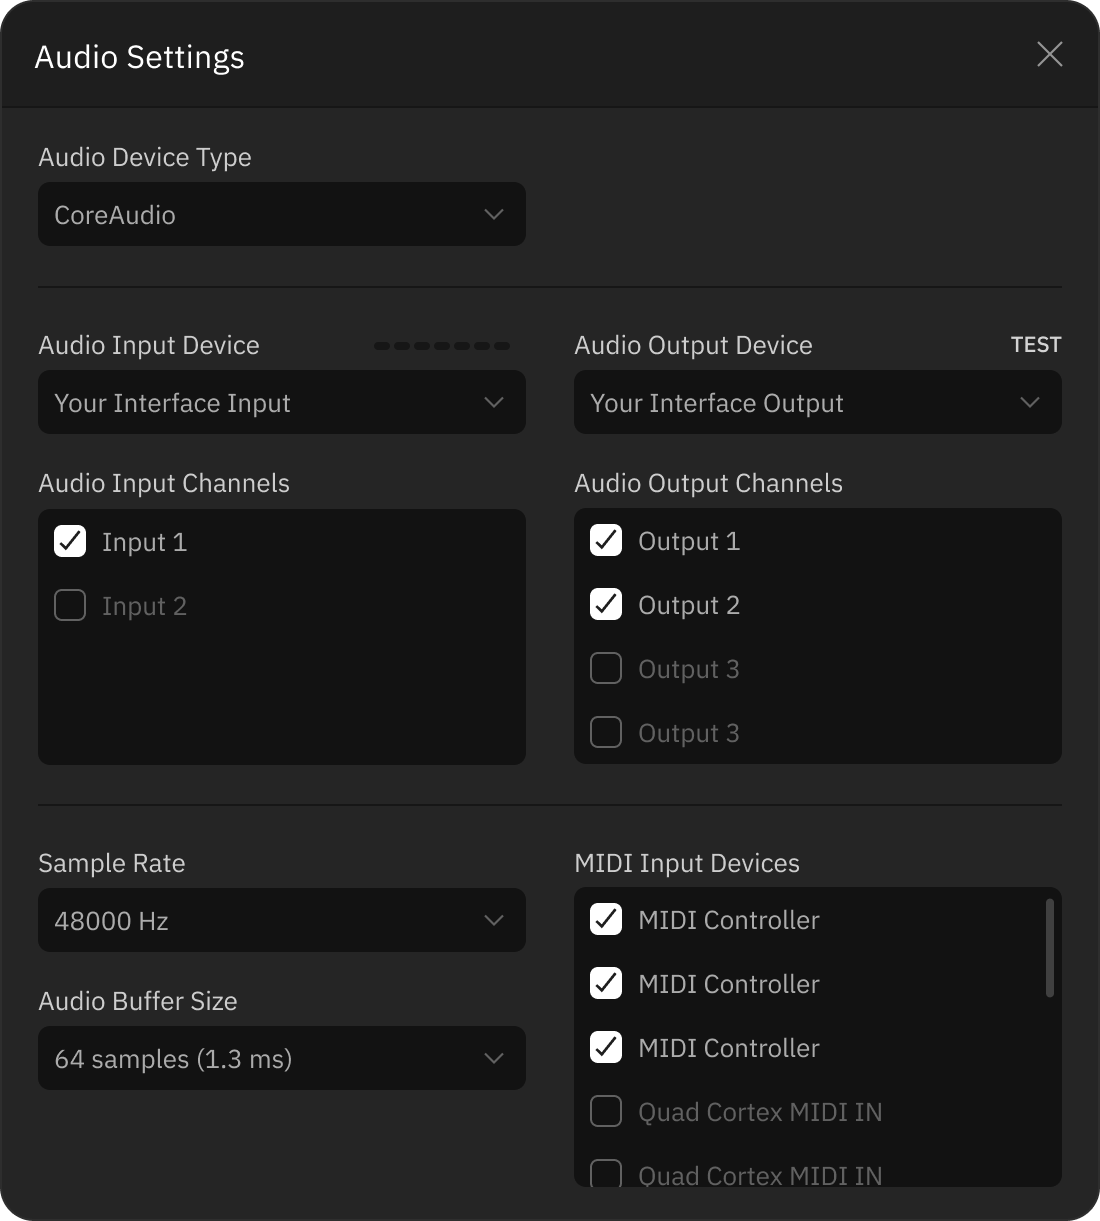
Once you have installed and activated your plugin, you can set it up and start using it. To get started, launch the plugin’s standalone app and click Settings in the footer.

Standalone plugins' Settings screen

Use the following settings to optimize your plugin’s performance and achieve the best possible tone.

  • Audio device type: All available audio drivers on your computer are listed here. For most audio recording applications on Windows®, ASIO is the preferred driver format. CoreAudio is the recommended option on macOS®.

  • Audio device: Choose the audio interface that your instrument is connected to.

  • Audio input channels: Select the interface input(s) your instrument is connected to.

  • Audio output channels: Select the interface output(s) that you use for monitoring.

  • Sample rate: We recommend 48000 Hz unless a different rate is required for your session.

  • Audio buffer settings: Set it to 128 samples or lower. Increase the buffer size to 256 samples or higher if you experience performance issues.

What is latency?

When monitoring plugins in real-time, you may experience a slight delay between playing a note on your instrument and hearing the sound through your headphones or studio monitors. This delay is called latency. Decreasing the buffer size reduces the latency, but demands more from your computer’s processing power.

How do I change these settings in a DAW audio session?

To set up audio settings for plugins within a DAW, open the audio settings section of your DAW’s preference menu. From there, you can select your audio interface, set the I/O channels, adjust the sample rate and buffer size.

Uninstalling Neural DSP software

To uninstall Neural DSP software on macOS®, delete the files manually in their respective folders.

On Windows®, Neural DSP software can be uninstalled either from the Control Panel or by selecting the “Remove” option from the setup installer.

Get in touch

Neural DSP Technologies is happy to provide professional technical support via email to all registered users, absolutely free of charge.

Before contacting us, we recommend searching our support and knowledge base sections below to see if the answer to your question has already been published.

Support

Knowledge Base

If you cannot find a solution for your problem on the pages above, please contact support@neuraldsp.com to help you further.


Corporate contact

Neural DSP Technologies OY
Merimiehenkatu 36 D
00150, Helsinki, Finland

05
Acknowledgements

Special thanks to...

Aaron Geldert / Adnan Ayub / Aleksi Peussa / Avihai Eini / Brian Arne / Christopher Walker / Craig Rollo / Domenico Pellegrino / Eero-Pekka Damskägg / Felix Eichas / Francisco Cresp / François Barrillon / Giovanni Azzalini / Greg Ramirez / Henri Penttinen / Jacopo Lovatello / Jakub Dąbroś / Joonas Tuovinen / Joshua Lewis / Juan Herrera / Jussi Kaloinen / Jussi Saarelainen / Matias Kupiainen / Michelangelo Nottoli / Rafael Castillo / Sebastian Pinilla / Sercan Atli / Tantep Sinjanakhom / Tarek Al Sibai / Theofilos Petsas / Thomas Sherson / Yevgen Chebotarenko

Beta testing

Aadil Panhwar / Adrián Esteban / Alex Meunier / Andrew Morgan / Chris Alford / David Porter / Filipe Delbel / Jon Banks / Kaitlyn Myers / Matt Cotterill / Max Salomaa / Mykyta Perfiliev / Patryk Siewiera / Renata Kazhan / Seamus Conacher