NeuralDSP logoNeuralDSP logo
Quad Cortex® User Manual 3.3.0

01
Welcome to Quad Cortex

Neural DSP Quad Cortex - User Manual (CorOS 3.3.0)

QC Manual Intro

Global Features

Quad Cortex is a powerful multi-effects processor designed for musicians. It combines advanced machine learning technology with an intuitive touchscreen interface, offering a complete solution for live performance, recording, and practice in a compact form factor.

  • Neural Capture: A powerful tool that can learn and replicate the sonic characteristics of any amplifier, cabinet, or overdrive pedal with accuracy and realism.

  • Virtual Devices: Access a wide collection of amps, cabinets, and studio-quality effects, all built directly into the unit.

  • Touchscreen Interface: A 7" multi-touch display provides fast, intuitive navigation and editing.

  • Flexible Signal Routing: Build complex, customized signal chains with multiple inputs and outputs to suit any setup.

  • Cortex Cloud Integration: Upload, share, and download presets and captures directly with the Neural DSP community.

  • Firmware Updates: Powered by CorOS, Quad Cortex receives updates with new features, improvements, and fixes.

Cortex Cloud

Discover Users, Presets, and Neural Captures using the Cortex Cloud app.

Contact Information

Neural DSP provides free, professional technical support via email to all registered users. Before reaching out, we recommend visiting our Knowledge Base to check if your question has already been answered.

If you’re unable to find a solution, please contact us at support@neuraldsp.com. Our team will be happy to assist you further.

02
Overview

Quad Cortex weighs 1.95 kg / 4.2 lbs and its dimensions are 29.0 x 19.5 x 6.9 cm / 11.4” x 7.7” x 2.7".

Hardware Dimensions

QC Overview 001

03
Quick Start Guide

Powering on your Quad Cortex

QC Power On 2

The Quad Cortex power supply is included in the product package.

  1. Align the barrel connector with the power input on the device.

  2. Insert the connector fully into the input.

  3. The Quad Cortex powers on automatically when power is supplied.

Power Requirements

Quad Cortex requires a center-negative power supply that provides 12V DC and at least 3.0 A.

Powering off your Quad Cortex

QC Power Off
  1. Press the POWER BUTTON above the Master Volume to toggle the Power & Locking Functions overlay.

  2. Tap SHUT DOWN to turn off the device.

Safe Shutdown

Always power off your device using the Power & Locking Functions overlay. Disconnecting the power cable while the device is running is not recommended.


POWER & LOCKING FUNCTIONS
Power Locking Overlay

Press the POWER BUTTON on the back of the unit to toggle the Power & Locking Functions overlay.

  • LOCK: Locks both the touchscreen and the Master Volume. While locked, a lock indicator appears in the top-right corner of the screen. To unlock, press the POWER BUTTON.

  • CANCEL: Closes the Power & Locking Functions overlay.

  • SHUT DOWN: Powers off the device. To turn it back on, press the POWER BUTTON.

  • REBOOT: Restarts the device. Any unsaved changes will be lost.

  • BE RIGHT BACK: Disables all audio outputs and turns off the screen. Press the POWER BUTTON to wake the device and restore the audio signal.

Connecting your equipment

QC Equipment 01

Connect your instrument to INPUT 1.


QC Equipment 02

Connect your studio monitors, PA, or FRFR cabinet to OUTPUTS 1/L and 2/R. Additionally, you can connect your Headphones to HP OUTPUT.

Master Volume

QC Master Volume 3

To adjust the Quad Cortex output volume, turn the Master Volume Knob located on the left side of the device.

  • Turn it clockwise to increase the output volume.

  • Turn it counter-clockwise to decrease the output volume.

While the Master Volume overlay is exposed, tap the checkboxes to assign or unassign the Master Volume to different outputs.

Global Controls

QC Touch Screen

Interact with the Quad Cortex interface using touch gestures on the screen.


QC Master Volume

To adjust the Quad Cortex output volume, turn the Master Volume Knob located on the left side of the device.


QC AH Stomps

Press A, B, C, D, E, F, G, H footswitches to navigate Presets, Scenes, or toggle device blocks.


QC Mode Cycle

Cycle Modes by pressing BANK DOWN + TEMPO footswitches simultaneously.


QC Tuner Access

Hold TEMPO to access the Tuner menu. Press BANK UP to exit to The Grid.


QC Tempo Access

Press TEMPO twice to access the Tempo & Metronome menu. Press BANK UP to exit to The Grid.


QC Bank Up Down
  • Press BANK UP to navigate banks up in PRESET Mode.

  • Press BANK DOWN to navigate banks down in PRESET Mode.

While in ‘Blinking Mode’, keep pressing BANK UP or BANK DOWN to navigate Preset Banks:

QC Blinking Mode
  • Press A, B, C, D, E, F, G or H to recall a Preset.

  • Press TEMPO to cancel ‘Blinking Mode’ and return to the currently loaded Preset.

Pressing BANK UP or BANK DOWN in SCENE or STOMP mode will navigate Presets Up or Down, respectively.


QC Param Editor Encoders

Tap a device block on The Grid to open its parameter editor. Turn A, B, C, D, E, F, G, H, BANK DOWN or TEMPO footswitch encoders to control assigned parameters. This feature is automatically enabled whenever controllable parameters are displayed on screen, such as Device Blocks, I/O Settings, Tuner, or Tempo menus.

QC Param Editor Cycle

When a virtual device parameter editor is open, turn the BANK UP encoder to cycle devices within the same category.


QC IO Settings Access

When in The Grid, swipe down from the top of the screen to access the I/O Settings menu.


QC Gig View Access

When in The Grid, swipe up from the bottom of the screen to access Gig View.

Tuner

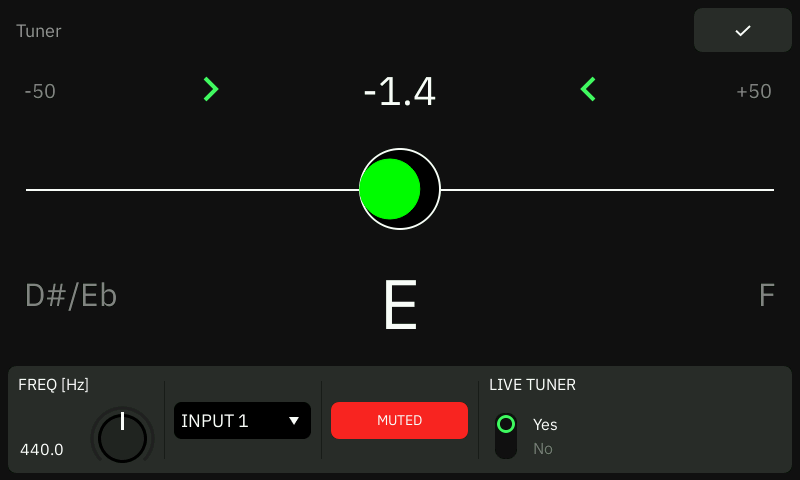
Quad Cortex features a chromatic tuner. It works by detecting the note being played and then displaying its pitch deviation on the screen.

QC Tuner Access

While in The Grid, hold TEMPO to access the Tuner.


TUNER MENU
QC Tuner Menu 1
  • FREQ [Hz]: Sets the tuner reference pitch.

  • INPUT DROPDOWN: Determines which input will feed the Tuner.

  • MUTE: Tap to mute/unmute the input signal when the Tuner is active.

  • LIVE TUNER: Toggles the LIVE TUNER in Gig View.

While in the Tuner menu, press BANK UP to exit to The Grid.


LIVE TUNER
QC Live Tuner Samples

When enabled, the LIVE TUNER appears at the top of the Gig View. The indicator moves horizontally with the pitch of the incoming note.


TUNER VIA MIDI

The Tuner menu can also be accessed by sending the following MIDI message to Quad Cortex:

  • CC#45 (Value 0-63): Closes the Tuner menu.

  • CC#45 (Value 64-127): Opens the Tuner menu.

Tempo & Metronome

The Tempo menu allows you to configure all tempo and synchronization settings, including tap tempo, BPM, and Metronome playback.

QC Tempo Access

While in The Grid, press TEMPO twice to access the Tempo menu.


TEMPO MENU
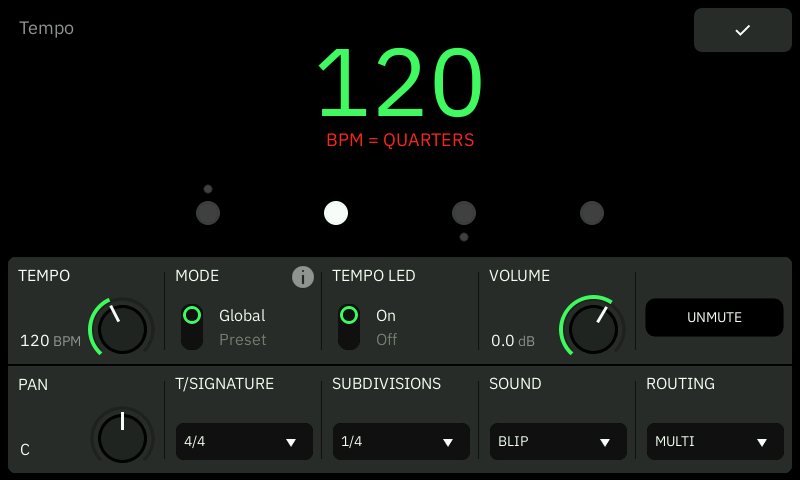
QC Tempo Menu 1
  • TEMPO: Sets the Quad Cortex tempo value (BPM).

  • MODE: Toggles between GLOBAL and PRESET tempo modes.

    • GLOBAL MODE: Tempo and Metronome settings are shared across all Presets. Any changes made will apply globally.

    • PRESET MODE: Tempo and Metronome settings are stored within each Preset. Each Preset retains its own Tempo and Metronome configuration.

  • TEMPO LED: Toggles the TEMPO LED on or off.

While in the Tempo menu, press BANK UP to exit to The Grid.


METRONOME PARAMETERS

The Tempo menu includes a Metronome. It works by producing a steady pulse to help you practice and play in time.

  • VOLUME: Adjusts the output level of the metronome playback.

  • PLAYBACK: Toggles the metronome playback on or off.

  • PAN: Adjusts the output panning of the metronome playback.

  • T/SIGNATURE: Sets the time signature. This affects the number of beats per measure and how accents are distributed.

  • SUBDIVISIONS: Determines the number of rhythmic pulses per beat.

  • SOUND: Determines the sound of the metronome beats.

  • ROUTING: Assigns the metronome playback to specific device outputs.


METRONOME PLAYBACK BEHAVIOR

Closing the Tempo menu does not stop metronome playback. Similarly, changing Presets does not stop the metronome either, though it may cause a brief audio dropout; its playback remains in sync with the set tempo.

Metronome playback can also be triggered from the Looper X parameter menu. Additionally, if the Looper X’s PRE ROLL feature is enabled, the metronome will provide an audio cue before the loop recording begins.


TAP TEMPO VIA MIDI

Tap Tempo can also be controlled by sending the following MIDI message to Quad Cortex:

  • CC#44 (Value 0-127): Tap Tempo press emulation.

Modes

Modes define how the device footswitches behave and interact with The Grid. Depending on the Mode selected, pressing footswitches will navigate Presets, recall different Scenes, or toggle device blocks.

QC Mode Indicator Zoom

The currently active mode is indicated at the top-right corner of The Grid.

QC Mode Cycle

While in The Grid or Gig View, press BANK DOWN + TEMPO simultaneously to cycle Modes.


MODES VIA MIDI

Modes can also be controlled by sending the following MIDI message to Quad Cortex:

  • CC#47 (Value 0): Mode Slot 1 (PRESET Mode by default).

  • CC#47 (Value 1): Mode Slot 2 (SCENE Mode by default).

  • CC#47 (Value 2): Mode Slot 3 (STOMP Mode by default).

When Modes are reordered in the Modes Configuration menu, MIDI CC values do not change to reflect the new cycle arrangement. If a Mode slot is empty, MIDI messages will not recall any Mode.

PRESET Mode

While in PRESET Mode, each footswitch loads a different Preset when pressed. The currently loaded Preset is indicated at the top of The Grid.

QC AH Stomps

Press A, B, C, D, E, F, G or H footswitches to load their assigned Presets.


BANK NAVIGATION
QC Bank Up Down

Presets are organized into Banks of eight. Press either BANK UP or BANK DOWN to navigate Banks in PRESET Mode.

While in ‘Blinking Mode’, keep pressing BANK UP or BANK DOWN to navigate Preset Banks:

QC Blinking Mode
  • Press A, B, C, D, E, F, G or H to recall a Preset.

  • Press TEMPO to cancel ‘Blinking Mode’ and return to the currently loaded Preset.

SCENE Mode

While in SCENE Mode, each footswitch loads a different Scene when pressed. The currently loaded Scene is indicated at the top-right corner of The Grid.

QC AH Stomps

Press A, B, C, D, E, F, G or H footswitches to load their assigned Scenes.

QC Bank Up Down

While in SCENE mode, press either BANK UP or BANK DOWN to navigate Presets up and down, respectively.


SCENE ASSIGMENTS

Scenes allow you to control multiple parameters and device blocks simultaneously within the same Preset.

QC Scene Assigment

Tap any device block on the Grid to access its parameter editor menu. Then, tap and hold a parameter to assign or unassign it to Scenes. Once assigned, the parameter’s value will be stored independently for each Scene. This operation can be done in any Mode.

By default, every new Preset starts with Scene A. To set another Scene as the default, simply save the Preset while that Scene is active.

STOMP Mode

While in STOMP Mode, each footswitch toggles the bypass state of its assigned device block when pressed.

QC AH Stomps

Press A, B, C, D, E, F, G or H footswitches to activate or deactivate their assigned device blocks.

QC Bank Up Down

While in STOMP mode, press either BANK UP or BANK DOWN to navigate Presets up and down, respectively.


FOOTSWITCH ASSIGNMENTS
QC Stomp Assignment 3

STOMP Mode allows you to assign device blocks to footswitches so their bypass state can be toggled within the same Preset.

While in STOMP Mode, tap any device block on the Grid to access its parameter editor menu, then select Footswitch Assignment. Press the desired footswitch to complete the assignment.

A single footswitch can be assigned to multiple device blocks.

HYBRID Mode

The Modes Configuration menu allows you to reorder the Modes cycle and create HYBRID Modes.

QC Modes Config Access 2

While in The Grid, tap and hold the MODE Indicator to access the Modes Configuration menu.


MODES CONFIGURATION MENU
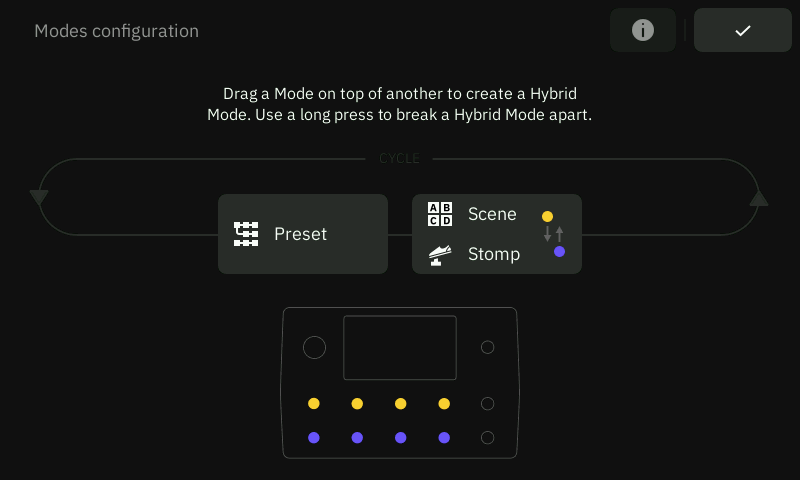
QC Modes Config Menu 2
  • Drag-and-drop Modes to reorder them. This determines their sequence when cycling through Modes.

  • Drag one Mode onto another to merge them into a single slot, creating a HYBRID Mode. To split a HYBRID Mode, tap and hold it.

  • Drag Modes to the top-right corner to remove them. At least one Mode must remain in the cycle.


HYBRID MODE
QC Hybrid Stomps

HYBRID Mode allows you to assign different Modes to each horizontal row of footswitches within the same Preset (A to D and E to H).

While in the Modes Configuration menu, drag one Mode onto another to merge them into a single slot to create a HYBRID Mode. Tap the right edge of the HYBRID slot to swap the Modes rows.


HYBRID PRESET BANKS

When HYBRID Mode is configured with PRESET Mode, the Preset Banks are divided into two. This occurs because one row of two footswitches is assigned to a different Mode, leaving only a single row available for Preset selection, either A-D or E-H.

Gig View

Gig View is a dedicated screen layout designed for improved readability while performing live. It transforms the entire display into a clear, visual summary of your current Footswitch configuration.

QC Gig View Access

When in The Grid, swipe up from the bottom of the screen to access Gig View.


GIG VIEW: PRESET MODE
QC Gig View PRESET

While in PRESET Mode, Gig View displays Preset assignments for each footswitch.


GIG VIEW: SCENE MODE
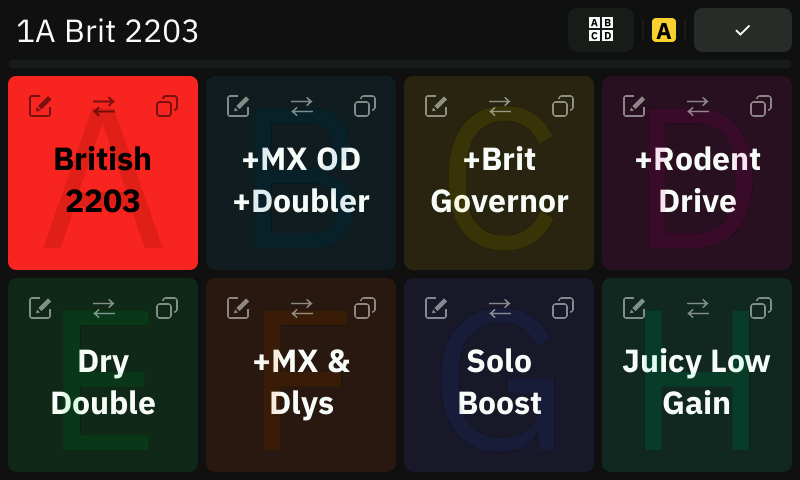
QC Gig View SCENE

While in SCENE Mode, Gig View displays Scene assignments for each footswitch along with additional options:

  • EDIT SCENE: Customizes the selected Scene’s name and color.

  • SWAP SCENE: Exchange the selected Scene’s footswitch assignment with another Scene.

  • COPY SCENE: Duplicates the selected Scene.


GIG VIEW: STOMP MODE
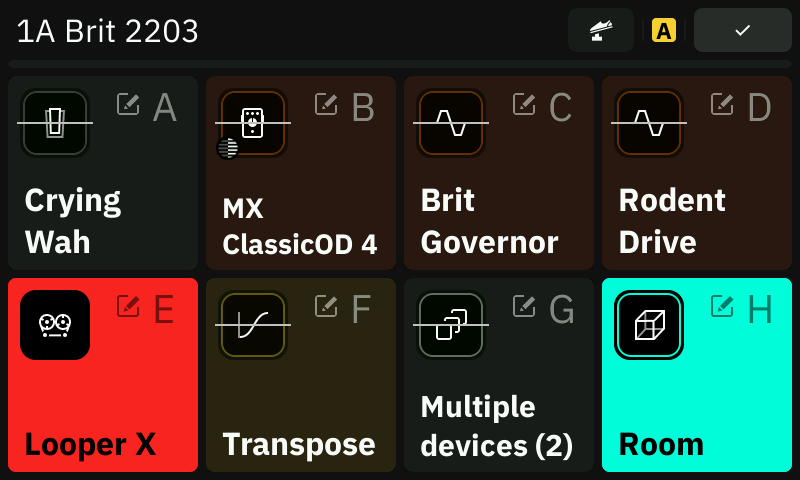
QC Gig View STOMP

While in STOMP Mode, Gig View displays Stomp assignments for each footswitch along with additional options:

  • EDIT STOMP: Customizes the selected Stomp name and device block assignments.

  • PARAMETER EDITOR SHORTCUT: Tap a device block icon in Gig View to open its parameter editor on The Grid.


GIG VIEW: HYBRID MODE
QC Gig View HYBRID

While in HYBRID Mode, Gig View automatically adapts its layout to reflect the Modes included in the HYBRID configuration.


GIG VIEW VIA MIDI

Gig View can also be accessed by sending the following MIDI message to Quad Cortex:

  • CC#46 (Value 0-63): Closes Gig View.

  • CC#46 (Value 64-127): Opens Gig View.

I/O Settings

The I/O Settings menu allows you to configure all input and output options for the device.

QC IO Settings Access

When in The Grid, swipe down from the top of the screen to access the I/O Settings menu.


ANALOG AUDIO PORTS
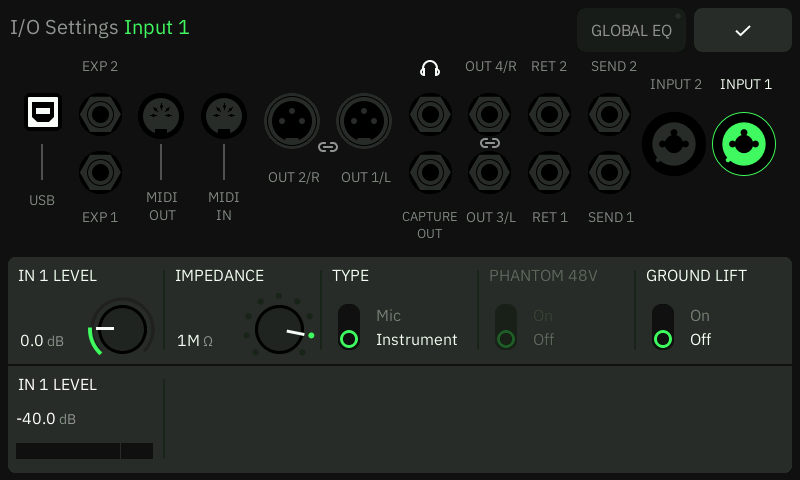
IO Settings Analog

Quad Cortex features multiple audio inputs and outputs. The parameters in the editor panel adapt based on the selected I/O. Tap any analog audio port to adjust its parameters:

  • LEVEL: Adjusts the gain level of the selected I/O.

  • IMPEDANCE: Determines the combo inputs’ impedance value (1MΩ by default). Disabled when the TYPE switches are set to “Mic”.

  • TYPE: Determines the combo inputs’ mode. Set them to “Mic” when using XLR cables (“Instrument” by default).

  • PHANTOM 48V: Toggles phantom power for the combo inputs.

  • GROUND LIFT: Toggles ground lift on the selected I/O. Useful for reducing noise caused by ground loops.

  • MUTE: Mutes or unmutes the selected I/O.

  • OUTPUT PAIRING: Hold OUTPUTS 1/2 or 3/4 to pair or unpair them. Paired output will share LEVEL, GROUND LIFT, and MUTE parameter values.

Quad Cortex Variants

The I/O Settings layout adapts based on the hardware variant. For Quad Cortex units equipped with the “ESS Codec”, the TYPE switches for INPUTS 1/2 are hidden, as input selection is automatic.


USB AUDIO & MIDI PORTS
IO Settings USB

Quad Cortex provides 16 USB audio channels (8 inputs / 8 outputs). These channels are mapped to either host sources or device analog audio ports. Tap on a USB or MIDI port to adjust its parameters:

  • USB LEVEL: Adjusts the USB audio volume.

  • HP SOURCE: Selects which USB audio channels are routed to the headphones output.

  • DRY/WET: Determines whether USB Outputs 1/2 or 3/4 carry clean DI signals or processed audio.

  • MIDI THRU: Enables or disables the MIDI Thru feature.


GLOBAL EQ
QC IO GLOBAL EQ 2

The I/O Settings menu includes a 5-Band Parametric EQ that can be assigned to one or both output pairs.

Tap GLOBAL EQ at the top of the I/O Settings to access its interface.

  • GLOBAL EQ BYPASS: Toggles the GLOBAL EQ on or off.

  • EQ BAND TABS: Tap to access EQ band parameters. Each EQ Band will affect a specific frequency range.

  • EQ BAND TYPE: Determines the filter type for the selected EQ band.

  • EQ BAND GAIN: Adjusts the gain of the selected EQ band (-12/+12dB).

  • EQ BAND FREQ: Adjusts the frequency of the selected EQ band (20Hz/20kHz).

  • EQ BAND Q: Adjusts the bandwidth of the selected EQ band. Higher Q values narrow the affected frequency range.

  • EQ BAND BYPASS: Toggles the selected EQ band on or off.

  • OUT TAB: Assign the GLOBAL EQ to one or both output pairs and adjust its overall output level.

Global EQ & Input Gate Bypass

The GLOBAL EQ and INPUT GATE blocks are automatically disabled when a Preset exceeds available processing resources.

04
The Grid

Grid’s Layout

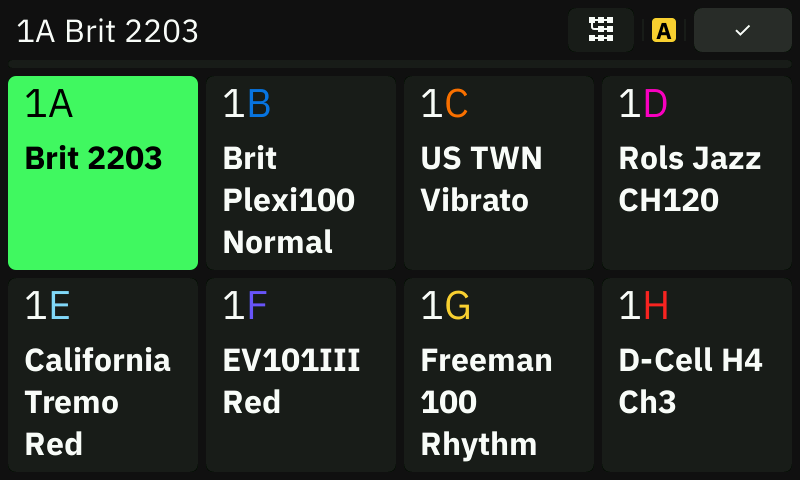
QC 1A Brit 2203

The Grid is the central workspace of Quad Cortex. It provides a clear visual layout for building Presets, offering flexibility to combine and organize device blocks as needed.

The Grid consists of four rows, each containing eight device block slots. Most elements on The Grid can be controlled using touch gestures, footswitches, expression pedals, or external devices via MIDI.

After powering on, Quad Cortex automatically displays The Grid.


VIRTUAL DEVICE LIST
QC Empty Slot Tap

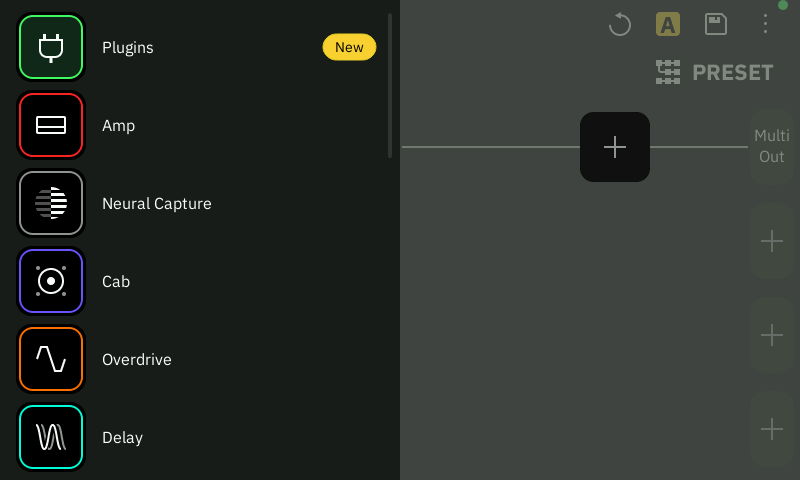
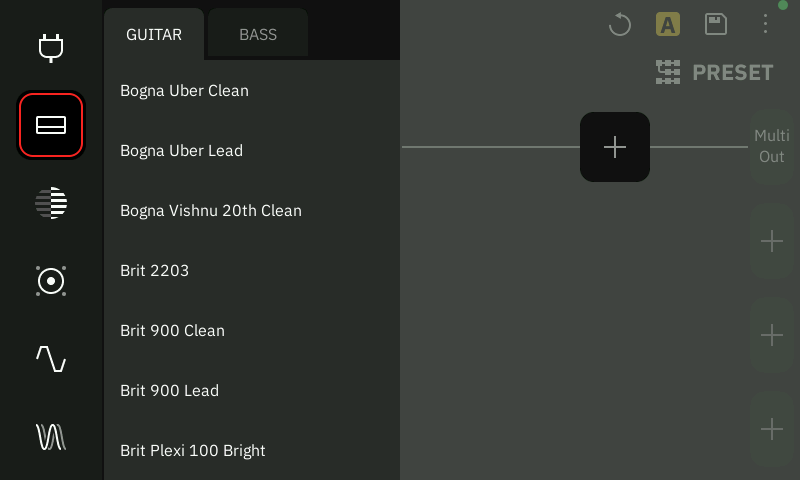
To begin building an audio signal chain, tap an empty slot on The Grid. This will open the Virtual Device List, which displays all device categories available.

Virtual Devices

QC Virtual Device List Amp

The Virtual Device List provides access to all virtual devices available that can be placed on The Grid. It allows you to browse by category, search for specific devices, and manage your favorites for quicker access.


BROWSING & LOADING VIRTUAL DEVICES
QC Virtual Devices 01

Once an empty slot on the Grid is selected, swipe vertically to browse virtual devices.


QC Virtual Devices 02

Tap Categories to expand or collapse them.


QC Virtual Devices 03

Tap a device to load it onto the Grid.


QC Virtual Devices 04

Tap and hold a device to pin it to the top of its respective category for quicker access.

Blocks

When a virtual device is loaded onto the Grid, it is represented as a device block. A device block is a functional unit that processes audio according to the characteristics of the selected virtual device.

QC Block Types

Device blocks can be arranged, edited, and interconnected to build signal chains within a Preset.


VIRTUAL DEVICE BLOCKS
QC Block Samples

Device blocks are organized into several categories, such as amplifiers, cabinets, effects, and utilities.

  • PLUGINS: Compatible Neural DSP ‘X’ plugin devices.

  • AMP: Amplifier devices for guitar and bass.

  • NEURAL CAPTURE: Neural Capture™ devices.

  • CAB: Cabinet simulation devices with selectable microphones, available in mono and stereo.

  • OVERDRIVE: Boost, distortion, and overdrive pedal devices.

  • DELAY: Digital, analog, and tape delay devices, available in mono and stereo.

  • REVERB: Digital and analog reverb devices.

  • COMPRESSOR: Dynamic control devices, available in mono, stereo, and side-chain.

  • PITCH: Pitch shifter devices.

  • MODULATION: Chorus, flanger, phaser, and other modulation devices.

  • MORPH: Complex audio processor devices.

  • SYNTH: Devices that generate sounds by shaping and manipulating waveforms.

  • FILTER: Dynamic and fixed filter devices.

  • EQ: Graphic and parametric equalizer devices.

  • IR LOADER: Load third-party Impulse Response files.

  • WAH: Wah pedal devices.

  • FX LOOP: Integrate external devices to The Grid via SEND and RETURN audio ports.

  • LOOPER: Record and layer audio in real time.

  • UTILITY: Routing, mixing, and other audio tools.


INPUT & OUTPUT BLOCKS
QC IO Blocks Samples

Input and output blocks define where the signal enters and exits The Grid. Their positions are fixed to ensure consistent audio routing across Presets.

  • INPUT BLOCKS: Represent the physical inputs of the device, such as instrument inputs, microphone inputs, returns, and USB audio input channels.

  • OUTPUT BLOCKS: Represent the physical outputs of the device, such as main outputs, sends, USB audio output channels, as well as routing to other Rows on The Grid.

QC IO Block 01

Tap an input or output block to assign a different input or output source.

QC IO Block 02

Tap and hold an input or output block to open its parameter editor:

  • INPUT GATE CONTROL: Available for all assigned input blocks. Adjusts noise gate parameters and provides an additional INPUT GAIN control.

  • LANE OUTPUT CONTROL: Available for all assigned output blocks, except when assigned to other Rows. Includes VOLUME, PAN, MUTE, and SOLO parameters.

I/O Clipping Alert

The input and output blocks will turn red if their assigned I/Os are clipping.


SIDE-CHAINING DEVICE BLOCKS
QC SC Block Samples

Certain virtual devices support side-chain processing. Side-chaining allows a virtual device to respond to a secondary input source, rather than only the primary input determined by its position on The Grid.

Virtual devices in the Compressor, Filter, and Utility categories labeled (S/C) include side-chaining features.

  • SOURCE/TRIGGER: Defines the secondary input used as the control signal for side-chain processing. Any input or device block that occurs earlier in the signal path on The Grid can be selected.

Side-Chaining Devices Limit

You may have up to two side-chain devices per pair of Rows within the same Preset.


SPLITTER & MIXER BLOCKS
QC Spliter Mixer Samples

These blocks can create parallel signal paths (A and B) and merge them back together.

  • SPLITTER BLOCKS: Route audio from Rows 1 or 3 (Path A) to Rows 2 or 4 (Path B), respectively, creating parallel paths that can be processed independently.

  • MIXER BLOCKS: Route parallel paths on Rows 2 or 4 (Path B) to different output blocks or merge them back into Rows 1 or 3 (Path A).

QC Spliter Mixer Placement Action

Tap and hold any empty slot on the Grid to insert a Splitter or Mixer for the corresponding pair of Rows. Alternatively, dragging any device block from Path A to Path B will automatically create a parallel signal path.

The (S) and (M) tokens can then be dragged and placed next to input or output blocks, as well as between device blocks.

SPLITTER PARAMETERS
  • TYPE: Determines the Splitter behavior with respect to how the audio signal is divided (Balance, A/B, or Crossover).

  • STEREO: Enables or disables the stereo split, assigning the left and right channels of the preceding block’s output to separate paths A and B, respectively.

  • BALANCE: Adjusts the distribution of the signal between Paths A and B (Available in ‘Balance’ type).

  • LEVEL TO A: Adjusts the output level sent to Path A (Available in ‘A/B’ type).

  • LEVEL TO B: Adjusts the output level sent to Path B (Available in ‘A/B’ type).

  • FREQUENCY: Adjusts the crossover frequency at which the signal is divided (Available in ‘Crossover’ type).

  • MODE: Swaps the crossover band assignments for Paths A and B (Available in ‘Crossover’ type).

  • MUTE: When enabled, mutes the Splitter block.

MIXER PARAMETERS
  • LEVEL A: Adjusts the volume level of Path A.

  • PAN A: Adjusts the stereo panning of Path A.

  • LEVEL B: Adjusts the volume level of Path B.

  • PAN B: Adjusts the stereo panning of Path B.

  • PHASE: When enabled, inverts the phase of Path B.

  • MIXER LEVEL: Adjusts the overall volume level of the Mixer block.

  • MUTE: When enabled, mutes the Mixer block.

Parameter Editors

QC Block Param Editor Action

Parameter editors are custom layouts that appear when you tap any block on The Grid. They provide access to all adjustable parameters of the selected device, along with routing options, Stomp and Scene assignments, bypass state, and other advanced settings.


PARAMETER EDITOR LAYOUT
Brit 2203 Params

The layout of a parameter editor depends on the selected block. For most devices—including splitters, mixers, and I/O blocks—the editor occupies the bottom half of the screen. Certain devices, such as Cabs, Looper X, and other special blocks, utilize a full-screen layout to provide additional controls and options.

  • CONTEXTUAL MENU: Provides access to additional options and device-specific actions.

  • VIRTUAL DEVICE NAME: Displays the name of the selected device block. Tap to browse and audition other virtual devices, and replace the current device if desired.

  • FOOTSWITCH ASSIGNMENT: Displays the current footswitch assignment. Tap to reassign or remove a footswitch assignment from the selected device.

  • SCENE SELECTOR: Tap to navigate Scenes without closing the parameter editor.

  • BYPASS SWITCH: Tap to bypass or activate the selected device.

  • CLOSE: Tap to close the parameter editor and return to The Grid.

  • KNOBS: Represent adjustable continuous parameters. Drag vertically to change their values, or tap the numeric display to enter a custom value using the on-screen keyboard.

  • DROPDOWNS: Tap to expand a predefined set of options.

  • SWITCHES: Tap to toggle between two or more discrete states.

  • SPECIAL PARAMETERS: Device-specific parameters that may include advanced functions unique to certain devices (Looper X, Cabs, and other devices).

Virtual Device Cycling

When a virtual device parameter editor is open, turn BANK UP to cycle devices within the same category.

Expression Pedals

An expression pedal is a continuous controller that allows you to manipulate block parameters in real time using your foot. Common uses include controlling volume, wah, pitch, modulation depth, or any other supported parameter.

QC Exp 1 2 Connectors

Connect expression pedals to the Quad Cortex EXP 1 or EXP 2 inputs using TRS cables.


EXPRESSION PEDAL CALIBRATION

To ensure accurate response across the full sweep range, it may be necessary to calibrate an expression pedal during first use.

HEEL TOE Switch 03
  1. Place the expression pedal on the surface where it will be used.

  2. Connect the expression pedal to the Quad Cortex EXP 1 or EXP 2 inputs using a TRS cable.

  3. Ensure the pedal is sitting flat on the surface, then access the I/O Settings menu (When in The Grid, swipe down from the top of the screen).

  4. Tap the EXP 1 input currently in use.

  5. Tap RECALIBRATE, then move the expression pedal fully from heel to toe.

  6. Verify that the POSITION indicator responds correctly, sweeping from 0.00 to 1.00.

  7. Tap SAVE to complete the calibration procedure.

The expression pedal calibration is stored as a global setting, remaining consistent across Presets, Scenes, and power cycles.

When to recalibrate?

Recalibration is recommended whenever you connect a different expression pedal model to ensure accurate operation.


EXPRESSION PEDAL ASSIGNMENT
QC Exp Pedal Assignment Action

Expression pedals can be assigned to control most adjustable parameters of any block.

  1. Tap a block on The Grid, access its contextual menu, and select Assign Expression Pedal.

  2. Tap ASSIGN to link parameters to the expression pedal.

  3. Set the MIN RANGE and MAX RANGE values for the pedal’s sweep. To reverse the behavior of a parameter, set its minimum value to 100% and its maximum value to 0%.

  4. Tap Expression 1 or Expression 2 at the top to toggle between expression inputs.

  5. Tap the SAVE icon in the top-right corner to confirm changes and exit.

Expression pedal assignments can be retained by using the Set Parameters as Defaults option in the block’s contextual menu:

  • The current parameter position and toe-switch polarity are not stored when saving Presets. Instead, the current position and toe-switch state are preserved when loading Presets.

  • When a parameter is assigned to an expression pedal, its values are excluded from Scene data and will not change when switching Scenes.


EXPRESSION BYPASS
QC Exp Bypass Menu

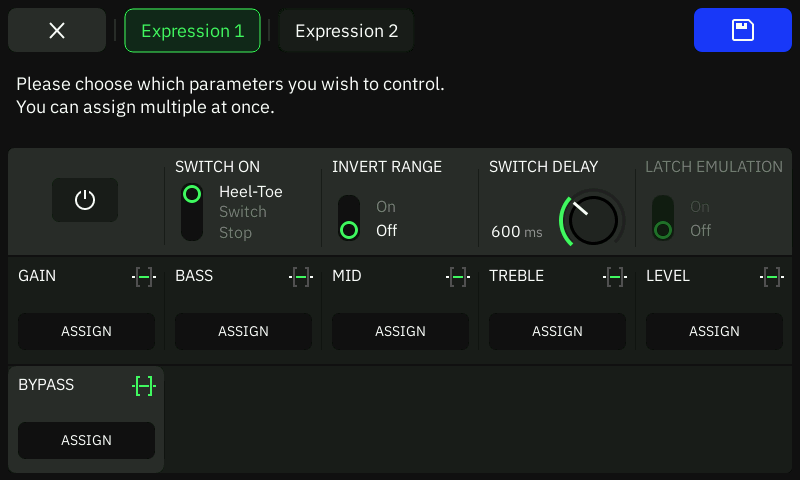
Blocks can be engaged or bypassed using expression pedals. To configure this, first assign an expression pedal to a device block by opening its contextual menu and selecting Assign Expression Pedal. Then, tap ASSIGN under the BYPASS parameter to access additional options:

  • SWITCH ON: Toggles between three bypass modes (Heel-Toe, Switch, and Stop).

  • HEEL-TOE BYPASS MODE: The block is bypassed at the heel position. If INVERT RANGE is enabled, the block will instead be bypassed at the toe position.

  • SWITCH BYPASS MODE: Pressing the toe switch on the expression pedal bypasses the block.

  • STOP BYPASS MODE: Holding the expression pedal still bypasses the block.

  • INVERT RANGE: Reverses the value at which the bypass is engaged.

  • SWITCH DELAY: Adjusts the time it takes for the block to be bypassed (Up to 5000 ms).

  • LATCH EMULATION: Enables momentary toe switches to emulate a latching response.


EXPRESSION PEDAL COMPATIBILITY

Quad Cortex is compatible with a wide range of expression pedals. Devices with the following features are supported:

  • Single TRS expression output (Wah or Volume outputs are not supported).

  • Dual TRS outputs for sweep control and toe-switch.

  • Latching toe switch.

  • Momentary toe-switch (only supported when Latching Emulation is set to ‘On’).

  • Linear or logarithmic curve.

  • Minimum value knob.

  • Polarity/Reverse function.

Looper X

The Looper X is a device block that, when placed on The Grid, captures and layers audio in real time, giving you full control over recording, overdubbing, playback, and more. While its position on The Grid determines whether the entire signal chain or only specific sections are recorded, custom routing options are also available.

QC Looper X Access

Tap the Looper X block to open its parameter editor.


LOOPER X ACTIONS

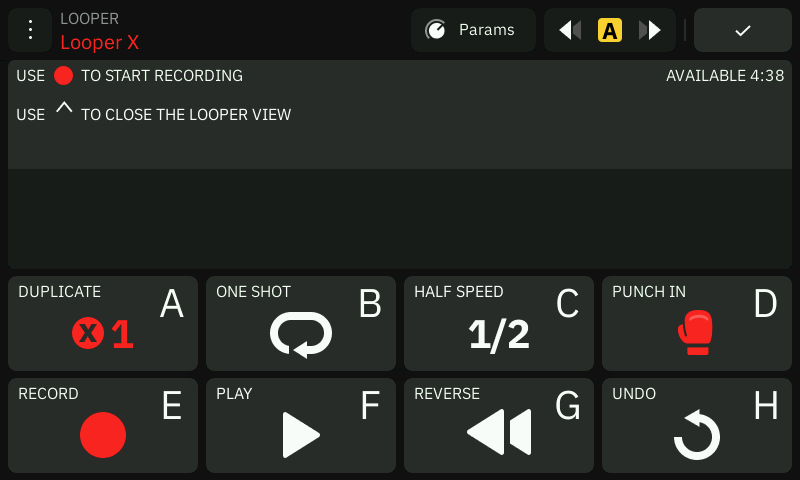
Looper X actions are displayed at the bottom of the screen, preassigned to A-H footswitches.

QC Looper X

To customize the footswitch layout, tap the Looper X contextual menu and select Assign Looper X Actions.

  • DUPLICATE: Creates an overdub that is twice the length of the original loop, allowing you to extend the loop during overdubbing. If THRESHOLD is enabled, this action also arms the Looper for recording.

  • RE-LOOP: Trims the length of the loop. This function is only available when DUPLICATE is active.

  • ONE SHOT: Plays the loop once, then stops. If activated during playback, the loop stops automatically after the recorded audio ends.

  • HALF SPEED: Plays the loop back at half the original speed.

  • PUNCH IN: Replaces the current loop audio with a new recording. Tap again to stop recording (PUNCH OUT).

  • RECORD: Starts recording a new loop. If THRESHOLD is enabled, this also arms the looper for recording. During playback, this control changes to OVERDUB.

  • OVERDUB: Records additional audio on top of the existing loop during playback.

  • PLAY/STOP: Starts or stops loop playback.

  • REVERSE: Reverses loop playback. If activated before playback begins, the loop will start in reverse after pressing PLAY.

  • UNDO: Reverts the last recording or overdub action. After using UNDO, the control changes to REDO.

  • REDO: Restores any actions previously undone with UNDO.

The Looper X actions and parameters can also be controlled via MIDI CC messages.


LOOPER X PARAMETERS

The Looper X parameters allow you to fine-tune playback, overdubbing, and overall loop behavior.

  • PLAYBACK LEVEL: Adjusts the overall playback volume of the loop playback.

  • OVERDUB LEVEL: Sets the playback level of the loop while overdubbing. For instance, a value of -5dB will reduce the volume by 5dB with each pass, gradually fading repeated overdubs.

  • HIGH PASS: Allows high frequencies to pass while cutting low frequencies from the loop playback.

  • LOW PASS: Allows low frequencies to pass while cutting high frequencies from the loop playback.

  • THRESHOLD: Enables automatic recording when an incoming audio signal is detected. This function is disabled when your device is receiving MIDI clock.

  • RECORD MODE: Sets the behavior of the RECORD function to Toggle or Momentary. In Momentary mode, recording is active only while its assigned Footswitch is held down.

  • OVERDUB MODE: Sets the behavior of the OVERDUB function to Toggle or Momentary. In Momentary mode, overdubbing is active only while its assigned footswitch is held down.

  • DUPLICATE MODE: Determines whether the DUPLICATE function is synced to the current tempo. When synced, loop length is locked to the tempo grid for rhythmic consistency. When unsynced, loop length is determined freely by user input.

  • PUNCH MODE: Sets the behavior of the PUNCH IN/OUT function to Toggle or Momentary. In Momentary mode, recording is active only while its assigned footswitch is held down.

  • ROUTING MODE: Configures the Input and Output routing for the Looper X block. The selected I/Os determine the audio path feeding the looper, allowing it to operate either as a Grid-based looper or a Global I/O looper.

  • QUANTIZE: Syncs the loop to the current tempo or an external MIDI Clock, based on the selected number of beats per bar.

  • MIDI CLOCK START: When enabled, receiving MIDI Clock messages automatically triggers the RECORD, DUPLICATE, and PLAY functions. This overrides the THRESHOLD recording feature.

  • PRE ROLL: Enables a metronome count-in of 1, 2, or 4 bars before transitioning into the next state, such as RECORD or PLAY. When enabled, a visual cue follows the metronome playback count-in before transitioning to RECORD or PLAY. The upper row of white squares reflects the number of beats per bar, based on the current metronome settings. The lower row of green squares represents the number of PRE ROLL bars selected.

  • METRONOME PLAYBACK: Toggles the metronome playback on or off.

  • RECORDING LENGTH: Sets a fixed loop recording length, adjustable from 1 to 32 bars.

CPU Monitor

The CPU Monitor displays the overall CPU usage of the current active Preset in the top-right corner of The Grid.

QC CPU Mon Access

To open it, tap the Grid’s Contextual Menu at the top-right corner and select CPU Monitor.

Global EQ & Input Gate Bypass

The GLOBAL EQ and INPUT GATE blocks are automatically disabled when a Preset exceeds available processing resources. Notice that bypassing or disabling blocks does not reduce CPU consumption.

05
The Directory

Directory’s Layout

QC Directory Presets

The Directory is the central hub for managing Presets, Neural Captures, and Impulse Responses. It provides a structured and intuitive view of all factory and user content stored on your device.

Content in the Directory is organized into categories. Items can be sorted, favorited, uploaded to your Cortex Cloud profile, or organized into subfolders.


QC Directory Access

Tap the Preset name at the top of The Grid to access the Directory.

Item Categories

QC Directory Categories

Tap the upper-left corner of the Directory to navigate item categories.


FAVORITES & RECENTS
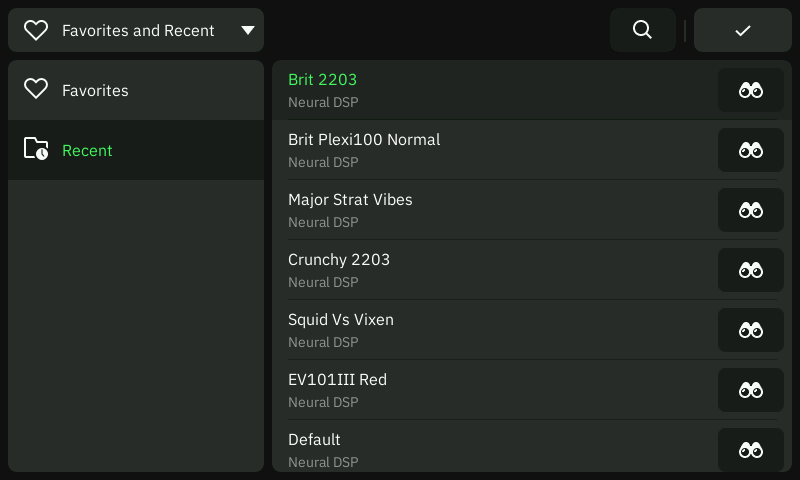
QC Directory Fav Rec
  • FAVORITES: Stores all the Presets you have added to Favorites. Presets can be added to Favorites via the Grid’s contextual menu.

  • RECENTS: The Recents screen lists all previously loaded presets, allowing you to quickly revisit recent work.

Item Limit

Both Favorites and Recents can store up to 51 Presets each. When this limit is reached, the newest Preset automatically replaces the oldest one.


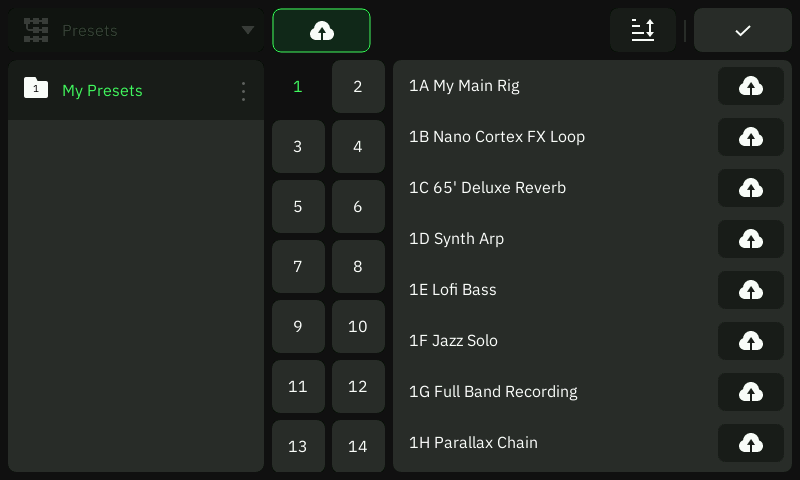
PRESETS
QC Directory Presets

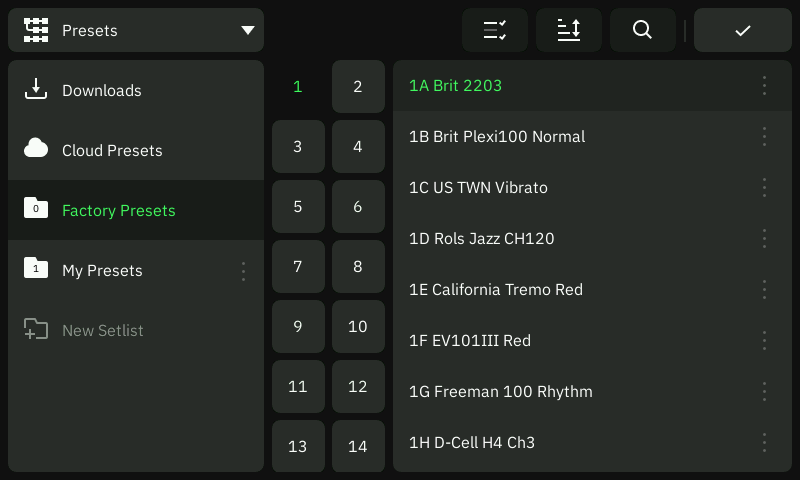
Presets are organized into Setlists, folders capable of storing up to 256 Presets. You can store up to 3072 user Presets on your device.

  • DOWNLOADS (PRESETS): Contains all the Presets you have downloaded from other users via the Cortex Cloud app.

  • CLOUD PRESETS: Contains all the Presets you have uploaded to your Cortex Cloud profile.

  • FACTORY PRESETS: Contains Factory Presets made by Neural DSP (Non-deletable).

  • MY PRESETS: Default User Preset Setlist (Non-deletable).

  • NEW SETLIST: Tap to create a new User Setlist. You can create up to 10 User Setlists, which can be renamed or deleted.

  • BANKS: Presets are organized into banks for easier navigation. By default, each bank contains four Presets. When a HYBRID Mode that includes PRESET Mode is active, each bank contains two presets instead.

Preset Deletion

Deleting a User Setlist will also permanently remove all Presets stored within it.


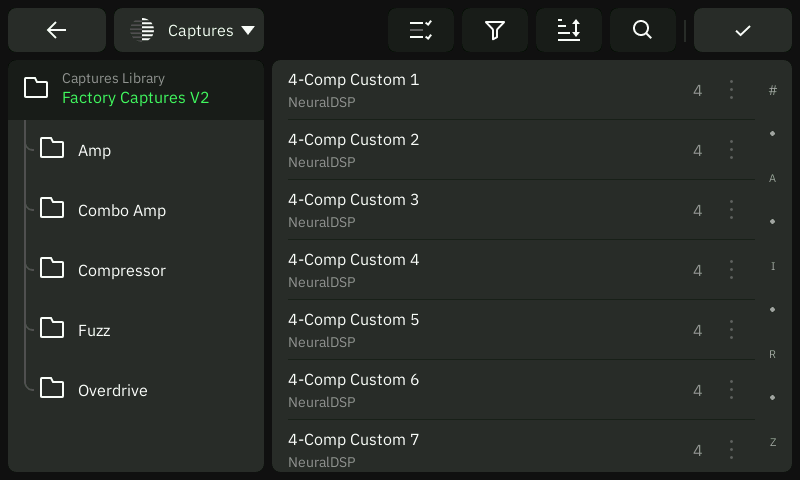
NEURAL CAPTURES
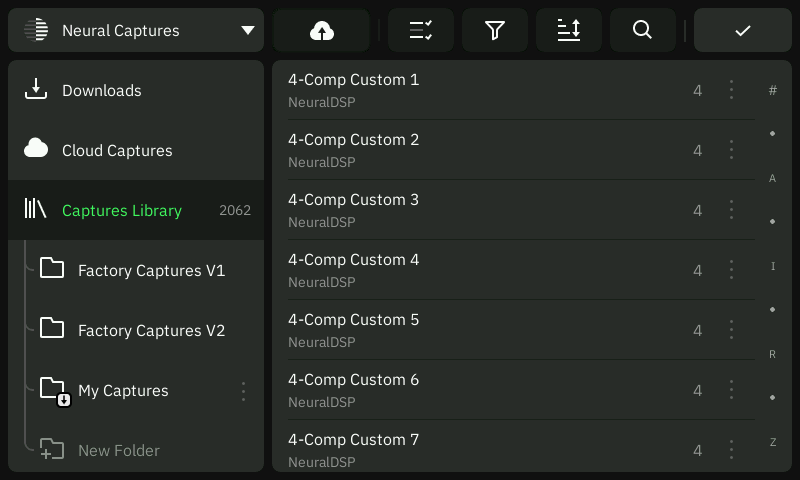
QC Directory Captures

Neural Captures are stored in the Capture Library. Along with Factory Captures, you can store up to 2048 user Neural Captures on your device.

  • DOWNLOADS (CAPTURES): Contains all the Neural Captures you have downloaded from other users via the Cortex Cloud app.

  • CLOUD CAPTURES: Contains all the Neural Captures you have uploaded to your Cortex Cloud profile.

  • FACTORY CAPTURES V1: Contains Neural Captures (V1) made by Neural DSP (Non-deletable).

  • FACTORY CAPTURES V2: Contains Neural Captures (V2) made by Neural DSP (Non-deletable).

  • MY CAPTURES: User Neural Captures library.

  • NEW FOLDER: Tap to create a new Capture folder.

Neural Capture Subfolders

Neural Captures can be organized into folders and nested into subfolders.


IMPULSE RESPONSES
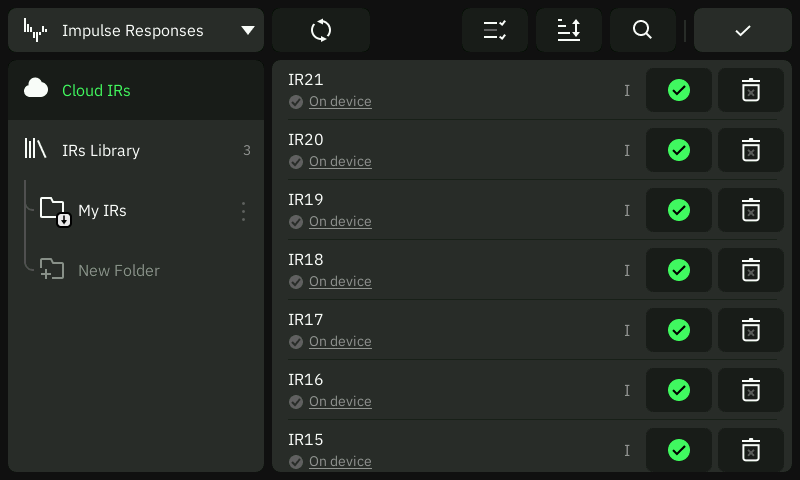
QC Directory IRs

Impulse Responses are stored in the IR Library. You can store up to 2048 Impulse Responses on your device.

  • CLOUD IRs: Contains all the Impulse Responses you have uploaded to your Cortex Cloud profile.

  • IRs LIBRARY: Local storage for Impulse Responses.

Impulse Response Truncation

Any compatible Impulse Response file (WAV) can be uploaded to Cortex Cloud regardless of its original length. Once uploaded, files are automatically resized to 1024 samples (approximately 21 ms).


PLUGIN PRESETS
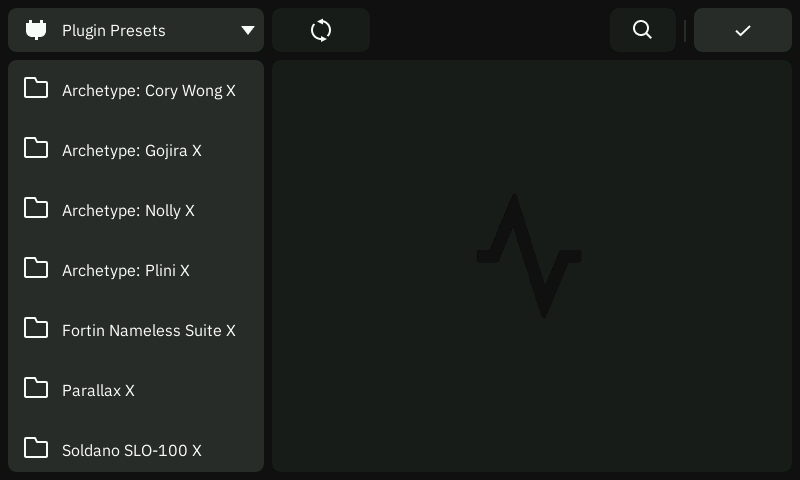
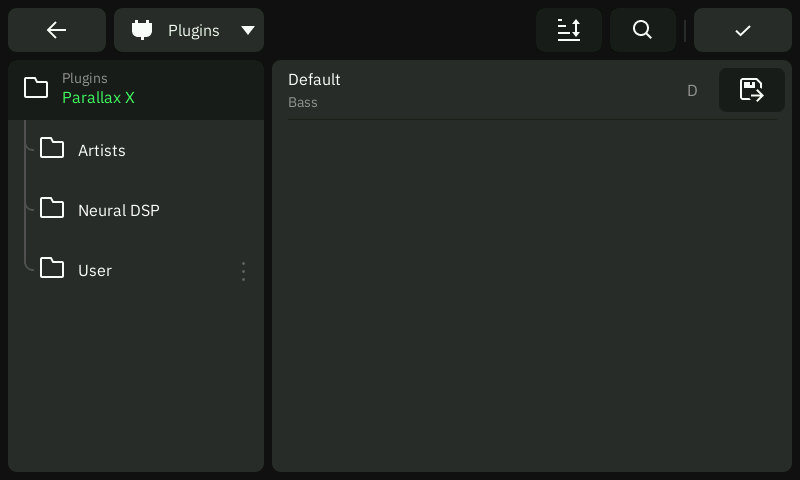
QC Directory Plugins

Plugin Presets are organized into dedicated folders, with each folder corresponding to a specific plugin. The folder structure is as follows:

  • MAIN ARTIST: Contains plugin Presets made by featured artists.

  • ARTISTS: Contains plugin Presets made by guest artists.

  • NEURAL DSP: Contains plugin Presets made by Neural DSP.

  • USER: Contains plugin presets you have created or imported. To transfer plugin Presets, connect your device to a computer via USB and use Cortex Control to import them.

Presets

Presets are customizable signal chain configurations. Each Preset can contain multiple device blocks (such as Amps, Cabs, Effects, Captures, and Plugin devices) arranged on The Grid.

Presets are organized into Setlists for easy navigation and management within the Directory. You can store, edit, rename, and move Presets, as well as upload them to Cortex Cloud for backup or sharing purposes.


SAVING PRESETS

Presets can be saved directly from The Grid.

QC Preset Italic

When a Preset has unsaved changes, its name will appear in italic text. Tap the SAVE icon in the top-right corner to immediately save your changes and overwrite the existing Preset configuration.

QC Preset Save as

To save your current Grid configuration as a new Preset, open the contextual menu at the top-right corner and select Save as… to keep your original Preset unchanged while saving your modifications separately.

Factory Presets can also be edited and stored as new Presets in any of your Setlists using the Save As… feature.

By default, Presets are saved in the currently active Setlist. When saving a Preset, you can also choose a different Setlist or create a new one for better organization.

Setlists & Folders

Setlists and folders help you organize content on your device via the Directory.

  • SETLISTS: Each setlist can store up to 256 Presets. You can create, rename, and delete user Setlists, while ‘Factory’ and ‘My Presets’ Setlists cannot be deleted.

  • FOLDERS: Used to organize other types of content, such as Neural Captures, Impulse Responses, and Plugin Presets.


BULK ACTIONS

Bulk actions can be performed in the Directory to manage multiple items at once.

QC Multiselect

Tap the Multi Select button to enable Multi Select Mode. While in this mode, you can copy, paste, move, favorite, upload, download, edit, and delete multiple items simultaneously.

QC Multiselect Copy

To move items, hold the Copy button to relocate the selected items to a different folder or location.


SORTING ITEMS

The Directory includes sorting and filtering options.

QC Sorting

Tap the Sort button to organize items by Name, Date Added, Author, or other available criteria. Tapping the currently selected option again toggles between ascending and descending order.

QC Funnel

Tap the Filter icon to refine your view of Neural Captures by category, such as Amp, Cab, Pedal, Made by Me, and more.

Preset Sorting Options

Presets can also be sorted in the same way. When Presets are sorted by Banks, they will display in Bank View. Sorting by any other option displays presets in List View.


SEARCHING ITEMS
QC Search

Tap the Search field to look for items in the Directory. Recently searched terms will appear beneath the text entry field, and suggestions will update dynamically as you type.

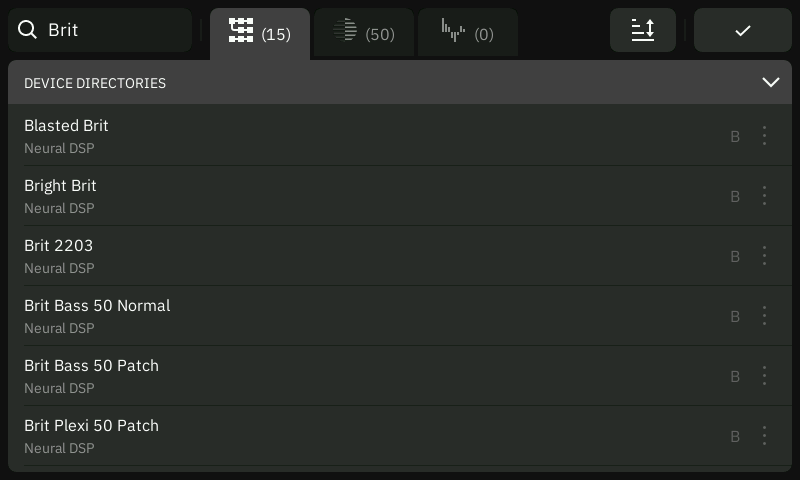
QC Search Results

Search results are organized into categories and tabs for Presets, Neural Captures, and IRs. Subcategories within each tab can be expanded or collapsed by tapping the arrows on the right side.

Tapping a search result takes you directly to the file’s location in the Directory, where it will be highlighted. From there, you can interact with the item, continue browsing, or tap the Search button to return to your search results. Search results can also be sorted and filtered based on the selected category.


FOLDERS & NESTED NAVIGATION

Captures and IR Libraries stored on your device can be further organized into folders and subfolders for easier navigation and management.

QC Nested Folders

Folders allow you to organize your Neural Captures and IRs without duplicating files. When items are placed in a folder, links to them are created in their respective libraries. This means a Neural Capture or Impulse Response can appear in multiple folders without consuming additional storage slots.

  • The Neural Captures Library can store up to 2048 Neural Captures and 30 folders.

  • The Impulse Responses Library can store up to 2048 IRs and 30 folders.

  • Folders can be nested up to four levels deep, and subfolders count toward the 30-folder maximum for each Library.

QC New Folder

Tap + New Folder to create a folder. Tap the three dots on the right edge of any folder to open its contextual menu.

  • DUPLICATE: Creates a copy of the selected folder and its content.

  • NEW SUBFOLDER: Creates a subfolder within the selected folder.

  • EDIT NAME: Renames the selected folder.

  • DELETE: Deletes the selected folder and its contents. Deleting items from the library is optional.

  • SET AS SAVING DESTINATION: Sets the selected folder as the default saving location.

06
Neural Capture Version 1

What is Neural Capture?

Neural Capture is a powerful tool that can learn and replicate the sonic characteristics of any amplifier, cabinet, or overdrive pedal with accuracy and realism.

QC Capture Intro

Neural Capture Version 1 is our original Neural Capture algorithm, trained directly on your device in just a few minutes. This is the fastest and most lightweight way to create Neural Captures, ideal when you are on the go or without an internet connection. Perfect for capturing the sound of guitar amplifiers, combos, cabinets, and overdrives with remarkable accuracy.

To create a Neural Capture, you will need to connect an overdrive pedal, mic a cabinet, or connect an amplifier through a reactive load box to your Quad Cortex. Once created, it can be inserted and used as a block on The Grid.


Tube Amplifier Warning

Connecting the speaker output of a tube amplifier directly to the Quad Cortex can cause serious damage to both devices. To ensure safe operation:

  • Use the D.I. output of the captured amplifier while keeping it connected to a speaker cabinet, or…

  • Connect a reactive load box between the amplifier’s speaker output and the Quad Cortex.

New Neural Capture

QC Capture V1 Access

To create a new Neural Capture Version 1, tap the Grid’s Contextual Menu at the top-right corner and select New Neural Capture.

Connection Diagram

01 REFERENCE INSTRUMENT
QC Capture V1 Step 01

Connect your instrument to INPUT 1.


02 MONITORING DEVICES
QC Capture V1 Step 02

Connect your headphones to HP OUTPUT or your monitor speaker to OUTPUTS 1L/2R or 3L/4R.


03 TARGET DEVICE INPUT
QC Capture V1 Step 03

Connect the Quad Cortex's CAPTURE OUT to the target device's input.


04 TARGET DEVICE OUTPUT
QC Capture V1 Step 04
  • OVERDRIVE PEDAL: If you are capturing an overdrive pedal, connect its output directly to the Quad Cortex's INPUT 2/CAPTURE INPUT.

  • AMP+CAB / COMBO AMP: Position a microphone in front of the speaker cabinet and connect it to the Quad Cortex's INPUT 2/CAPTURE INPUT.

  • AMP HEAD (NO SPEAKER): Connect the amp's 'Speaker Output' to a reactive load box. Then, connect the Reactive load box's balanced output to the Quad Cortex's INPUT 2/CAPTURE INPUT.

Tube Amplifier Warning

Connecting the speaker output of a tube amplifier directly to the Quad Cortex can cause serious damage to both devices. To ensure safe operation:

  • Use the D.I. output of the captured amplifier while keeping it connected to a speaker cabinet, or…

  • Connect a reactive load box between the amplifier’s speaker output and the Quad Cortex.


05 REVIEW

Once everything is connected correctly, tap NEXT to proceed with the calibration settings.

Calibration Settings

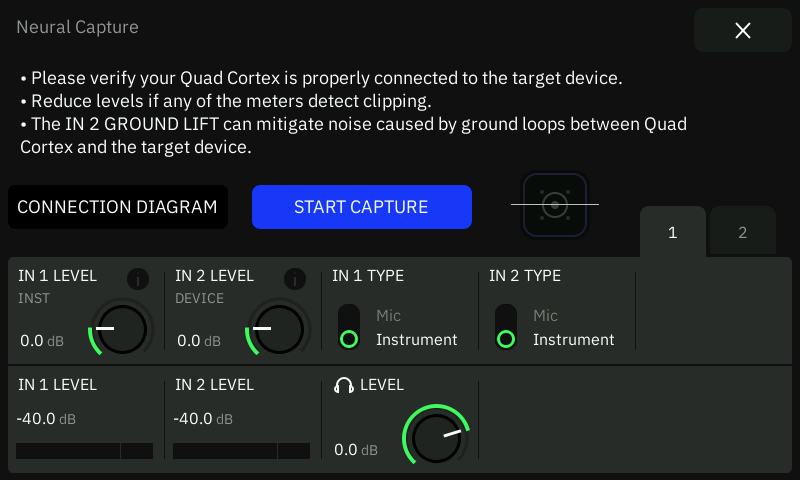
QC Capture Settings

Before starting the Neural Capture process, ensure the microphone position and target device settings are adjusted to your preference. Reduce input levels if any meters indicate clipping.

  • IN 1 LEVEL: Adjusts the input gain of the instrument signal. Adjust this level as you would in The Grid to properly feed the target device while playing your instrument. This setting is for monitoring purposes only and does not affect the CAPTURE OUT training signal level.

  • IN 2 LEVEL: Adjusts the input gain coming from the target device signal. For optimal results, aim for a peak level around -12 dB.

  • HP LEVEL: Adjusts the headphones' output level.

  • IN 1 METER: Displays the instrument input signal level.

  • IN 2 METER: Displays the target device signal level.

  • IN 2 GROUND LIFT: Toggles the ground lift on INPUT 2/CAPTURE INPUT. This feature helps to reduce unwanted noise by interrupting the ground loops coming from external sources.

  • IN 2 PHANTOM: Toggles 48V Phantom Power for compatible microphones.

  • OUT 1 GND LIFT: Toggles the ground lift on OUTPUT 1L. This feature helps to reduce unwanted noise by interrupting the ground loops coming from external sources.

  • OUT 2 GND LIFT: Toggles the ground lift on OUTPUT 2R. This feature helps to reduce unwanted noise by interrupting the ground loops coming from external sources.

  • CAPTURE CAB/IR LOADER BLOCK: Tapping the Cab block opens the Capture Cab/IR Loader parameter editor, allowing you to audition the target device with a cabinet or an impulse response (IR). Both the Cab and IR Loader blocks function exactly as they do on The Grid and can be bypassed if you prefer to audition your target device without additional processing.


Tap START CAPTURE to begin the Neural Capture process.

Neural Capture Process

QC Capture V1 Process

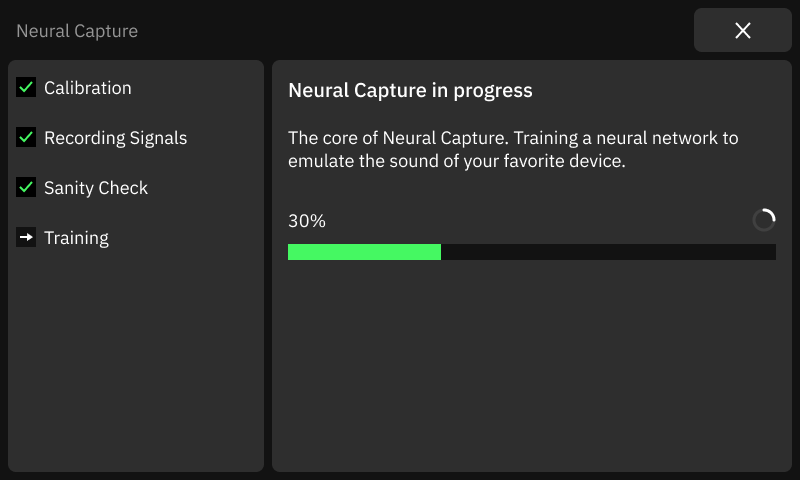
During the Neural Capture Version 1 process, the Quad Cortex measures the latency of the target device and sends a series of recorded test signals through it. These signals are then analyzed to model the device’s sonic characteristics. After a brief sanity check, the Quad Cortex trains a neural network to accurately replicate the tone and dynamic response of the target device.

This process may take a few minutes.


A/B TEST

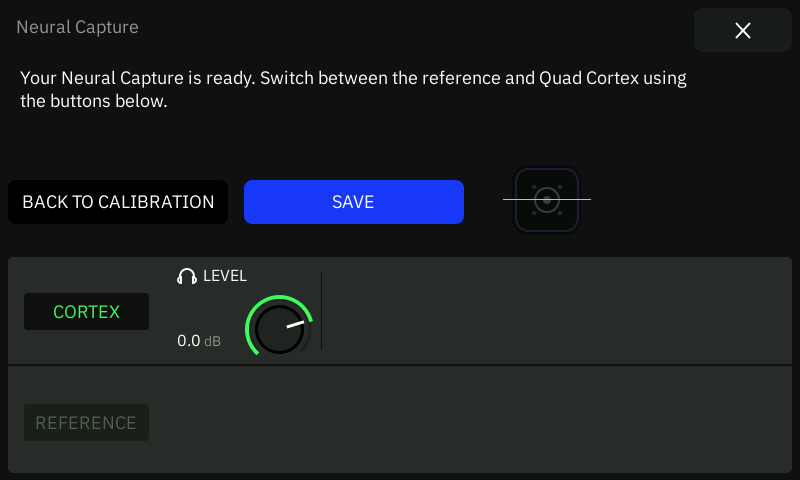
Once the capture process is complete, your Neural Capture will be ready for testing. You can easily A/B compare the sound of the original device with the Neural Capture to ensure accuracy.

QC Capture V1 AB Test
  • A/B TOGGLE: Tap to toggle between the original device signal and the Neural Capture.

  • HP LEVEL: Adjusts the headphones' output level.

  • RESTART CAPTURE: Redo the Neural Capture process.

  • CAPTURE CAB/IR LOADER BLOCK: Tapping the Cab block opens the Capture Cab/IR Loader parameter editor, allowing you to audition the target device with a cabinet or an impulse response (IR).

When you are satisfied with the results, tap SAVE to store your recently created Neural Capture.


SAVE NEURAL CAPTURE

Tap SAVE to store your recently created Neural Capture.

QC Capture V1 Metadata

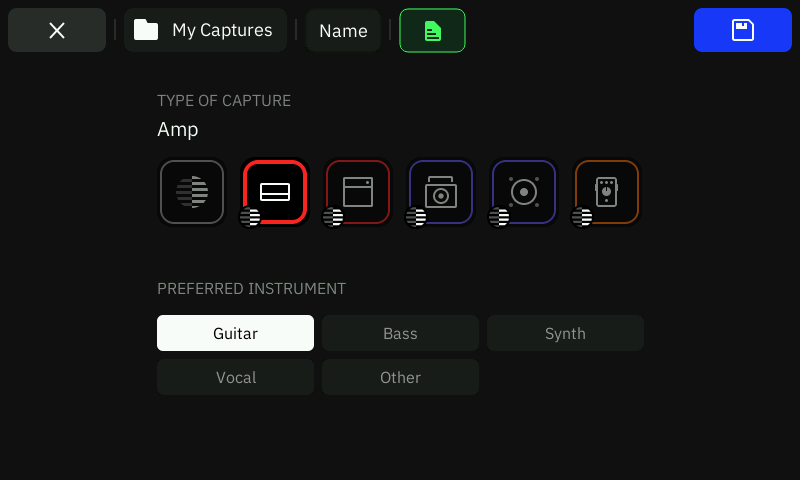
After naming your Neural Capture, you can add two types of metadata: Capture Type and Preferred Instrument. This metadata can also be added or edited later when modifying a Preset on the Quad Cortex or via the Cortex Cloud app. Each capture type includes its own icon, which is displayed on The Grid once assigned.

Gain metadata is calculated automatically during the Neural Capture™ process. The device evaluates the saturation level of the target device and assigns a ranking from 1 to 10, with 1 representing a clean tone and 10 representing the highest level of distortion.

07
Plugin Compatibility

Plugin Licenses

Logging in to your Neural DSP account on the Quad Cortex verifies which Neural DSP plugin licenses are associated with your linked iLok account(s) and unlocks any plugin devices on your device.

Neural DSP Profile 2024b

You can link up to three iLok accounts to your Neural DSP account. All purchased Neural DSP licenses are automatically deposited into your primary iLok account. Unlocking plugin devices on the Quad Cortex does not affect the number of activations available on iLok License Manager.

  • 14-day trials are not valid perpetual licenses.

  • An internet connection is only required once to verify perpetual plugin licenses.

  • As a security measure, a plugin license can be activated on up to three devices simultaneously. If this limit is reached, plugin device blocks will appear locked in the Virtual Device List and will be bypassed on the fourth device linked to the same account.


Plugin Licenses Offline Support

Once validated, plugin licenses remain available on your device even when it is offline. Their status will only change if you link a different Neural DSP account to the device.

Plugin Devices

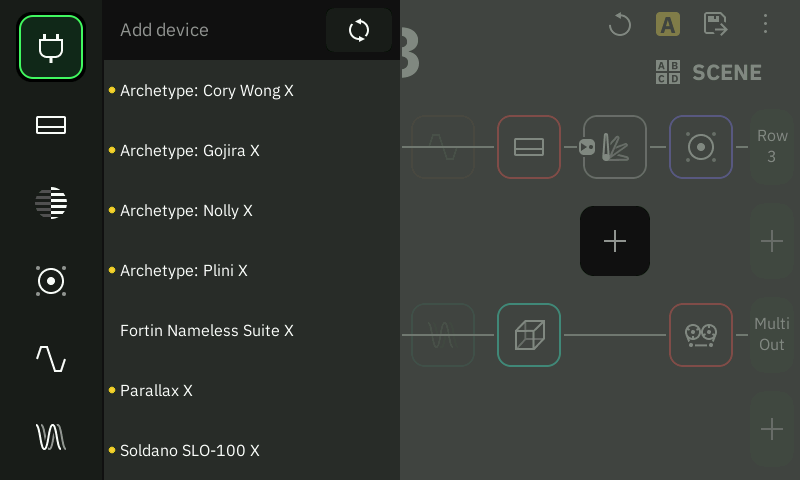
Plugin device blocks are located in the ‘Plugins’ category within the Device List.

QC Plugin Devices List

Blocks are organized into folders by plugin. Tap a folder to expand plugin device blocks. When you tap a device block in the Device List, it is automatically loaded into the previously selected slot on The Grid.


QC Plugin Refresh

Tap REFRESH to update the plugin availability status in the Virtual Device List. Plugin blocks will unlock automatically when a valid license is detected in your account. Plugins you do not own will remain locked in the Virtual Device List and cannot be loaded onto The Grid.

Plugin Presets

Plugin Presets can be accessed via the Directory. A perpetual license for each plugin is required to use these presets on both the Quad Cortex and the Cortex Control app.

QC Plugin Folders
  • Plugin Presets can be added to Favorites, sorted by Name or Preferred Instrument.

  • Plugin device blocks maintain a consistent organization across all Plugin Presets. Their bypass states and parameters are recalled exactly as saved in the original Preset.

  • Any changes made in The Grid can be saved as a regular Preset in any User Setlist.


User Plugin Preset Importing

User-created Plugin Presets can be imported to the device via the Cortex Control app.

08
MIDI Support

Quad Cortex supports MIDI via USB-B and MIDI DIN.

MIDI Settings Menu

QC Grid Settings

To access the MIDI settings, tap the Grid’s Contextual Menu at the top-right corner and select Settings > Device > MIDI.


QC MIDI Settings
  • MIDI CHANNEL: Determines the MIDI input channel that Quad Cortex will respond to. Select OMNI to receive MIDI messages from all channels.

  • MIDI THRU: MIDI Thru allows multiple devices to be connected in series, enabling them to receive MIDI data from a single common source. When enabled, Preset MIDI Out messages will be disabled.

  • MIDI OVER USB: Enable or disable MIDI communication via USB.

  • IGNORE DUPLICATE PC:

    • ON: When enabled, prevents Presets from being reloaded if the same MIDI Program Change (PC) message is received repeatedly. Related messages such as CC#0 and CC#32 will also be ignored.

    • OFF: Presets will be reloaded each time the corresponding MIDI Program Change (PC) message is received.

  • MIDI CLOCK OUT: Tap to toggle ‘MIDI Clock In’ through USB or DIN on or off. To receive MIDI Clock via USB, ‘MIDI Over USB’ must be enabled.

  • MIDI CLOCK IN: Tap to toggle ‘MIDI Clock Out’ through USB or DIN on or off. To send MIDI Clock via USB, ‘MIDI Over USB’ must be enabled.


MIDI Clock Behavior

The Tempo LED turns red when your device is sending MIDI Clock and turns blue when it is receiving MIDI Clock.

Preset MIDI Out

Quad Cortex can send MIDI messages to external devices via USB or MIDI DIN when assigned footswitches are pressed or upon Preset load.

QC MIDI Out Access

Tap the Grid’s Contextual Menu at the top-right corner and select Preset MIDI Out.


QC MIDI Out
FOOTSWITCH & EXPRESSION MESSAGES

You can assign up to 12 MIDI messages per footswitch (A-H) that will be sent via USB and/or MIDI DIN simultaneously upon pressing a designated footswitch.

Tap any Footswitch or Expression Pedal in the Preset MIDI Out menu to view and edit its MIDI message assignments.

  • TYPE: Sets the type of MIDI message sent (CC, CC Toggle, or PC).

  • CHANNEL: Sets the MIDI channel used to send the message (1 to 16).

  • CC#: Sets the Control Change number for the CC message (0 to 127).

  • BANK CC#0: Sets the Bank Select MSB for the PC message (Most Significant Byte).

  • BANK CC#32: Sets the Bank Select LSB for the PC message (Least Significant Byte).

  • VALUE: Sets the value for the assigned CC message (0 to 127).

  • MIN/MAX VALUE: Sets the value range for the assigned CC Toggle message (0 to 127).

  • PROGRAM#: Sets the program value for the assigned PC message (0 to 127).

MIDI Out Behavior

  • Footswitch MIDI messages are sent only when SCENE, STOMP, or HYBRID modes are active.

  • Expression Pedal MIDI messages are always sent, regardless of the active mode.


ON PRESET LOAD MESSAGES

You can assign up to 12 MIDI messages per Preset that will be sent via USB and/or MIDI DIN simultaneously once the current Preset is loaded.

Tap ON PRESET LOAD MESSAGE in the Preset MIDI Out menu to view and edit the current Preset MIDI message assignments.

  • TYPE: Sets the type of MIDI message sent (CC or PC).

  • CHANNEL: Sets the MIDI channel used to send the message (1 to 16).

  • CC#: Sets the Control Change number for the CC message (0 to 127).

  • BANK CC#0: Sets the Bank Select MSB for the PC message (Most Significant Byte).

  • BANK CC#32: Sets the Bank Select LSB for the PC message (Least Significant Byte).

  • VALUE: Sets the value for the assigned CC message (0 to 127).

  • PROGRAM#: Sets the program value for the assigned PC message (0 to 127).

Incoming MIDI Messages

Quad Cortex can receive MIDI messages from external devices via USB or MIDI DIN.


PROGRAM CHANGE (PC)

Quad Cortex supports Program Change (PC) messages to recall Presets and Setlists with precision.

  • CC#0 (Value 0-1): Sets the Bank Select MSB (Most Significant Byte), which determines the Preset group within the current active Setlist:

    • Value 0: Presets 0-127.

    • Value 1: Presets 128-256.

  • CC#32 (0-12): Sets the Bank Select LSB (Least Significant Byte), which determines the Setlist:

    • Value 0: ‘Factory Presets’ folder.

    • Value 1: ‘My Presets’ folder.

    • Value 2-12: ‘User’ folders.

  • CC# PROGRAM (0-127): Recalls a specific preset within the selected preset group, as determined by CC#0.

MIDI PC Calculator Tool

Setting up MIDI Program Change (PC) messages can feel overwhelming at first.

The MIDI PC Calculator web tool helps you quickly determine the correct PC message to send to your Quad Cortex.


CONTINUOUS CONTROLLER (CC)

Control Change (CC) messages are a type of MIDI message that allows you to control specific parameters and actions on the Quad Cortex. Unlike Program Change (PC) messages, which recall Presets or Setlists, CC messages can actively change parameter settings in real time.

Incoming CC List

For a complete overview of all supported CC messages and their assigned functions, check the next section.

Incoming MIDI CC List

The following MIDI Continuous Controller (CC) messages are reserved for direct control of Quad Cortex parameters:

PRESET RECALL

CC#0: Bank (MSB) Preset Groups.
• Value 0: Presets 0
• Value 1: Presets 128 to 256.

CC#32: Bank (LSB) Setlists Recall.
• Value 0: ‘Factory Presets’ folder.
• Value 1: ‘My Presets’ folder.
• Value 2-12: ‘User’ folders.


EXPRESSION PEDAL CONTROL

CC#1: Expression Pedal 1 position.
• Value 0: Heel Position.
• Value 127: Toe Position.

CC#2: Expression Pedal 2 position.
• Value 0: Heel Position.
• Value 127: Toe Position.


FOOTSWITCH CONTROL

CC#35: Footswitch A.
• Value 0-127: Footswitch Press.

CC#36: Footswitch B.
• Value 0-127: Footswitch Press.

CC#37: Footswitch C.
• Value 0-127: Footswitch Press.

CC#38: Footswitch D.
• Value 0-127: Footswitch Press.

CC#39: Footswitch E.
• Value 0-127: Footswitch Press.

CC#40: Footswitch F.
• Value 0-127: Footswitch Press.

CC#41: Footswitch G.
• Value 0-127: Footswitch Press.

CC#42: Footswitch H.
• Value 0-127: Footswitch Press.


SCENE RECALL

CC#43: Scenes.
• Value 0: Scene A.
• Value 1: Scene B.
• Value 2: Scene C.
• Value 3: Scene D.
• Value 4: Scene E.
• Value 5: Scene F.
• Value 6: Scene G.
• Value 7: Scene H.


MENU ACCESS & FEATURE CONTROL

CC#44: Tap Tempo.
• Value 0-127: Tap Tempo press emulation.

CC#45: Tuner.
• Value 0-63: Closes the Tuner menu.
• Value 64-127: Opens the Tuner menu.

CC#46: Gig View.
• Value 0-63: Closes Gig View.
• Value 64-127: Opens Gig View.

CC#47: Modes.
• Value 0: Mode Slot 1 (PRESET Mode by default).
• Value 1: Mode Slot 2 (SCENE Mode by default).
• Value 2: Mode Slot 3 (STOMP Mode by default).

MIDI & Modes Cycling

When Modes are reordered in the Modes Configuration menu, MIDI CC values do not change to reflect the new cycle arrangement. If a Mode slot is empty, MIDI messages will not recall any Mode.


LOOPER X CONTROL

CC#48: Looper X.
• Value 0-63: Opens the Looper X parameter editor (‘Perform’ Mode).
• Value 64-127: Closes the Looper X parameter editor.

CC#49: Duplicate (Looper X).
• Value 64-127: Toggles DUPLICATE on and off.

CC#50: One Shot (Looper X).
• Value 64-127: Toggles ONE SHOT on and off.

CC#51: Half Speed (Looper X).
• Value 64-127: Toggles HALF SPEED on and off.

CC#52: Punch In/Out (Looper X).
• Value 0-63: PUNCH OUT.
• Value 64-127: Toggles PUNCH IN / PUNCH OUT.

0-63 Value Behavior

Value 0-63 works as long as the parameter is set to momentary and value 0-63 is sent upon the MIDI footswitch’s release.

CC#53: Record/Overdub (Looper X).
• Value 0-63: STOP active recording.
• Value 64-127: Toggles RECORD / OVERDUB.

0-63 Value Behavior

Value 0-63 works as long as the parameter is set to momentary and value 0-63 is sent upon the MIDI footswitch’s release.

CC#54: Play/Stop (Looper X).
• Value 64-127: Toggles PLAY / STOP.

CC#55: Reverse (Looper X).
• Value 64-127: Toggles REVERSE on and off.

CC#56: Undo/Redo (Looper X).
• Value 64-127: Toggles UNDO / REDO.

CC#57: Duplicate Mode (Looper X).
• Value 0: Free.
• Value 1: Sync.

CC#58: Quantize (Looper X).
• Value 0: Off.
• Value 1-8: 1-8 beats.
• Value 9: 16 beats.

CC#59: MIDI Clock Start (Looper X).
• Value 0: Free.
• Value 1: Sync.

CC#60: Perform/Parameters Mode Swap (Looper X).
• Value 0: Perform Mode.
• Value 1: Parameters Mode.

CC#61: Routing Mode (Looper X).
• Value 0: Grid.
• Value 1: Input 1.
• Value 2: Input 2.
• Value 3: Return 1.
• Value 4: Return 2.
• Value 5: Inputs 1/2.
• Value 6: Returns 1/2.
• Value 7: Output 1.
• Value 8: Output 2.
• Value 9: Output 3.
• Value 10: Output 4.
• Value 11: Outputs 1/2.
• Value 12: Outputs 3/4.
• Value 13: ‘Multiple Outputs’ block.


MIDI SETTINGS

CC#62: Ignore Duplicate PC.
• Value 0-63: Off. Presets will be reloaded each time the corresponding MIDI Program Change (PC) message is received.
• Value 64-127: On. Prevents Presets from being reloaded if the same MIDI Program Change (PC) message is received repeatedly. Related messages such as CC#0 and CC#32 will also be ignored.

09
Computer Integration

USB Audio Setup

Quad Cortex can be utilized as a USB 2.0, 24-bit, 48kHz (Fixed), low-latency audio interface for Windows® and Mac® computers.

QC USB Location

Connect your Quad Cortex to your computer with the USB cable included in the box.


MAC® SETUP
  1. Connect your Quad Cortex to your computer via USB.

  2. Go to 'System Preferences', 'Sound', and select Quad Cortex as the main input and output device of your computer.

  3. Adjust the monitoring volume via audio controls per application.

WINDOWS® SETUP
  1. Download the audio driver installer from our website (Neural DSP® Downloads).

  2. Run the installer. Reboot your computer after the setup.

  3. Connect your Quad Cortex to your computer via USB.

  4. Go to 'Control Panel', 'Hardware and Sound', 'Sound', and ensure your device is set as the default Playback and Recording device of your computer.

  5. Adjust the monitoring volume via audio controls per application.


Neural DSP Driver Files

Neural DSP Windows® audio drivers are installed in the following directory:

  • C:\Program Files\Neural DSP Drivers\

USB Channels

Quad Cortex has 16 USB Audio Channels (8 Inputs / 8 Outputs).


USB INPUTS

USB INPUT 1 (DRY INPUT 1)
• Source
: Analog INPUT 1.
• Description: Dry Input (D.I.) signal from analog INPUT 1 to the host. Select INPUT 1 on your DAW to record the dry input signal coming from your instrument.

USB INPUT 2 (DRY INPUT 2)
• Source
: Analog INPUT 2.
• Description: Dry Input (D.I.) signal from analog INPUT 2 to the host. Select INPUT 2 on your DAW to record the dry input signal coming from your instrument or microphone.

USB INPUT 3 (WET SIGNAL L)
• Source
: Analog OUTPUT 1/L.
• Description: Processed signal from analog Output 1/L to the host. Select INPUT 3 on your DAW to record the processed audio signal from The Grid.

USB INPUT 4 (WET SIGNAL R)
• Source
: Analog OUTPUT 2/R.
• Description: Processed signal from analog Output 2/R to the host. Select INPUT 4 on your DAW to record the processed audio signal from The Grid.

USB INPUT 5 (GRID’S USB OUTPUT 5)
• Source
: Grid’s USB OUTPUT 5.
• Description: Processed signal from Grid’s USB Output 5 to the host. Select INPUT 5 on your DAW to record the processed audio from this specific output block.

USB INPUT 6 (GRID’S USB OUTPUT 6)
• Source
: Grid’s USB OUTPUT 6.
• Description: Processed signal from Grid’s USB Output 6 to the host. Select INPUT 6 on your DAW to record the processed audio from this specific output block.

USB INPUT 7 (GRID’S USB OUTPUT 7)
• Source
: Grid’s USB OUTPUT 7.
• Description: Processed signal from Grid’s USB Output 7 to the host. Select INPUT 7 on your DAW to record the processed audio from this specific output block.

USB INPUT 8 (GRID’S USB OUTPUT 8)
• Source
: Grid’s USB OUTPUT 8.
• Description: Processed signal from Grid’s USB Output 8 to the host. Select INPUT 8 on your DAW to record the processed audio from this specific output block.


USB OUTPUTS

USB OUTPUT 1 (TO OUT 1/L)
• Source
: Host’s Left Output.
• Description: Playback signal from the host to OUTPUT 1/L. Select OUTPUT 1 on your DAW to route the host playback to OUTPUT 1/L.

USB OUTPUT 1 (TO OUT 2/R)
• Source
: Host’s Right Output.
• Description: Playback signal from the host to OUTPUT 2/R. Select OUTPUT 2 on your DAW to route the host playback to OUTPUT 2/R.

USB OUTPUT 3 (TO OUT 3/L)
• Source
: Host’s Left Output.
• Description: Playback signal from the host to OUTPUT 3/L. Select OUTPUT 3 on your DAW to route the host playback to OUTPUT 3/L.

USB OUTPUT 4 (TO OUT 4/R)
• Source
: Host’s Right Output.
• Description: Playback signal from the host to OUTPUT 4/R. Select OUTPUT 4 on your DAW to route the host playback to OUTPUT 4/R.

USB OUTPUT 5 (GRID’S USB INPUT 5)
• Source
: Host’s USB OUTPUT 5.
• Description: Playback signal from the host to USB OUTPUT 5. Select USB INPUT 5 on any input block to route the processed audio from the host to The Grid.

USB OUTPUT 6 (GRID’S USB INPUT 6)
• Source
: Host’s USB OUTPUT 6.
• Description: Playback signal from the host to USB OUTPUT 6. Select USB INPUT 6 on any input block to route the processed audio from the host to The Grid.

USB OUTPUT 7 (GRID’S USB INPUT 7)
• Source
: Host’s USB OUTPUT 7.
• Description: Playback signal from the host to USB OUTPUT 7. Select USB INPUT 7 on any input block to route the processed audio from the host to The Grid.

USB OUTPUT 5 (GRID’S USB INPUT 8)
• Source
: Host’s USB OUTPUT 8.
• Description: Playback signal from the host to USB OUTPUT 8. Select USB INPUT 8 on any input block to route the processed audio from the host to The Grid.


USB Dry/Wet Swap

When enabled, toggles between sending dry (unprocessed) or wet (processed) signal to USB channels 1/2 and 3/4. Channel names on your computer will update after reconnecting or power cycling your device.

This feature is available in the I/O Settings menu.

Host Monitoring

DI & PROCESSED SIGNAL RECORDING

Quad Cortex allows you to record dry and processed signals simultaneously. Connect your instrument to INPUT 1 and ensure your device is selected as the default audio interface on your computer.

QC USB Wireframe
  1. Open your DAW, create a mono audio track, and set its input as Input 1 (Dry input signal).

  2. Create a stereo audio track and set its input as Input 3/4 (Processed signal from analog OUTPUT 1/L and OUTPUT 2/R).

  3. Arm both tracks for recording.

  4. To reamp a recorded D.I. track, set the track’s output as Output 5 and the Grid input block to USB Input 5 during DAW playback. Then, arm a stereo track (Inputs 3/4) for recording.


IPHONE® AND IPAD® INTEGRATION

You can use any class-compliant USB audio device with an iPhone® or iPad®. Quad Cortex can be used with such devices via USB-C (iPhone 15 or later).

iPhone 14 and older generations will need the Apple® Lightning to USB-C Camera Adapter to recognize Quad Cortex as an external microphone device.

This feature allows you to use Quad Cortex with audio apps such as GarageBand® for recording purposes.

10
Device Settings Menu

QC Grid Settings

You can access the Device Settings via the Grid’s contextual menu.

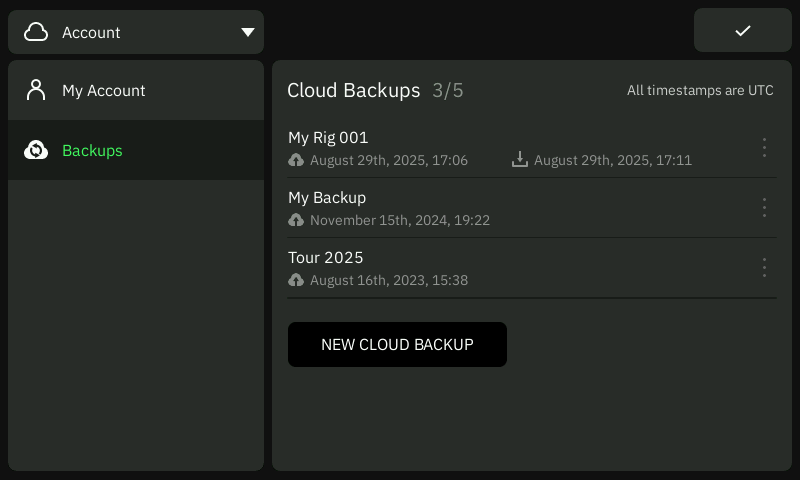
Account Settings

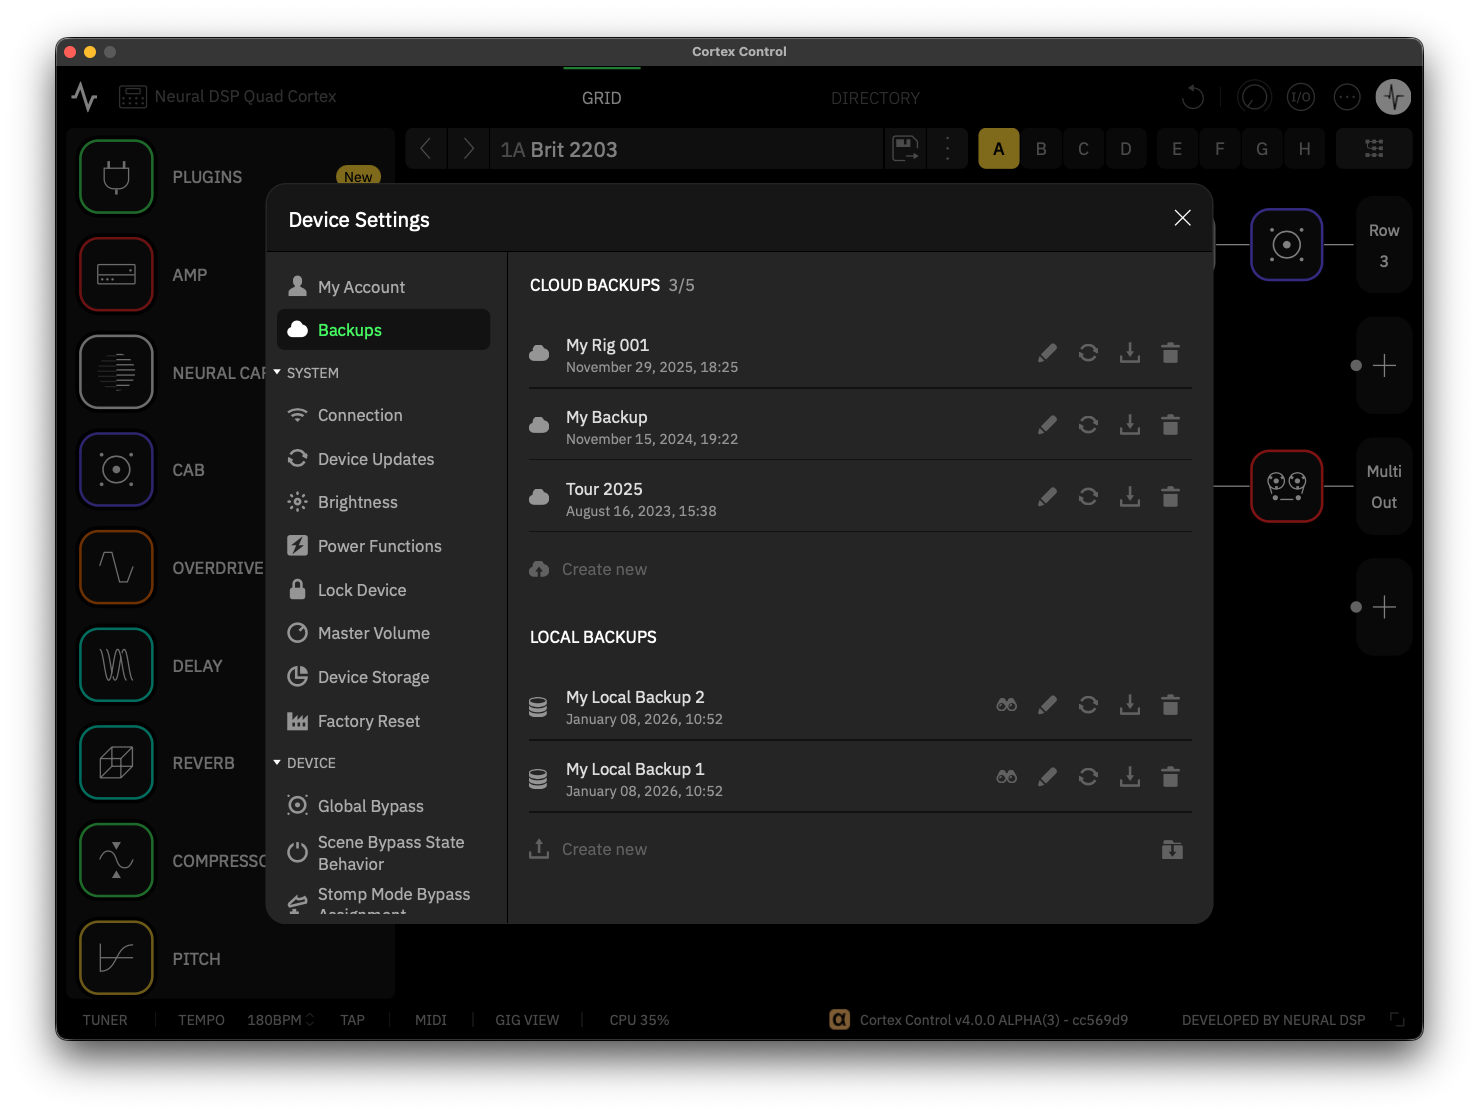
Manage your Cortex Cloud and backup data. This section lets you sign in or out, view your account details, and manage backups stored in the cloud.

QC Settings Account
  • MY ACCOUNT: View and manage your Cortex Cloud™ account.

  • BACKUPS: Manage and restore backups stored in the cloud.

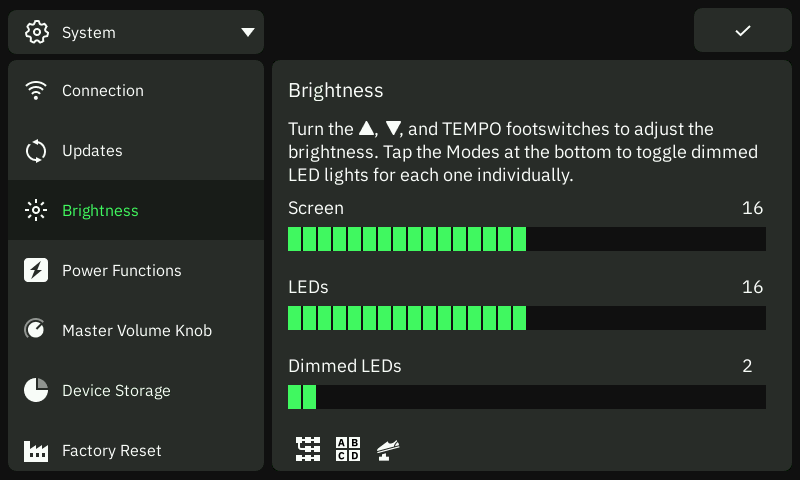
System Settings

Quad Cortex operating system settings. Includes connectivity, firmware updates, power options, screen brightness, and storage management. Use this section to ensure your device is up to date and functioning optimally.

QC Settings System
  • CONNECTION: Configure Wi-Fi bands and device Internet connectivity settings.

  • UPDATES: Check and install CorOS updates.

  • BRIGHTNESS: Adjust screen and LED brightness settings.

  • POWER FUNCTIONS: Power button sensitivity settings.

  • MASTER VOLUME: Set the function of the Master Volume knob (Global or Output specific).

  • DEVICE STORAGE: User Presets, User Captures, and Impulse Responses storage information.

  • FACTORY RESET: Restore to factory settings and/or remove user data from the device.

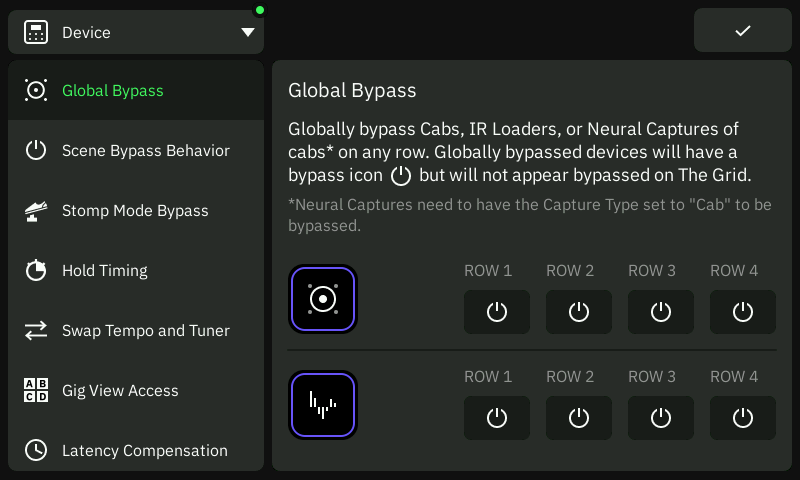
Device Settings

Configure how the Quad Cortex behaves during performance. Adjust global audio settings, footswitch behavior, latency, and MIDI control. These options directly affect how you interact with Presets, Scenes, and external MIDI devices.

QC Settings Device
  • GLOBAL BYPASS: Enable or disable Cab and IR Loader blocks across all Presets for selected Rows in The Grid.

  • SCENE BYPASS BEHAVIOR: Select how block bypass states are managed when working with Scenes:

    • Always overwrite bypass state (default): All block bypass changes are automatically saved per Scene.

    • Footswitch Presses are not saved: Block bypass changes made via footswitches in STOMP Mode are not saved. Changes made via the touchscreen are saved.

    • No changes are saved: Block bypass changes made by any method are not saved.

  • STOMP MODE BYPASS: Select whether blocks are automatically assigned or not to footswitches for STOMP Mode operation once they are loaded onto The Grid.

  • SWAP TEMPO AND TUNER: Swap the footswitch combinations for accessing the Tempo and Tuner menus. When enabled:

    • Press TEMPO twice to open the Tuner menu.

    • Hold TEMPO to open the Tempo menu.

  • LATENCY COMPENSATION: Toggles Dynamic latency Compensation. Disabling this feature may help prevent phase issues when bypassing devices in The Grid.

  • MIDI: Configure MIDI channel, MIDI Thru, MIDI over USB, and MIDI Clock settings.

Support Settings

Access essential information and troubleshooting tools. Includes device diagnostics, firmware details, support contact, and software licensing.

QC Settings Support
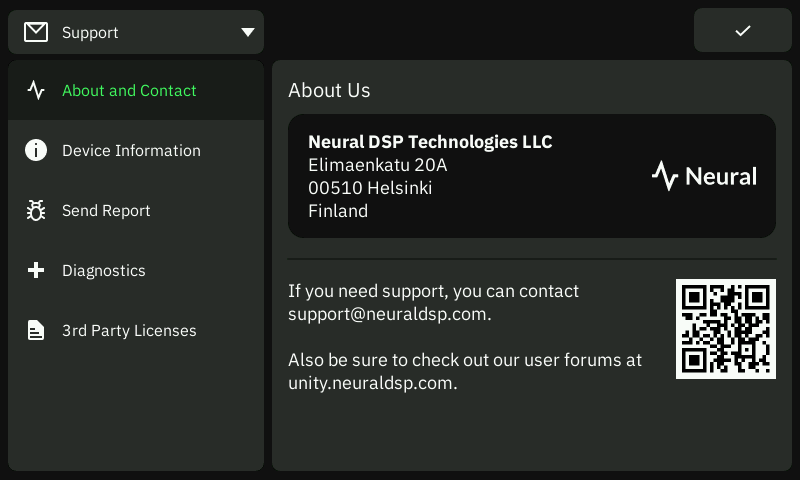
  • ABOUT AND CONTACT: Neural DSP information and Customer Support contact.

  • DEVICE INFORMATION: Device and Software information.

  • SEND REPORT: Send a system logs report to Neural DSP.

  • DIAGNOSTICS: DSP, Footswitches, and USB audio statistics.

  • 3RD PARTY LICENSES: View open-source and third-party software license information.

11
Cortex Control App

QC Control 1

Cortex Control is a fully integrated desktop application that allows you to manage every feature and setting of your Quad Cortex via USB.

It provides a clear, intuitive interface for organizing Presets, Neural Captures, Impulse Responses, and device settings, making management faster and more efficient.

App Setup

QC Control Download
INSTALLATION

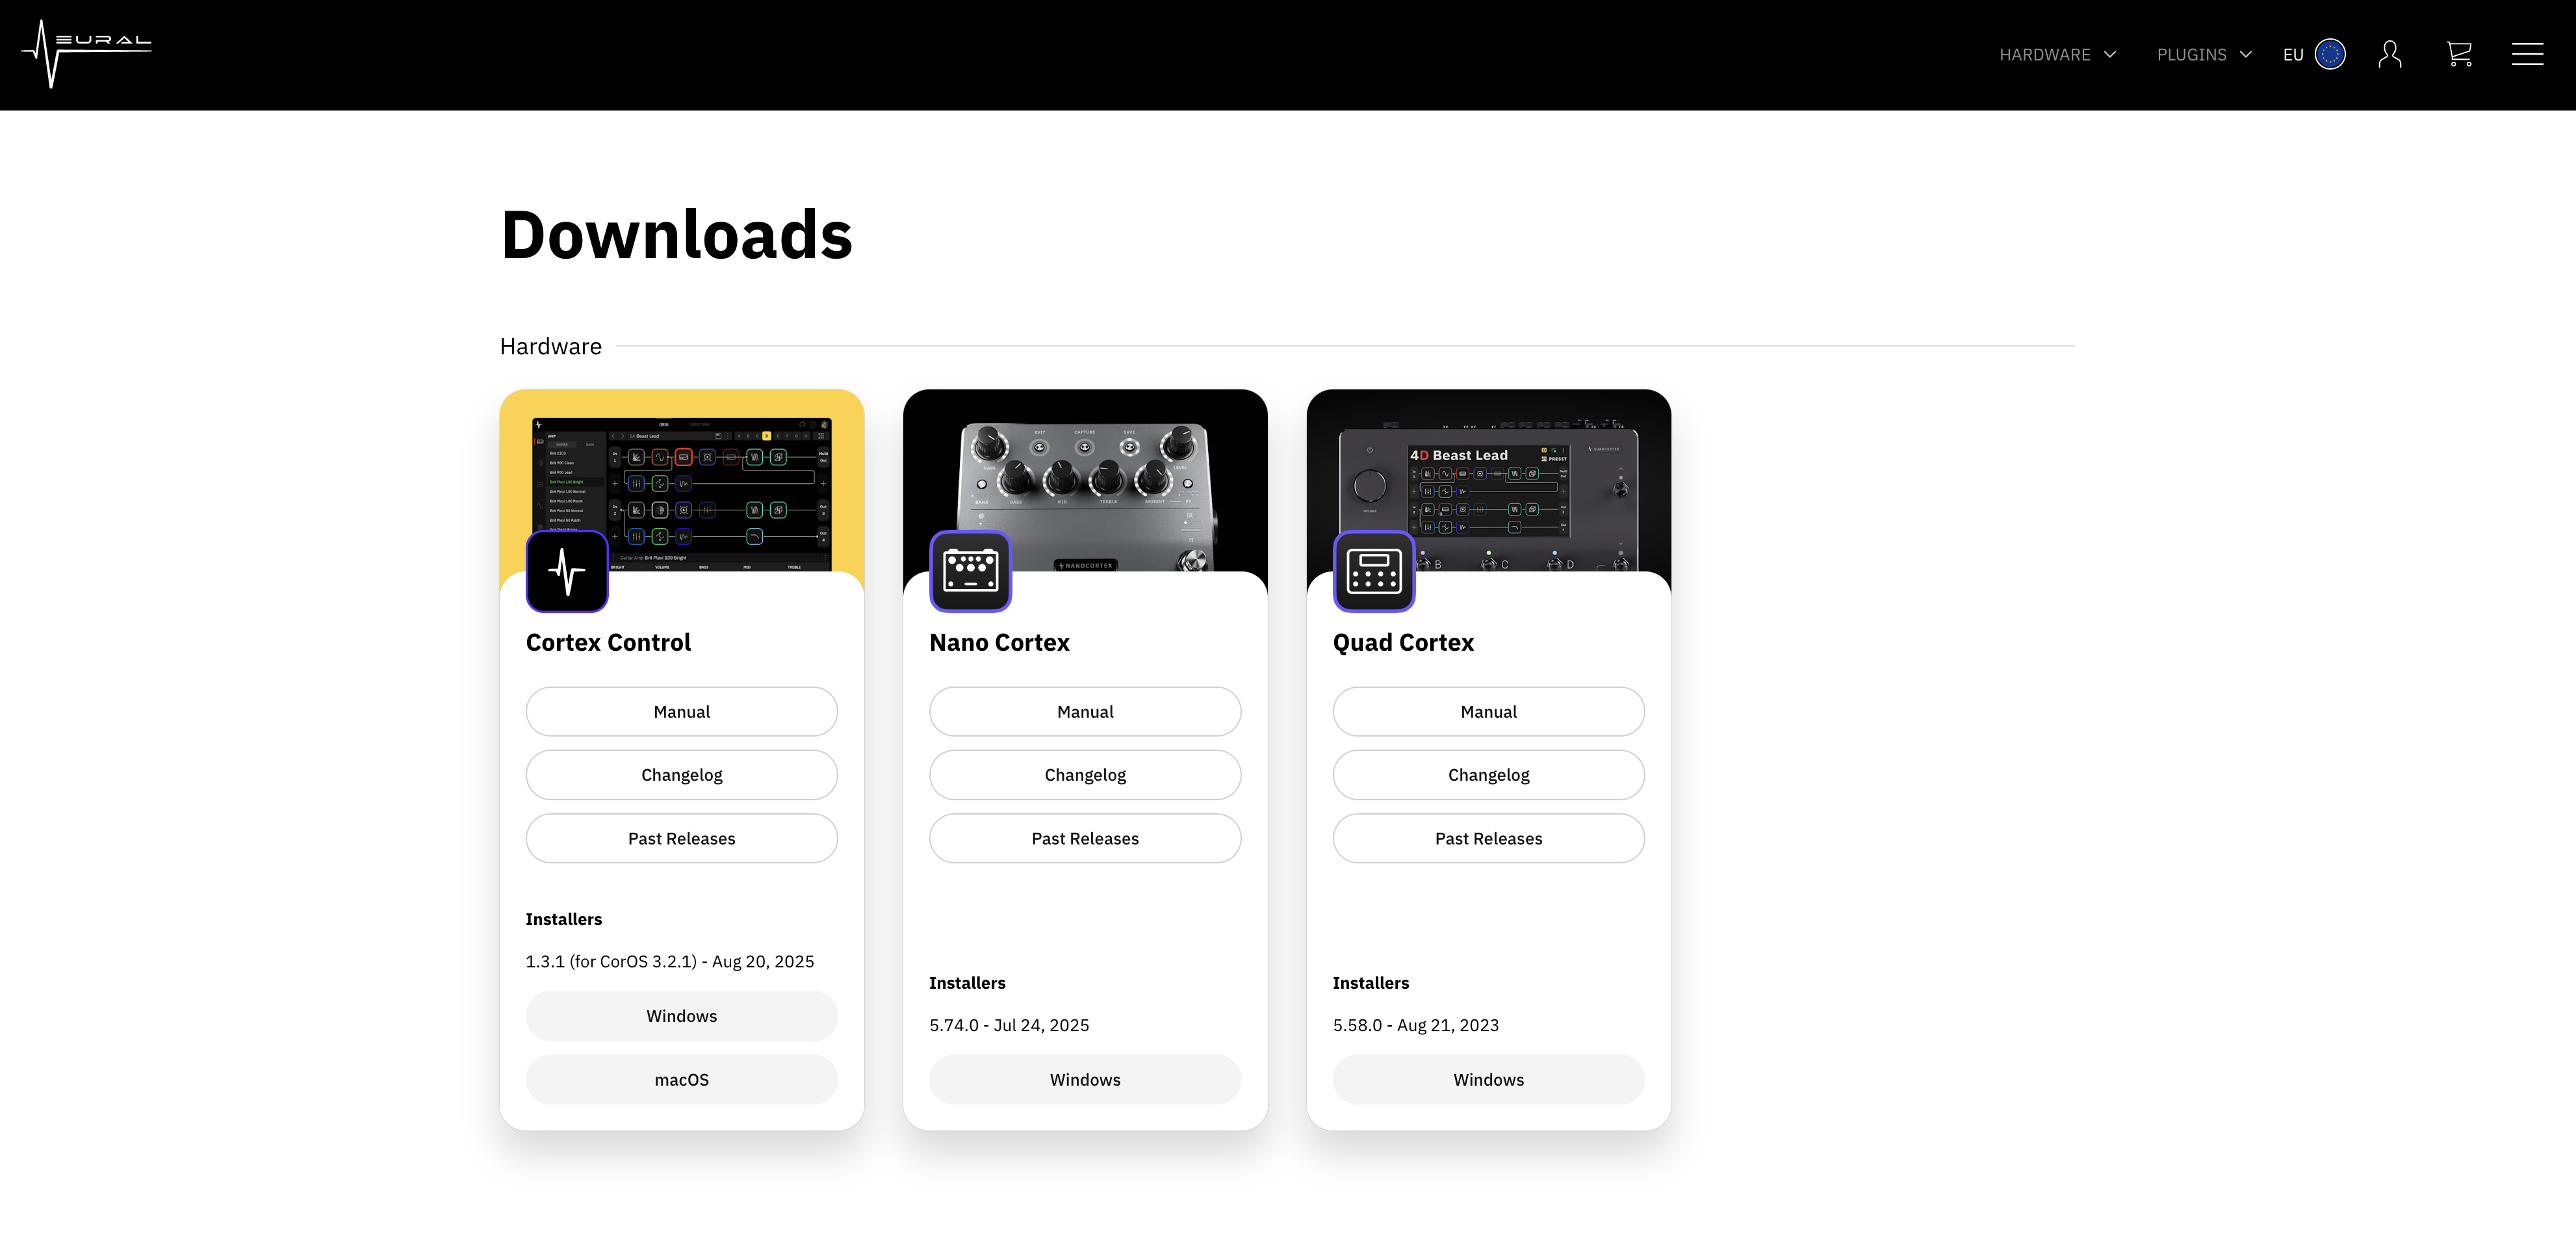
Download the latest version of Cortex Control from our official website and run the installer to complete the installation process. Cortex Control is available for both macOS® and Windows®.


UPDATES

To update Cortex Control, download the latest version from the official website and run the installer. There is no need to uninstall the previous version, as your existing files will be automatically overwritten during the installation process.


UNINSTALLATION
  • On macOS®, uninstall Cortex Control by manually deleting its files from their respective folders.

  • On Windows®, you can uninstall Cortex Control via the Control Panel or by selecting the Remove option in the installer.

System Requirements

Cortex Control requires a Quad Cortex connected to your computer via USB. Standalone operation is not supported.

Any Windows® or Apple® computer capable of audio processing is supported. On Windows® computers, the Quad Cortex ASIO® audio driver must be installed before using Cortex Control.


MACOS® MINIMUM REQUIREMENTS
  • Intel Core® i5 (4th generation or higher).

  • Apple® Silicon (M1 or higher).

  • 8 GB RAM or more.

  • macOS® 13 Ventura (or higher).

WINDOWS® MINIMUM REQUIREMENTS
  • Intel Core® i5 (4th generation or higher).

  • 8 GB RAM or more.

  • Windows® 10 (or higher).

  • Latest Quad Cortex® ASIO® audio driver.

Cortex Control™ requires 100 MB of free storage space.

File Locations

Cortex Control is installed in the default directories unless a custom installation location is selected during setup.


MACOS® DEFAULT DIRECTORIES
  • Standalone App: Macintosh HD/Applications/Neural DSP/

  • Settings Files: <User Folder>/Library/Application Support/Neural DSP/Cortex Control

  • Local Backups: <User Folder>/Library/Application Support/Neural DSP/Backups


WINDOWS® DEFAULT DIRECTORIES
  • Standalone App: C:\Program Files\Neural DSP\Cortex Control

  • Settings File: C:\Users\<Your Profile>\AppData\Roaming\Neural DSP\Cortex Control

  • Local Backups: C:\Users\<Your Profile>\AppData\Neural DSP\Backups

App Startup

When you first launch Cortex Control, the application checks if a device is connected to your computer via USB.

QC USB Wireframe

Connect your device via USB and wait for the application to complete startup.


Automatic Version Check

Cortex Control automatically checks for firmware compatibility upon startup.

If a version mismatch is detected, a pop-up window will appear with the option to download and install the latest available version.

User Interface

The Cortex Control user interface provides a streamlined, desktop-based experience for managing every aspect of your Quad Cortex.

From the main window, you can access The Grid, browse and organize content via the Directory, and adjust device settings.


GRID
QC Control Grid

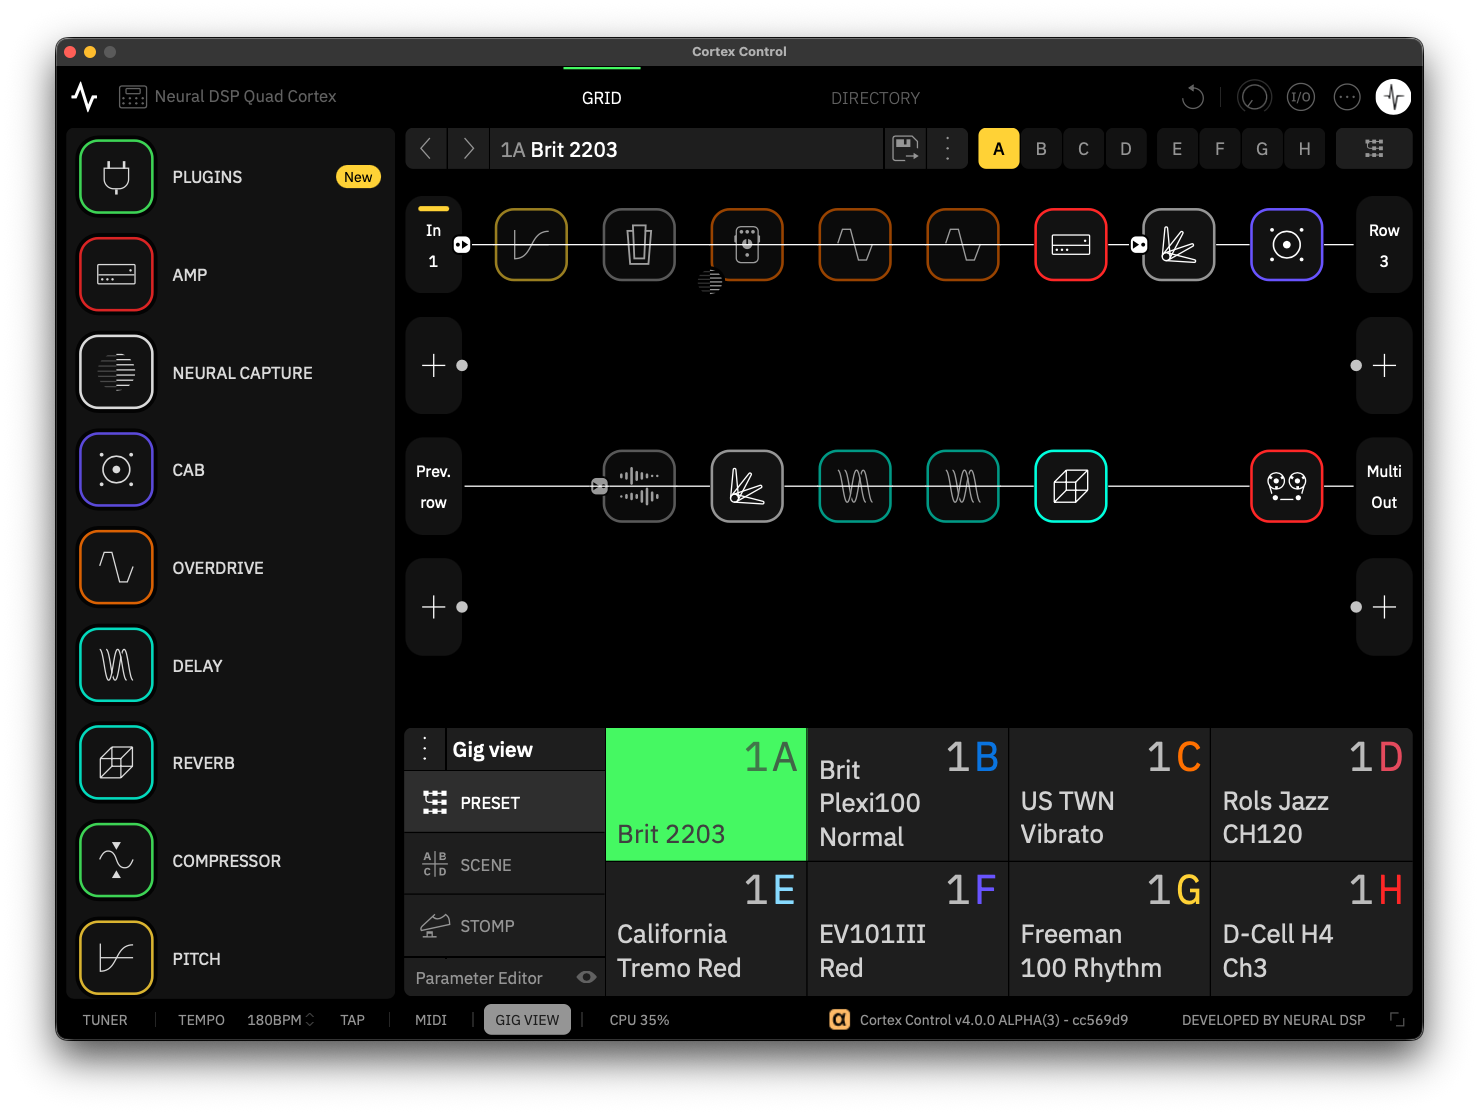
Cortex Control features an intuitive and expanded version of The Grid, giving you a clear overview of the current active Preset. The Grid displays your virtual devices, signal routing, parameter values, active Scene, Tempo, and CPU usage.

QC Control Empty Slot

You can start building a Preset by clicking an empty slot on The Grid to add your first device block from the Virtual Device List. Additionally, you can drag-and-drop devices directly from the Virtual Device List onto The Grid.

Parameter Editors

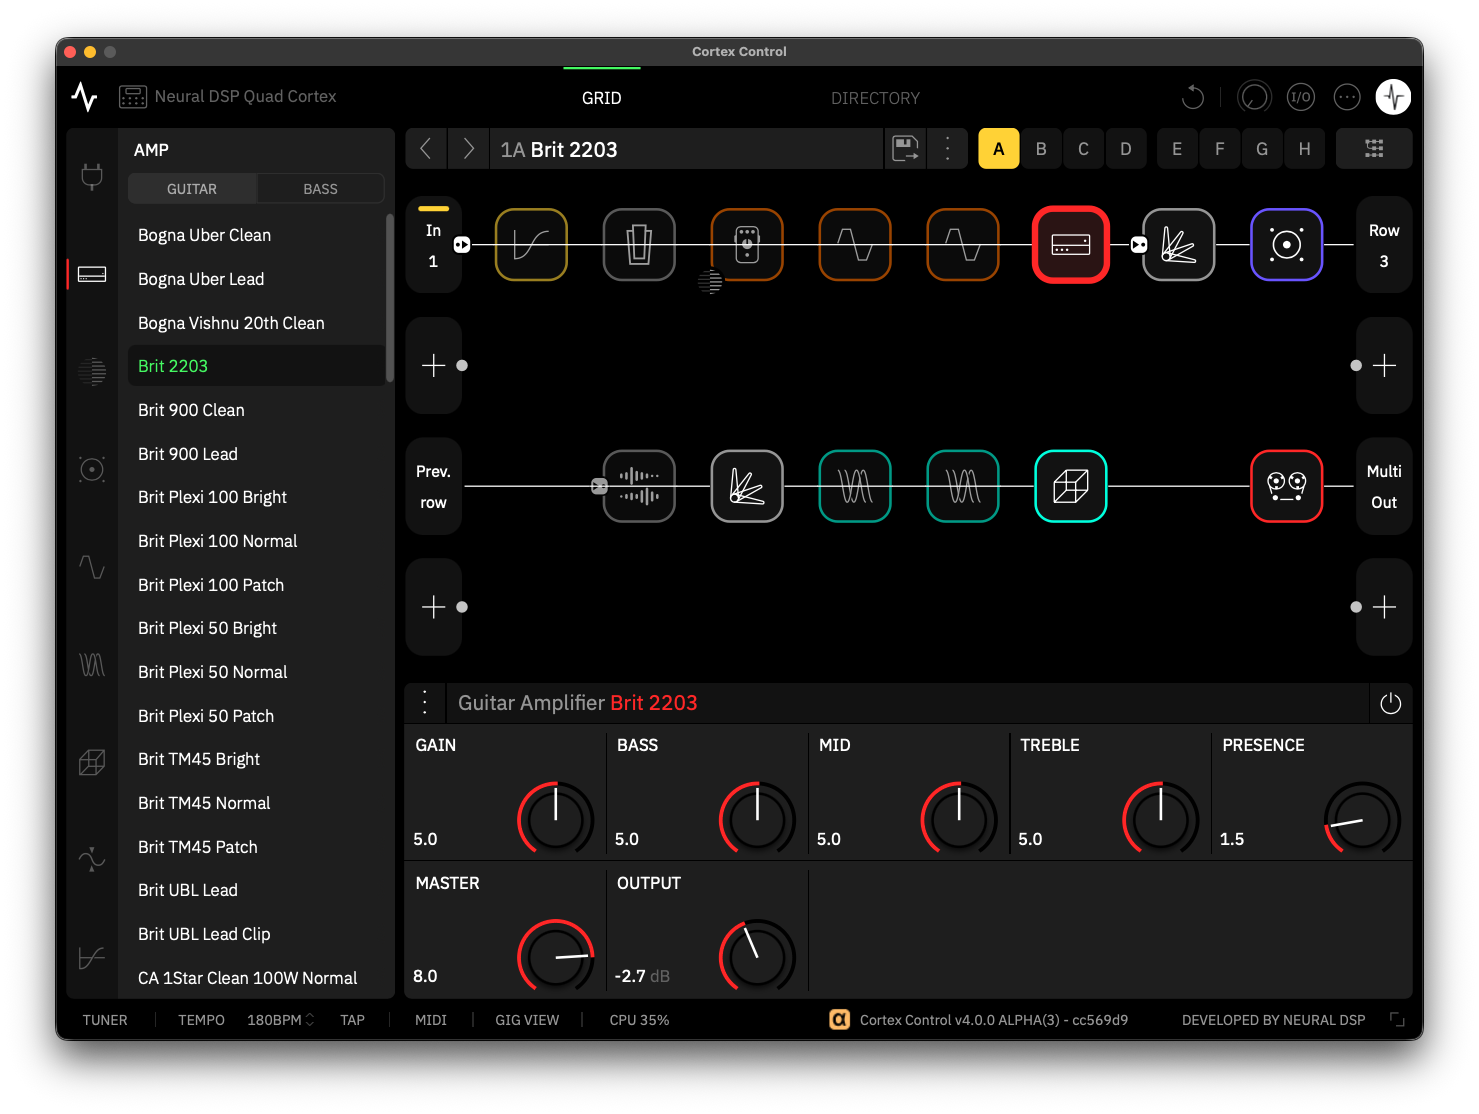
The Parameter Editors expand or collapse depending on the selected item. The Grid always remains visible to ensure an uninterrupted editing experience.


DIRECTORY
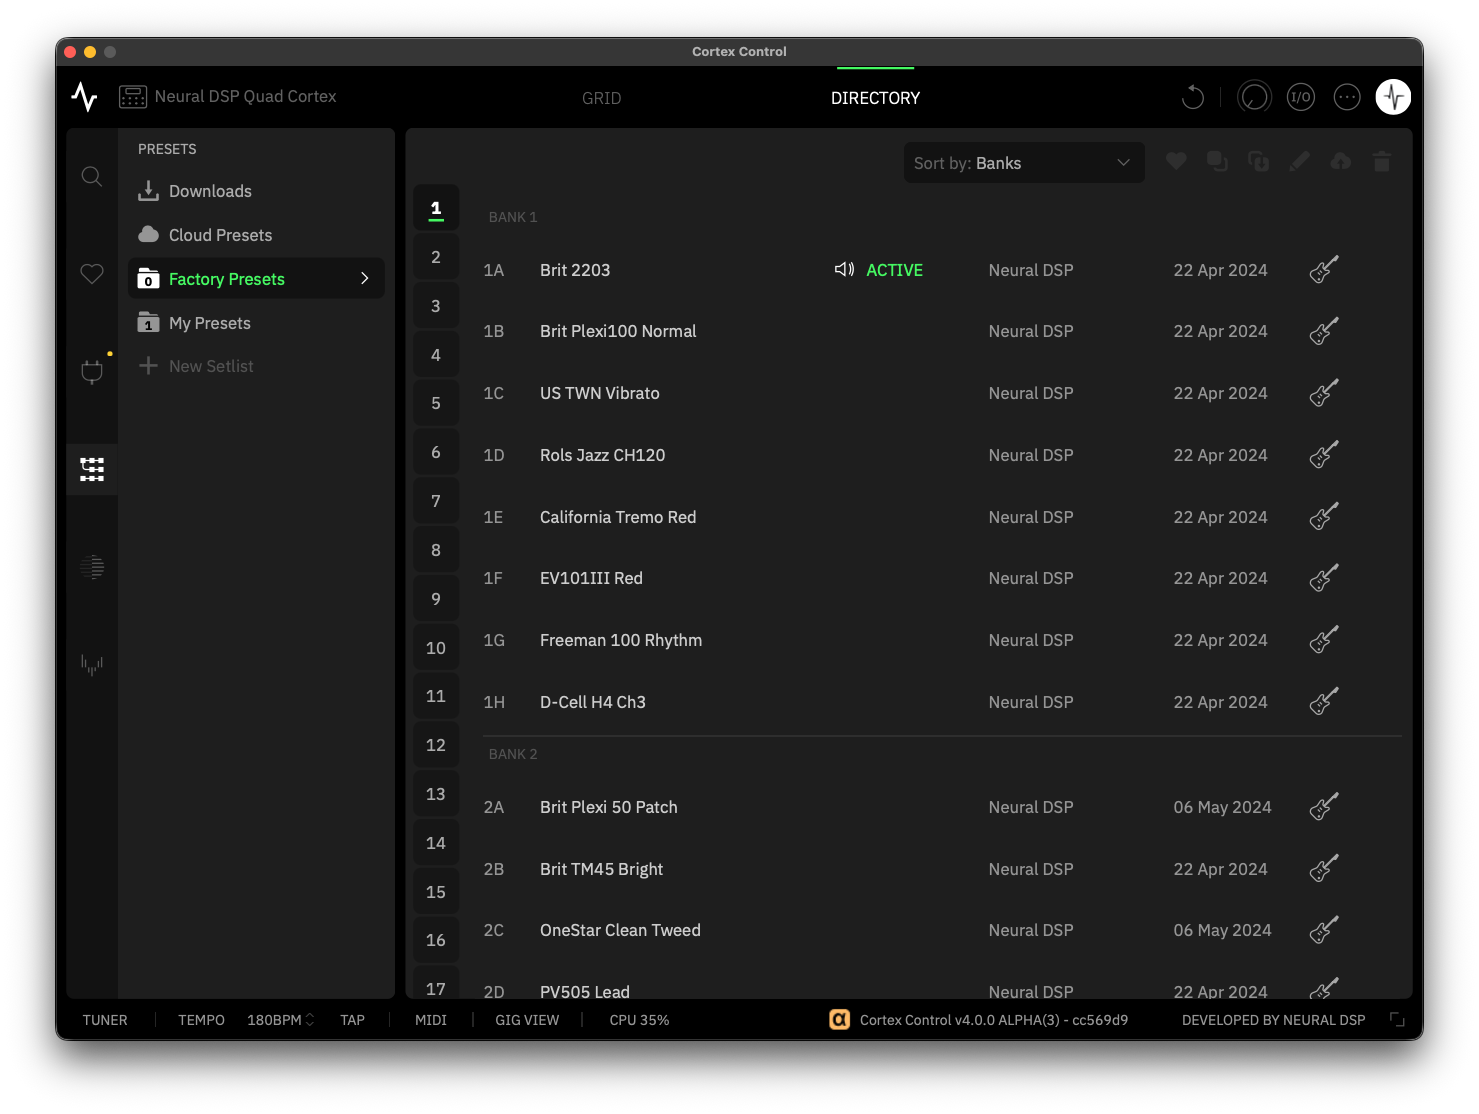
QC Control Directory

The Directory provides a complete overview of all your content, including Presets, Neural Captures, Impulse Responses, and Plugin Presets. The Directory is designed for fast navigation, allowing you to browse, search, and manage all factory and user content on your device.

QC Control Directory Management

From the Directory, you can load items, upload or download content to and from Cortex Cloud, and organize your library using folders, setlists, and subfolders. You can also favorite, rename, duplicate, or delete content directly from the Directory interface.

Contextual Menus

Right-click items on the Directory to quickly access relevant actions while keeping the Directory view visible for seamless content management.


BOTTOM UTILITY BAR

QC Control Utility Bar

The bottom utility bar in Cortex Control provides quick access to essential tools, making it easy to switch between views and adjust settings without leaving The Grid or Directory.

  • TUNER: Click to open the Tuner menu.

  • TEMPO: Click to access the Tempo and Metronome menu. You can set tempo values per Scene, Preset, or globally.

  • BPM: Displays the current tempo value. Click to enter a custom BPM with your keyboard, or click and drag vertically to adjust it.

  • TAP: Sets the tempo value by clicking. The BPM is based on the interval between your last two clicks.

  • MIDI: Click to open the Preset MIDI Out menu.

  • GIG VIEW: Click to toggle the Gig View on both the device and Cortex Control.

  • CPU: Toggles the CPU Monitor. When enabled, it displays overall CPU usage per device block and the current bypass state of GLOBAL EQ and INPUT GATES.

  • WINDOW SIZE: Resizes the Cortex Control window to different window sizes. The app will remember your selection when reopened. Additionally, you can also drag the edges of the window for continuous resizing.


MASTER VOLUME BEHAVIOR

QC Control Master Vol

The Master Volume Knob in Cortex Control adjusts the overall output level of the connected device. Click and drag the knob upward to rotate it clockwise and increase the volume, or drag downward to rotate it counterclockwise and lower the volume.

Master Volume Mismatch

The volume level displayed in Cortex Control may not always match the physical Master Volume on your device. When this occurs, the hardware volume wheel is temporarily deactivated to prevent sudden volume changes.

To re-sync the Master Volume, adjust the volume on your device until it matches the level shown in Cortex Control.

Neural Capture Version 2

Neural Capture is a powerful tool that can learn and replicate the sonic characteristics of any amplifier, cabinet, or overdrive pedal with accuracy and realism.

C2 Devices

Neural Capture Version 2 is an advanced evolution of Neural Capture trained via Cortex Cloud. This option provides even higher-resolution Captures, making it especially powerful for touch-sensitive devices like fuzzes, compressors, and certain styles of amps, while still excelling at everything that Neural Capture Version 1 does.

To create a Neural Capture, you will need to connect an overdrive pedal, mic a cabinet, or connect an amplifier through a reactive load box to your Quad Cortex. Once created, it can be inserted and used as a block on The Grid.


Tube Amplifier Warning

Connecting the speaker output of a tube amplifier directly to the Quad Cortex can cause serious damage to both devices. To ensure safe operation:

  • Use the D.I. output of the captured amplifier while keeping it connected to a speaker cabinet, or…

  • Connect a reactive load box between the amplifier’s speaker output and the Quad Cortex.


FEATURE ACCESS
QC Control Capture V2 Intro
  1. Open the Cortex Control app and log in to your Neural DSP account.

  2. Open the app’s contextual menu and select New Neural Capture.

  3. When prompted, choose Neural Capture Version 2 to begin the process.


CAPTURE PROCESS
QC Control V2 Metadata

When performing a Neural Capture Version 2 for the first time, Cortex Control may request permission to access your microphone. This is required because Cortex Control acts as the bridge between the Cortex Cloud and your connected device. Additionally, Windows® users must install the latest public audio driver for proper functionality.

  1. Connect your devices by following the on-screen instructions. Once in the Neural Capture Calibration menu, set the levels and click FILL METADATA.

  2. For Neural Capture Version 2, filling in the metadata of your target device in advance helps optimize the training process.

  3. Click START CAPTURE and wait a few minutes for the process to complete.

  4. Once completed, review the results in the A/B TEST menu, then click SAVE NEURAL CAPTURE to store it on your device.

Cloud Auto-Save

By default, all Neural Capture Version 2 files are automatically saved to the user’s Cortex Cloud profile as private items. Neural Capture V2 training is performed in the Cloud, and the user’s profile serves as the default storage location so that Quad Cortex can download the captures afterward.


Neural Capture Version 2 F.A.Q.

This section addresses the most common questions about Neural Capture Version 2.

  • Do Neural Capture Version 2 blocks look different on The Grid?

Version 2 blocks feature a distinct double-layered contour, making them easier to identify on The Grid compared to Version 1. Both versions of Neural Capture™ blocks share the same parameter editor layout.

  • How many Captures V2 sessions can be performed daily?

Each user can currently perform up to 40 Neural Capture Version 2 sessions per day.

  • How long do Neural Capture Version 2 sessions take to complete?

Each session typically takes around 10 minutes to complete.

  • Where is the “Auto-Set” switch?

The “Auto-Set” switch has been removed from both Neural Capture Version 1 and Version 2 workflows. Tooltips have been added to the IN 1 and IN 2 parameters in the Neural Capture calibration menu, guiding how to configure optimal settings before starting the capture process.

  • I keep getting the message “There was an issue with the recorded audio”. What can I do?

First, ensure that all cables are connected correctly as shown in the Connection Diagram and that Cortex Control has the necessary microphone permissions. You should also confirm that the macOS Voice Isolation feature is disabled in the Control Center. Additionally, remember that third-party applications using your audio devices in the background may interfere with Neural Capture Version 2. If the issue persists, please contact Support for further assistance.

  • Does Neural Capture Version 2 support Compressor Devices?

Yes. Neural Capture Version 2 can successfully capture compressor devices. However, based on our internal tests, captures made on compressors with aggressive threshold settings and long release times may start producing results that differ from the original hardware signal. Users are encouraged to experiment with different settings to achieve the most accurate results.

  • How does gain metadata work with Compressor Devices?

Gain estimation is based on the device’s dynamic range and the amount of harmonic content it produces. This method applies to compressors as well. However, since compressors typically generate less harmonic content than high-gain amplifiers or fuzz pedals, their estimated gain values will appear lower.

  • My recently made Capture does not sound as expected. Is there any way to improve it?

Neural Capture Version 2 achieves greater accuracy compared to Neural Capture Version 1, especially in reproducing dynamic nuances and subtle tonal details.

If you find that a Capture does not have as much gain as you would like, it is best to create a new Capture with higher gain settings on the original device rather than boosting the block parameters (for example, setting its GAIN to +24dB). This approach ensures more authentic results.

If you experience issues with your Neural Capture Version 2 devices, we recommend performing the capture again to ensure optimal results.

User Content Transfer

You can quickly import and organize your plugin Presets on the Quad Cortex via Cortex Control.


PLUGIN PRESETS TRANSFER
QC Control Preset Import

To import user plugin Presets, simply drag-and-drop the corresponding XML files directly into the User Presets area of the Cortex Control interface. Third-party Impulse Responses (IRs) used in plugin presets are automatically imported during the transfer.

Legacy Plugin Presets Importing

Legacy user Presets must be resaved in their respective Plugin X versions before they can be imported.


IMPULSE RESPONSES TRANSFER
QC Control IR Import

To import Impulse Responses (IRs), simply drag-and-drop the corresponding WAV files directly into the IRs Library in the Cortex Control interface.

Impulse Response Truncation

Any compatible Impulse Response file (WAV) can be uploaded to Cortex Cloud regardless of its original length. Once uploaded, files are automatically resized to 1024 samples (approximately 21 ms).

Local Backups

Local backups in Cortex Control are complete snapshots of your device content and settings stored on your computer. A backup includes all Presets, Neural Captures, impulse responses, Setlists, and device configurations, allowing you to restore your Quad Cortex to a previous state at any time.

QC Control Backups

Local backups are saved directly to your computer’s storage, so they do not require an internet connection. You can create as many backups as your available storage allows.


BACKUP OPTIONS
  • SEARCH BACKUP: Opens the folder on your computer where local backups are stored.
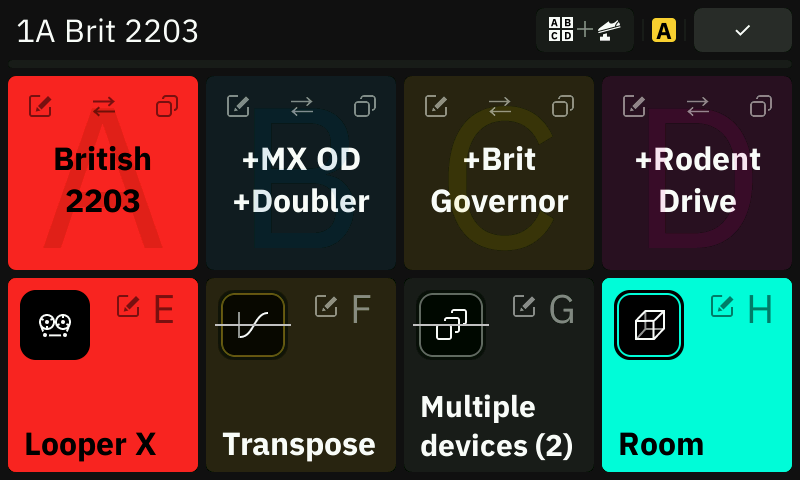
  • EDIT BACKUP: Renames the selected backup.

  • UPDATE BACKUP: Updates an existing backup with the current content and settings from your device.

  • DOWNLOAD BACKUP: Restores the selected backup to your device, replacing its current content.

  • DELETE BACKUP: Permanently removes the selected backup from your computer.


LOCAL BACKUP DIRECTORIES
  • WINDOWS®: <User Folder>/Library/Application Support/Neural DSP/Backups

  • MACOS®: C:\Users\<Your Profile>\AppData\Neural DSP\Backups

CorOS Updates via USB

Keeping Cortex Control and Quad Cortex up to date ensures optimal functionality. To update your Quad Cortex via USB:

  1. Go to Device Settings > Device Updates and click Check for Updates.

  2. If an update is available, Cortex Control will automatically transfer the CorOS update to your device via USB.

  3. For faster installation, we recommend updating over Wi-Fi. To switch methods, cancel the USB transfer, disconnect your device from the computer, and restart the update directly on your device.


During a CorOS Update...

  • The touchscreen and footswitches will be temporarily disabled.
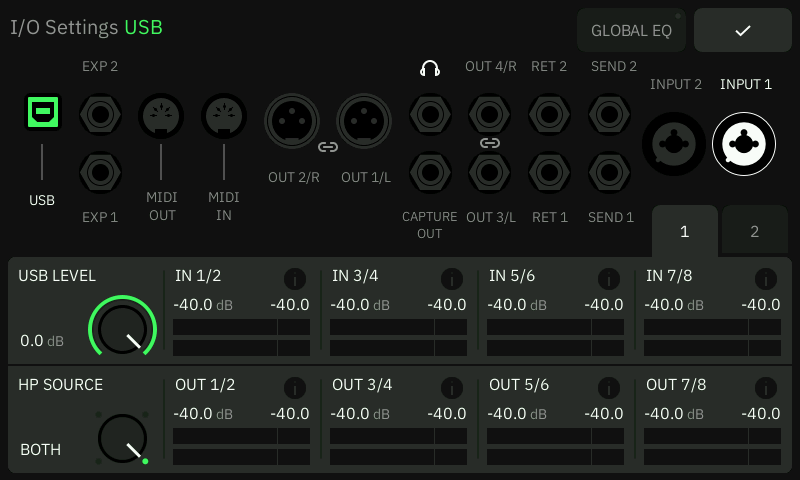
  • Audio processing will be unavailable.

  • Do not remove the power cable or turn off your device.

Keyboard Shortcuts

Cortex Control has a range of keyboard shortcuts designed to speed up navigation and streamline editing.


GLOBAL SHORTCUTS

SHOW GRID
• MacOS®
: CMD + 1
• Windows®: CTRL + 1

SHOW DIRECTORY
• MacOS®
: CMD + 2
• Windows®: CTRL + 2

RESIZE APP WINDOW
• MacOS®
: CMD + 7/8/9
• Windows®: CTRL + 7/8/9

UNDO ACTION
• MacOS®
: CMD + Z
• Windows®: CTRL + Z

REDO ACTION
• MacOS®
: SHIFT + CMD + Z
• Windows®: SHIFT + CTRL + Z

COPY
• MacOS®
: CMD + C
• Windows®: CTRL + C

PASTE
• MacOS®
: CMD + V
• Windows®: CTRL + V


GRID SHORTCUTS

GRID SLOT NAVIGATION
• MacOS®
: LEFT, UP, RIGHT, DOWN ARROWS
• Windows®: LEFT, UP, RIGHT, DOWN ARROWS

NEW PRESET
• MacOS®
: CMD + N
• Windows®: CTRL + N

SAVE PRESET
• MacOS®
: CMD + S
• Windows®: CTRL + S

SAVE AS…
• MacOS®
: SHIFT + CMD + S
• Windows®: SHIFT + CTRL + S

SCENE RECALL
• MacOS®
: OPTION + 1, 2, 3… 8.
• Windows®: ALT + 1, 2, 3… 8.

EDIT USER PRESET DETAILS
• MacOS®
: CMD + E
• Windows®: CTRL + E

TOGGLE GIG VIEW
• MacOS®
: CMD + G
• Windows®: CTRL + G

PRESET MIDI OUT
• MacOS®
: SHIFT + CMD + M
• Windows®: SHIFT + CTRL + M

SELECTED BLOCK BYPASS TOGGLE
• MacOS®
: B
• Windows®: B

BLOCK HOVER BYPASS
• MacOS®
: MOUSE HOVER + B
• Windows®: MOUSE HOVER + B

REMOVE SELECTED BLOCK
• MacOS®
: BACKSPACE
• Windows®: BACKSPACE


VIRTUAL DEVICE LIST SHORTCUTS

TOGGLE DEVICE LIST
• MacOS®
: CMD + DOT
• Windows®: CTRL + DOT

PREVIOUS VIRTUAL DEVICE
• MacOS®
: CMD + ARROW UP
• Windows®: CTRL + ARROW UP

NEXT VIRTUAL DEVICE
• MacOS®
: CMD + ARROW DOWN
• Windows®: CTRL + ARROW DOWN


DIRECTORY SHORTCUTS

SEARCH ITEM
• MacOS®
: CMD + F
• Windows®: CTRL + F

LOAD SELECTED ITEM ON THE GRID
• MacOS®
: ENTER
• Windows®: ENTER


LOOPER X SHORTCUTS

RECORD
• MacOS®
: OPTION + 1
• Windows®: ALT + 1

PLAY/STOP
• MacOS®
: OPTION + 2
• Windows®: ALT + 2

REVERSE
• MacOS®
: OPTION + 3
• Windows®: ALT + 3

UNDO
• MacOS®
: OPTION + 4
• Windows®: ALT + 4

DUPLICATE
• MacOS®
: OPTION + 5
• Windows®: ALT + 5

ONE SHOT
• MacOS®
: OPTION + 6
• Windows®: ALT + 6

HALF SPEED
• MacOS®
: OPTION + 7
• Windows®: ALT + 7

PUNCH IN/OUT
• MacOS®
: OPTION + 8
• Windows®: ALT + 8

12
Additional Information

Virtual Devices List

QC Devices Line

All product names are trademarks of their respective owners, who are not associated or affiliated with Neural DSP in any way. The names of device blocks are used solely to identify the specific products that were studied during the development of virtual devices.


Quad Cortex Virtual Device List

https://neuraldsp.com/device-list

Recovery Mode

Recovery Mode on the Quad Cortex is a startup option that allows you to troubleshoot and restore the device if it is not working as expected.
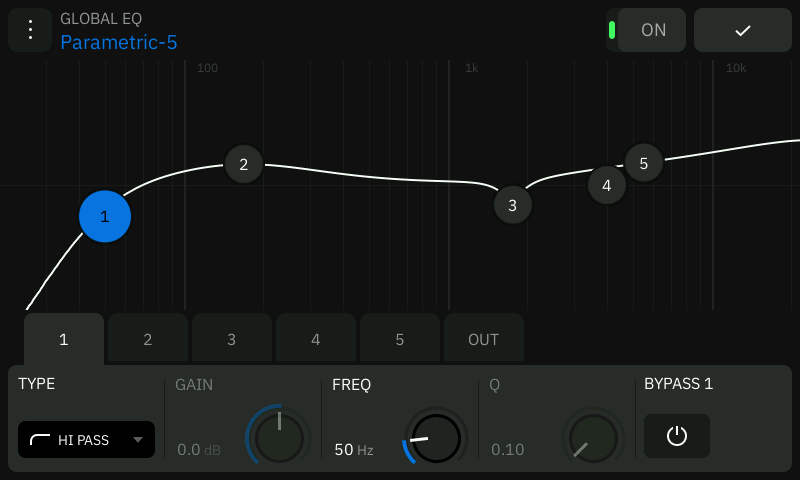
QC Recovery Access

To initiate Recovery Mode, hold A and H footswitches during the startup screen while booting.
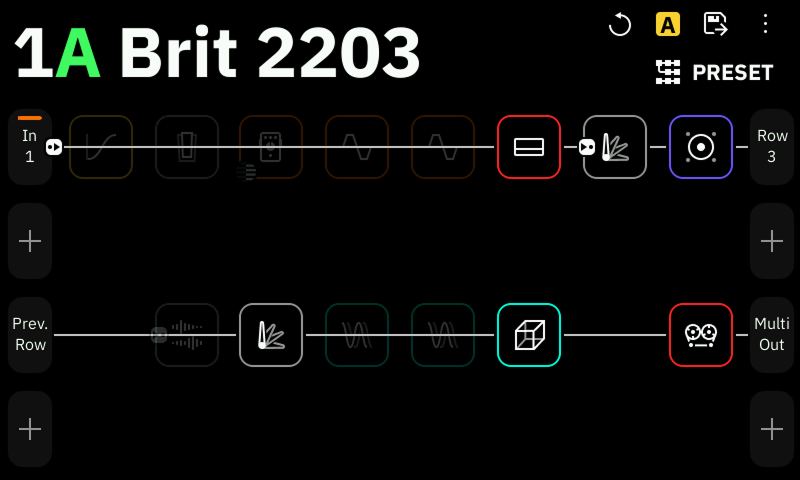

RECOVERY OPTIONS
  • CANCEL: Exits Recovery Mode. The device will boot normally.

  • RESET SETTINGS: Restores system settings to default without deleting user data (Presets, Captures, etc).

  • FACTORY RESET: Removes all user data and returns the device to its original factory state.


Recovery Options

Actions made in the Recovery Options menu are permanent and cannot be undone.

Hardware Specifications

INPUTS 1/2

  • CONNECTOR: (2) XLR-F + ¼ “ TS-F (GROUND LIFT)

  • XLR IMPEDANCE: 9.4KΩ

  • TS IMPEDANCE: 10KΩ - 10MΩ

  • MAX INPUT GAIN: +60dB


RETURN INPUTS 1/2

  • CONNECTOR: (2) ¼ “ TRS-F (GROUND LIFT)

  • IMPEDANCE: 1MΩ

  • MAX INPUT GAIN: +60dB


XLR OUTPUTS 1/2

  • CONNECTOR: (2) XLR-M (GROUND LIFT)

  • IMPEDANCE: 560Ω

  • MAX OUTPUT: +9.5dBu


TRS OUTPUTS 3/4

  • CONNECTOR: (2) ¼ “ TS-F

  • IMPEDANCE: 560Ω

  • MAX OUTPUT: +15.5dBu (BALANCED), +9.5dBu (UNBALANCED)


SEND OUTPUTS 1/2

  • CONNECTOR: (2) ¼ “ TRS-F (GROUND-CANCELLING)

  • IMPEDANCE: 560Ω

  • MAX OUTPUT: +9.5dBu


HEADPHONES OUTPUT

  • CONNECTOR: ¼ TRS-F

  • OUTPUT POWER: 300mW


EXPRESSION INPUTS 1/2

  • CONNECTOR: (2) ¼ “ TRS-F


MIDI IN & THRU/OUT

  • INPUT CONNECTOR: 5-Pin DIN

  • OUTPUT CONNECTOR: 5-Pin DIN


USB AUDIO

  • FORMAT: USB Audio Class 2.0 Compliant

  • CHANNELS: 16 (8 IN / 8 OUT)

  • AUDIO CLOCK: 48kHz (FIXED)


GENERAL

  • FINISH: Anodized aluminum unibody

  • CONTROLS:

    • 1 Capacitive Power Button

    • 1 Master Volume Knob

    • 11 Stainless Steel Stomp + Rotary Footswitches

  • DISPLAY: 7” High-Brightness

  • DIMENSIONS: 29.0 x 19.5 x 6.9 cm / 11.4 x 7.7 x 2.7"

  • WEIGHT: 1.95 kg / 4.2 lbs

  • INPUT VOLTAGE: 12V DC 3A (Center Negative)


ENVIRONMENTAL

  • OPERATING TEMPERATURE: 0 to 50 °C (32 to 122 °F)

  • STORAGE TEMPERATURE: -10 to 70 °C (14 to 158 °F)

  • HUMIDITY: Maximum non-condensing


DISCLAIMER

In the interest of continuous improvement, specifications for the Quad Cortex are subject to change without notice.

For any questions, please feel free to contact us at support@neuraldsp.com.

Regulatory Information

REGULATORY INFORMATION FCC

FCC § 15.19 Labelling Requirements

This device complies with part 15 of the FCC Rules and ISED license-exempt RSS standard(s). Operation is subject to the following two conditions:

  1. This device may not cause harmful interference, and…

  2. This device must accept any interference received, including interference that may cause undesired operation.

FCC § 15.21 Information To User

Changes or modifications not expressly approved by the party responsible for compliance could void the user’s authority to operate the equipment.

RF Exposure Requirements

This equipment complies with FCC and IC radiation exposure limits set forth for an uncontrolled environment. This equipment should be installed and operated with a minimum distance of 20 cm between the radiator and your body.

This transmitter must not be co-located or operating in conjunction with any other antenna or transmitter.

FCC §15.105 Statement

This equipment has been tested and found to comply with the limits for a Class B digital device, pursuant to part 15 of the FCC Rules. These limits are designed to provide reasonable protection against harmful interference in a residential installation.

This equipment generates, uses, and can radiate radio frequency energy and, if not installed and used in accordance with the instructions, may cause harmful interference to radio communications. However, there is no guarantee that interference will not occur in a particular installation.

If this equipment does cause harmful interference to radio or television reception, which can be determined by turning the equipment off and on, the user is encouraged to try to correct the interference by one or more of the following measures:

  • Reorient or relocate the receiving antenna.

  • Increase the separation between the equipment and receiver.

  • Connect the equipment into an outlet on a circuit different from that to which the receiver is connected.
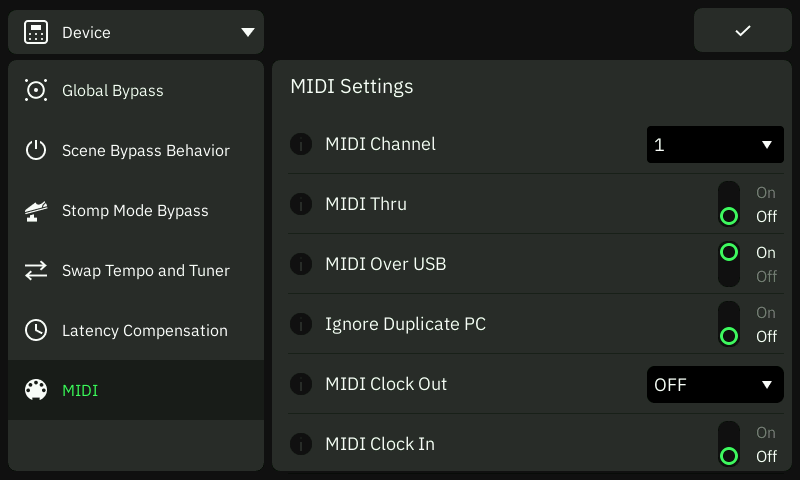
  • Consult the dealer or an experienced radio/TV technician for help.


REGULATORY INFORMATION ISED

Le présent appareil est conforme aux CNR d'ISED applicables aux appareils radio exempts de licence. L'exploitation est autorisée aux deux conditions suivantes:

  1. L'appareil ne doit pas produire de brouillage, et…

  2. L'utilisateur de l'appareil doit accepter tout brouillage radioélectrique subi, même si le brouillage est susceptible d'en compromettre le fonctionnement.

RF Exposure Requirements

This equipment complies with Canada radiation exposure limits set forth for an uncontrolled environment. This equipment should be installed and operated with minimum distance 20cm between the radiator and your body.

Déclaration d’exposition aux Radiations

Cet équipement est conforme aux limites d’exposition aux rayonnements IC établies pour un environnement non contrôlé. Cet équipement doit être installé et utilisé avec un minimum de 20 cm de distance entre la source de rayonnement et votre corps.

Ce transmetteur ne doit pas être place au même endroit ou utilise simultanément avec un autre transmetteur ou antenna.

Canada Class B Statement

  • This Class B digital apparatus complies with Canadian ICES-003.

  • Cet appareil numérique de la classe B est conforme à la norme NMB-003 du Canada.

Declaration of Conformity

This equipment has been tested and found to comply with the limits for a Class B digital device, pursuant to part 15 of the FCC Rules.

These limits are designed to provide reasonable protection against harmful interference in a residential installation. This equipment generates, uses, and can radiate radio frequency energy, and if not installed and used in accordance with the instructions, may cause harmful interference to radio communications.

However, there is no guarantee that interference will not occur in a particular installation. If this equipment does cause harmful interference to radio or television reception, which can be determined by turning the equipment off and on, the user is encouraged to try to correct the interference by one or more of the following measures:

  • Reorient or relocate the receiving antenna.

  • Increase the separation between the equipment and the receiver.

  • Connect the equipment into an outlet on a circuit different from that to which the receiver is connected.

  • Consult the dealer or an experienced radio/TV technician for help.
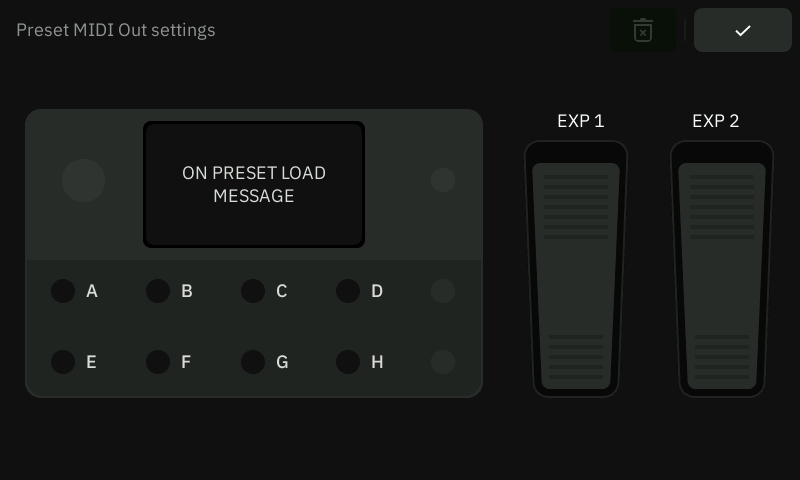
This device complies with Industry Canada license-exempt RSS standard(s). Operation is subject to the following two conditions:

  1. This device may not cause interference, and…

  2. This device must accept any interference, including interference that may cause undesired operation of the device.

Le présent appareil est conforme aux CNR d’Industrie Canada applicables aux appareils radio exempts de licence. L’exploitation est autorisée aux deux conditions suivantes:

  1. L’appareil ne doit pas produire de brouillage, et…

  2. L’utilisateur de l’appareil doit accepter tout brouillage radioélectrique subi, même si le brouillage est susceptible d’en compromettre le fonctionnement.

NEURAL DSP TECHNOLOGIES OY® 2025
All rights reserved.


Neural DSP®, Neural Capture®, Capture®, Quad Cortex®, Archetype®, Algorithmically Perfect®, and Nameless® are registered trademarks of Neural DSP Technologies Oy.