June 24, 2026


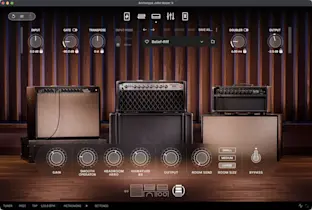
Neural DSP is leading the game in creating ultra-realistic digital models of analog components you know and love, delivering them in an affordable package with a beautiful, easy-to-use user interface.
If you’re new to plugins and you’re wondering how you get started, we’ve written this guide for you! Getting set up is very simple, but there are a few things you’ll need.
Audio interface. This a piece of hardware that connects to your computer, typically via USB. Audio interfaces range in price and features. A higher price typically means you get better audio processing, more inputs & outputs, and better quality components. There is an audio interface available for almost any budget, so it’s likely you will be able to find something to suit your needs, but if you spend a little extra here you will notice the difference in audio quality. Focusrite, Apogee, and Universal Audio are three companies who make great quality interfaces, but there are plenty more for you to check out!
Monitors or headphones. Once you have your guitar signal going into your computer and it is being processed by the plugin, you need to hear it. Having this sound come out of your computer’s speakers is a bit of a no-no, so at the very least you’ll want a good pair of headphones. Better still, a great pair of studio monitors. Again, you can find these for almost any budget.
A PC or Apple computer that’s not more than 5 or 6 years old. Guitar plugins require a powerful computer due to the amount of processing that is happening in the background. You don’t need to break the bank buying a new computer, but you need something with a dual-core processor and at least 4GB of RAM. Neural DSP plugins are currently not available for mobile or tablet devices.
iLok License Manager. This is a free piece of software that you run on your computer to manage your licenses for our plugins. It is simple to sign up and install, and it protects your license ensuring that nobody can steal it, and nobody can pirate our plugins!
A guitar & jack cable. You probably already have these!
A Digital Audio Workstation is necessary if you want to record what you’re playing on your computer, but our plugins also come with a standalone version. This means that you can run the software without having to open or even own a DAW.
Once you’ve got your audio interface hooked up to your computer, all the drivers are installed, and you’re getting audio out of your monitors or headphones, it’s time to get iLok License Manager and install a plugin!
Head over to https://www.ilok.com/#!registration and create a free iLok account. Then go to https://www.ilok.com/#!license-manager and download the free iLok License Manager software. Please note that you do not need the iLok USB device to use our software. When iLok License Manager has downloaded, install it and follow the on-screen instructions, then open it and sign into the iLok account you created just before.
When iLok License Manager is up and running, head over to neuraldsp.com and get any of the plugins you like. A 14-day free trial is available for all of them, so you have plenty of time to check them out and decide which is your favourite (or buy them all because we’re nice!)
If you have downloaded a plugin trial, simply run the installer and follow the on-screen steps. There are several versions of the plugin packaged in the installer depending on your requirements. These are detailed below. Check the one(s) you need and proceed with the installation. Once the installation is complete, you can either load the standalone app if you have installed it or load a plugin instance on a track in your DAW session. When you have loaded the plugin, follow the on-screen steps and click “Try” when presented the option to begin your 14-day trial. Doing this will automatically deposit a 14-day trial license to your iLok License Manager so you do not need to enter a code.
If you have purchased a plugin, your order confirmation page will show links to download the software as well as your license code. Copy this license code, open iLok License Manager, click the “Redeem Activation Code” button, and paste your copied code in. You will then see your activated license listed in the licenses window. You then need to drag-and-drop the license you just redeemed from the list over to your computer listed on the left. This will activate the license on your computer, permitting your computer to run the plugin with the license you just purchased.
After completing activation on iLok, download and install the plugin on your computer, following the on-screen steps. There are several versions of the plugin packaged in the installer depending on your requirements. These are detailed below. Check the one(s) you need and proceed with the installation. Once the installation is complete, you can either load the standalone app if you have installed it or load a plugin instance on a track in your DAW session.
During our installer, you will notice several packages available to install that you can check/uncheck as you require. Depending on the DAW you use, or whether you use a DAW at all, will determine which of these packages you should use.
AU – Audio Unit (Mac Only) for Logic Pro, GarageBand, and other cross-platform DAWs running on macOS (i.e. Ableton).
VST – Ableton, Cubase, FL Studio, Studio One, Reaper.
VST3 – The latest incarnation of VST, supported by newer versions of the above DAWs. This is likely the one you will need unless you are using an older version of one of these DAWs.
AAX – ProTools.
Standalone App – Choose this if you want to use the plugin without a DAW. Perfect if you just want to play without recording, or you don’t want to have to always load your DAW.
Presets – Each of our plugins come with presets created by our engineering team and some of our favourite artists. They’re a quick route to getting a fantastic tone!
The first thing you need to do when you have loaded a plugin, whether it’s the standalone version or in a DAW, is configure the audio settings. If you are launching the plugin for the first time, you may be asked to grant the plugin permission to access the microphone/your audio device. Make sure you allow this. Once the plugin is running, click the settings button (the little gear icon) at the bottom-left.
Audio output device: This should be set to your audio interface. When you select your interface you will be able to specify the output(s) to route your signal to depending on the interface you have.
Audio input device: This should be set your audio interface too. Select the input you have plugged your instrument into.
Note: On computers running Windows, you need to select “ASIO” as the Audio Device Type for the plugins to function correctly.
The “test” button at the top-right of the Audio Settings window should produce a result. If it doesn’t, ensure you have selected the correct device, your volume is turned up, your monitors are on, and you have configured the correct inputs. If you are sure all of these are how they should be, email our support team at support@neuraldsp.com and they will help you as soon as they can.
Sample rate: Stick with 44.1KHz unless you know what you are doing here.
Audio buffer size: Buffer size is the amount of time that you allow your computer to process the audio information it is being given. The more time it has, the less performance-demanding the task will be, but the more latency you will have. Latency is the delay between, in this case, hitting the strings on your guitar and hearing the effected sound coming out of your monitors. You want to set this to a number that feels comfortable when you play, bearing in mind that the lower you set it, the more processing power it is going to use on your computer. This becomes more pertinent when you are using the plugins in a DAW session where lots of other things are going on, each of them demanding performance from your computer. We recommend you set this to 128 samples.
With these settings configured, you should be able to play your guitar and get a tone, and adjusting the parameters of the pedals, amplifiers, and other on-screen components should change how your guitar sounds.
If you selected them during installation, all of our plugins come with presets that have been made by our team and our favourite artists, giving you a shortcut to a great sounding tone. You can browse through the artist & factory presets by clicking the menu at the top of the plugin, or you can use the left & right arrows either side to cycle through them, trying each one as you go.
That concludes our guide on getting set up & using Neural DSP plugins! We hope you found this useful, and we can’t wait to hear what you create using them. If you have any problems, please e-mail our support team at support@neuraldsp.com. They are always happy to help and answer any questions you may have.

